Quick Answer
Learning how to sew a tote bag is one of the best beginner sewing projects because it requires minimal materials, uses straight seams, and produces a practical result in 1-3 hours. A basic unlined tote bag needs just two fabric rectangles, two strap pieces, and basic straight stitching on any home sewing machine. The project teaches essential skills like seam allowances, topstitching, and strap attachment while creating a sturdy, reusable bag.
Key Takeaways
- Beginner-friendly project: Tote bags use simple straight seams and require no advanced techniques, making them ideal for new sewers
- Minimal materials needed: Basic tote requires ½-1 yard of medium-weight fabric, thread, and optional interfacing for structure
- Quick completion time: A simple unlined tote bag takes 1-2 hours; lined versions with pockets take 2-3 hours
- Machine or hand-sewing: While a sewing machine speeds the process, hand-sewing a tote bag is entirely possible with a backstitch
- Fabric choice matters: Canvas, denim, and heavyweight cotton create the sturdiest bags that hold their shape and carry weight
- Interfacing adds structure: Fusible interfacing prevents sagging and helps bags maintain their shape, especially at the bottom
- Common mistakes are fixable: Twisted straps, weak seam reinforcement, and inadequate bottom support are easily prevented with proper technique
- Customization options: Add pockets, linings, magnetic snaps, or decorative topstitching to personalize your bag
What Materials Do I Need to Sew a Tote Bag?
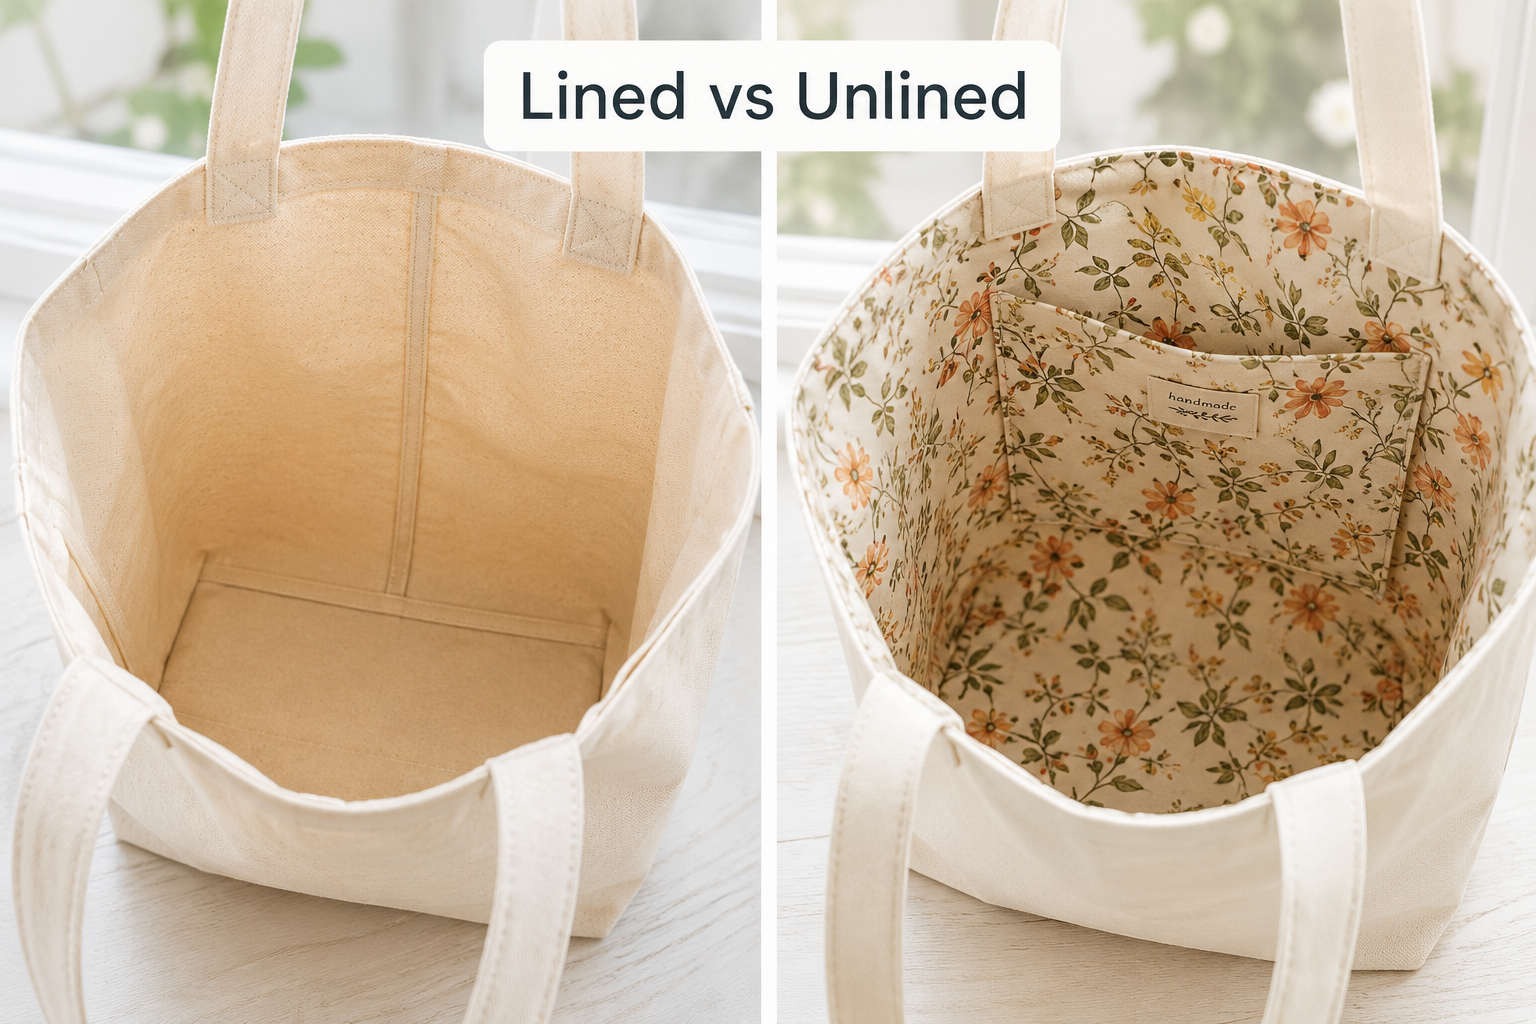
To sew a basic tote bag, you need ½ to 1 yard of medium to heavyweight fabric, matching thread, scissors or a rotary cutter, pins, an iron, and access to a sewing machine or hand-sewing needles. Optional but helpful materials include interfacing for structure, a ruler or measuring tape, and fabric marking tools.
Essential materials:
- Fabric: ½ yard for a small tote (12″ × 14″), ¾-1 yard for a standard tote (14″ × 16″)
- Thread: All-purpose polyester or cotton thread matching your fabric color
- Cutting tools: Fabric scissors or rotary cutter with cutting mat
- Pins or clips: To hold fabric layers together while sewing
- Iron and ironing board: For pressing seams and creating crisp folds
- Sewing machine or hand-sewing needles: Size 14-16 universal needles work for most fabrics
Optional but recommended:
- Interfacing: Fusible medium-weight interfacing (½ yard) adds body and prevents sagging
- Measuring tools: Clear ruler, measuring tape, or quilting ruler for accurate cuts
- Fabric marker: Chalk, water-soluble pen, or tailor’s chalk for marking placement
- Seam ripper: For fixing mistakes without damaging fabric
Choose materials based on your skill level. Beginners should start with woven cotton canvas or denim because these fabrics don’t shift or stretch during sewing, making them more forgiving than slippery materials like satin or stretchy knits. If you’re new to sewing for beginners, stick with solid colors or simple patterns to avoid matching print placement.
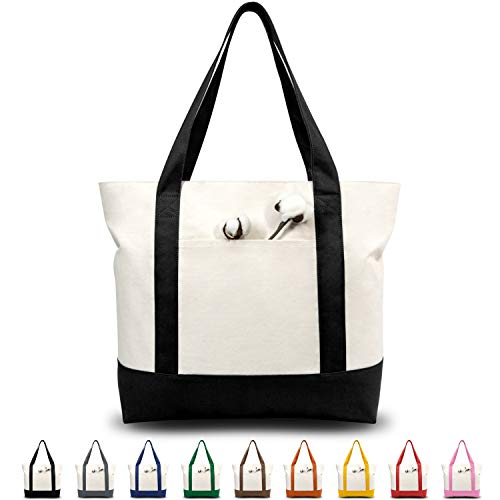
LARGE CAPACITY & DURABILITY: the size is 21" x 15" x 6" and it is made of heavy duty 100% 12oz cotton canvas with 8" x 8" outside pocket for carrying small items. Further, the top zipper closure makes your goods safer. Its handle is 1.5" W x 25" L, which is easy to carry or slung over a shoulder. The bags are made with dense thread and exquisite workmanship. All seams are reinforced and sewn to ensure their durability.

Heavy duty and durable: Made with premium materials. We use a premium and Thick fabric with precise heavyweight stitching throughout, including Cross stitching at the handles for maximum strength allowing the bag to hold up. Model #: 79163
What Is the Easiest Tote Bag Pattern for Beginners?
The easiest tote bag pattern for beginners is a simple rectangular unlined bag with sewn-on straps, requiring only four pattern pieces (two body rectangles and two strap strips) and basic straight seams. This design eliminates complex curves, zippers, or lining construction while still producing a functional, attractive bag.
Basic beginner pattern specifications:
- Bag body: Two rectangles, 15″ wide × 16″ tall (includes ½” seam allowance)
- Straps: Two strips, 4″ wide × 24″ long (makes 1″ finished width straps)
- Seam allowance: ½” throughout for consistency and ease
Step-by-step construction overview:
- Cut two body rectangles and two strap strips from your fabric
- Fold and press each strap strip lengthwise, wrong sides together
- Open the fold, then fold each long edge to the center crease and press
- Fold in half again along the original center crease and topstitch both long edges
- Place body rectangles right sides together and sew side and bottom seams
- Create boxed corners by flattening each bottom corner into a triangle and sewing across
- Fold top edge down ½” then 1″ to create a hem and press
- Pin straps to bag exterior, positioning them 4″ from each side seam
- Topstitch around the entire top hem, securing straps in place
This pattern works because it uses only straight seams and basic folding techniques. The boxed corners add a professional three-dimensional shape without requiring pattern-making skills. If you encounter issues with your stitches while working on this project, check our guide on why sewing machines skip stitches.
Common beginner mistake: Skipping the pressing steps. Each press creates a guide for the next fold or seam, making your finished bag look crisp and professional rather than lumpy and uneven.

Premium Material: The tote bag for women is crafted from high-quality, soft corduroy material, this work tote bags for women is sturdy and use for a long time. The wide shoulder strap distributes the weight, not add burden, the tote bag for work help you carry essential items effortlessly

A canvas utility tote with handles featuring a rectangular Krush container design and chevron pattern
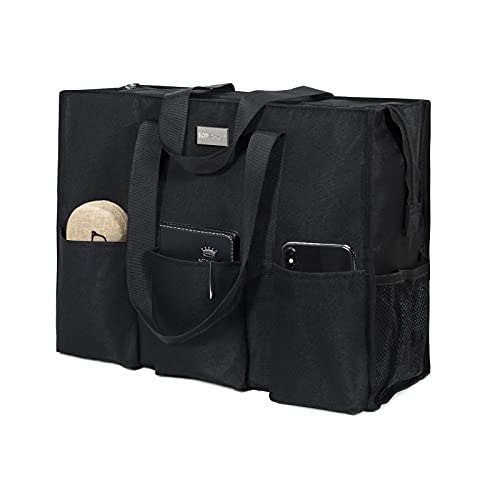
SIZE: 14.5" x 10.75" x 6.5", 16L capacity, weighs only 12oz, lightweight and easy to carry by hand or over the shoulder. Reinforced handles with double-stitched seams on all edges for extra durability – designed to withstand heavy loads without tearing.
How Much Fabric Do I Need for a Tote Bag?
For a standard-sized tote bag (approximately 14″ × 16″ finished), you need ¾ to 1 yard of fabric, depending on whether you’re making an unlined or lined version. An unlined bag requires ¾ yard, while a lined bag with interior pockets needs 1 to 1½ yards total (½-¾ yard for exterior, ½-¾ yard for lining).
Fabric requirements by bag size:
| Bag Size (finished) | Unlined Fabric | Lined Fabric (exterior + lining) | Strap Fabric |
|---|---|---|---|
| Small (10″ × 12″) | ½ yard | ¾ yard total | Included |
| Standard (14″ × 16″) | ¾ yard | 1¼ yards total | Included |
| Large (16″ × 18″) | 1 yard | 1½ yards total | Included |
| Extra-large (18″ × 20″) | 1¼ yards | 2 yards total | Included |
Factors that affect yardage:
- Fabric width: Most quilting cotton is 44-45″ wide; home décor fabric is often 54-60″ wide and may require less yardage
- Pattern direction: Directional prints (stripes, one-way designs) may need extra fabric to ensure patterns align correctly
- Pockets and embellishments: Interior or exterior pockets add ¼-½ yard to requirements
- Strap style: Separate contrasting straps need an additional ¼ yard of accent fabric
Cutting layout tip: When working with ¾ yard of 44″ wide fabric, you can typically cut two 15″ × 17″ body pieces and two 4″ × 24″ strap pieces by laying them out efficiently. Fold the fabric in half lengthwise, cut the body pieces from the folded section, then cut straps from the remaining single-layer fabric.
Buy an extra ¼ yard if you’re new to cutting fabric. This buffer allows for cutting mistakes or lets you practice seam techniques on scrap pieces before sewing your actual bag. Understanding proper seam allowance helps minimize fabric waste.

Perfect for all of your sewing and crafting projects

100% Good Cotton Fabric: Our cotton fabric is made by 100% premium cotton which has a medium-weight 5.2oz (145g/square meter) plain weave. Our cotton fabric in medium weight won’t shrink much after washing. It has great strength and durability, breathable and soft touch, which is perfect for any quilting, sewing and crafting projects, from toys and bags to home decoration.

Uses: Beach Cover-Up, Beach Sarong, Skirt, Scarf, Head Wrap, Dress, Towel, Table Cloth, Curtains, Cover-Up, Wall Hanging, And More.
Should I Make a Tote Bag With Lining or Without Lining?
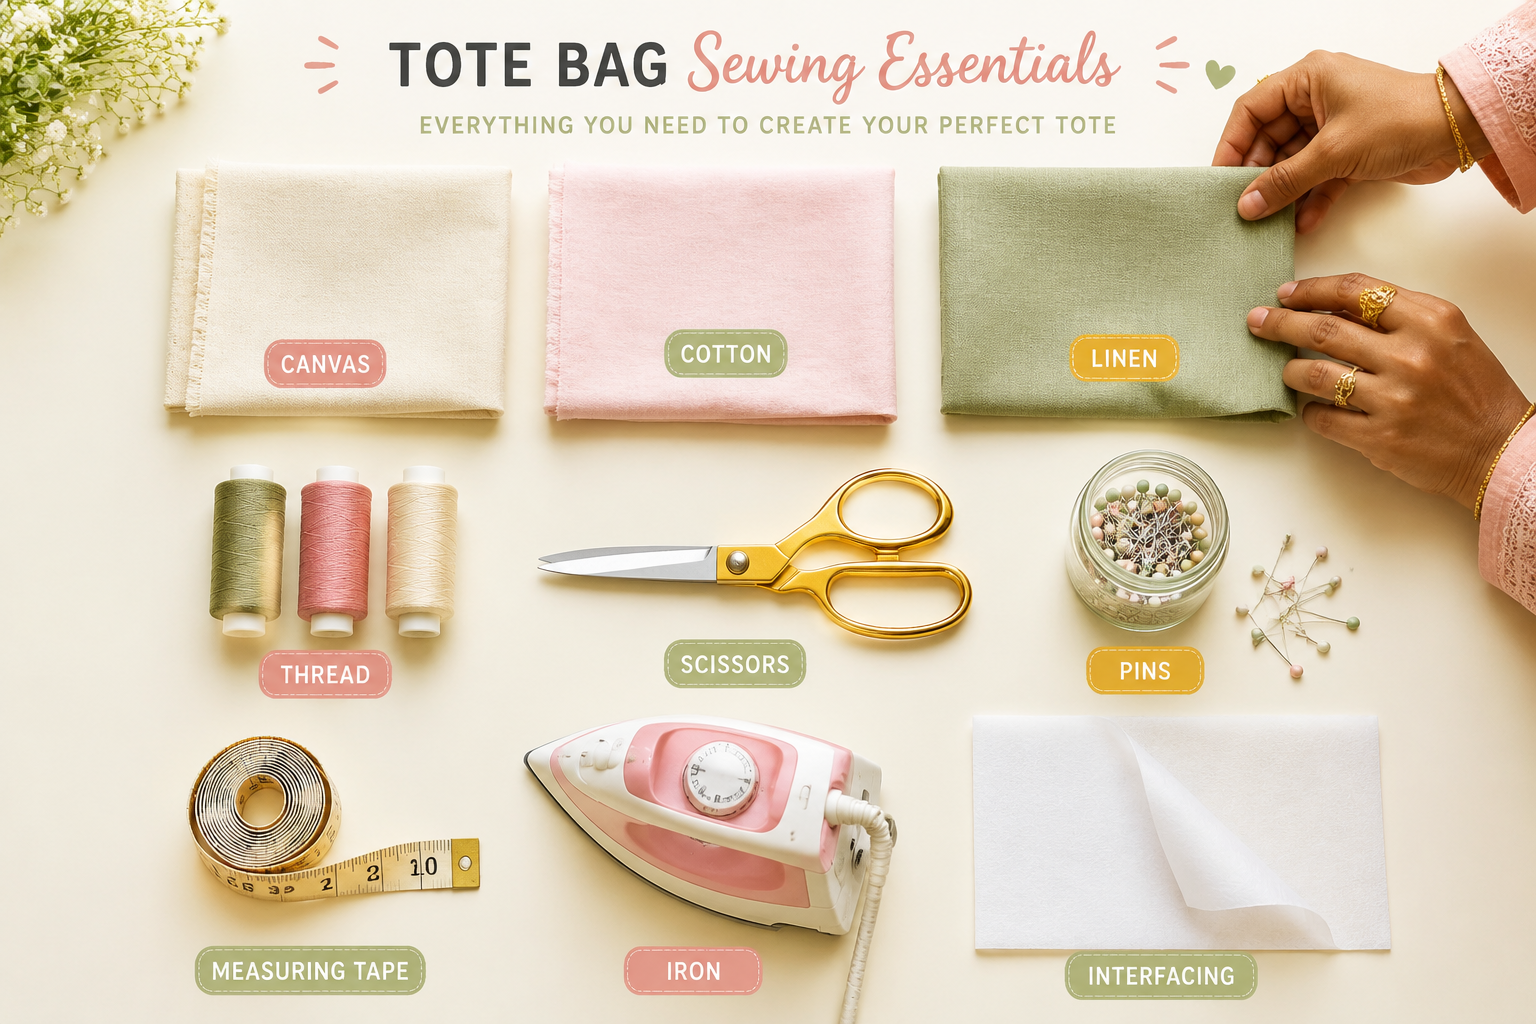
An unlined tote bag is faster to sew (1-2 hours), requires less fabric, and works well for beginners, while a lined tote bag looks more professional, hides interior seams, adds durability, and provides an opportunity to add interior pockets. Choose unlined for your first project or when making quick gift bags; choose lined when you want a polished finish or need to conceal raw seams.
Unlined tote bag advantages:
- Faster construction: Eliminates lining cutting, sewing, and attachment steps
- Less fabric needed: Saves ¼-½ yard of material and reduces cost
- Simpler for beginners: Fewer layers mean fewer opportunities for alignment errors
- Easier to wash: Single-layer construction dries faster and has no trapped moisture between layers
Lined tote bag advantages:
- Professional appearance: Hides all interior seams and raw edges
- Added strength: Double fabric layers increase weight capacity and durability
- Interior pockets: Lining provides a clean way to attach organizational pockets
- Contrasting design: Coordinating or contrasting lining fabric adds visual interest when the bag opens
When to choose each option:
- Choose unlined if: You’re making your first tote bag, working with very thick fabric (canvas, upholstery weight), or creating a casual market bag
- Choose lined if: You’re gifting the bag, using lightweight fabric that needs reinforcement, or want to add interior pockets for keys and phone
Hybrid option: Make an unlined bag but finish the top edge with bias binding or a facing. This technique hides the raw top edge while avoiding the complexity of a full lining, giving you a semi-professional finish in less time.
The construction method differs significantly. Unlined bags are sewn, turned right-side out, and hemmed at the top. Lined bags require sewing the exterior and lining separately, then joining them at the top edge before turning through a gap left in the lining. If you’re concerned about thread tension when sewing multiple layers, adjust your machine settings before starting the lining attachment.
How Do I Add Pockets to a Tote Bag?
To add pockets to a tote bag, sew patch pockets to the exterior before assembling the bag, or attach pockets to the lining fabric before joining the lining to the bag exterior. Exterior patch pockets are easiest for beginners, while interior pockets sewn into the lining create a cleaner look and protect pocket contents.
Exterior patch pocket method (easiest):
- Cut a pocket rectangle 7″ wide × 8″ tall (finished size will be approximately 6″ × 7″)
- Fold the top edge down ½” and press, then fold down another 1″ and press to create a hem
- Topstitch the hem ¼” from the bottom fold
- Fold the remaining three edges under ½” and press to create clean edges
- Pin the pocket to the bag exterior, positioning it 3-4″ from the bottom and centered or offset as desired
- Topstitch around three sides (bottom and both sides), leaving the hemmed top open
- Optional: Add a vertical line of stitching down the center to create two divided pockets
Interior lining pocket method:
- Cut a pocket rectangle 8″ wide × 9″ tall from lining fabric
- Fold in half with right sides together so it measures 8″ × 4½”
- Sew around three sides with ½” seam allowance, leaving a 3″ gap on the bottom edge
- Turn right-side out through the gap, press flat, and topstitch the gap closed
- Position the pocket on the lining fabric piece before assembling the lining
- Topstitch around three sides (bottom and both sides), leaving the top open
Pocket placement guidelines:
- Exterior pockets: Position 3-5″ from the bottom edge and 2-4″ from side seams
- Interior pockets: Center on one lining panel, positioned 2-3″ from the top edge
- Multiple pockets: Space at least 2″ apart to prevent crowding and allow easy access
Common pocket mistakes:
- Skipping the press: Unpressed pocket edges look wavy and unprofessional
- Weak corners: Backstitch or add a small triangle of reinforcement stitching at top corners where stress concentrates
- Wrong pocket size: Make pockets at least 1″ wider and taller than the items they’ll hold (phone, keys, etc.)
For a phone pocket, cut the rectangle 5″ wide × 7″ tall. For a water bottle pocket, consider an exterior patch pocket at least 4″ wide × 6″ tall with elastic at the top edge to secure the bottle. Understanding proper sewing techniques helps ensure your pockets lie flat and function well.
Why Is My Tote Bag Strap Twisting?
Tote bag straps twist because they weren’t pressed flat during construction, the fabric has directional stretch or bias, or the straps weren’t topstitched along both long edges to stabilize them. Proper pressing, cutting straps on the straight grain (parallel to the selvage), and topstitching both edges prevents twisting.
Primary causes of strap twisting:
- Inadequate pressing: Each fold must be pressed firmly to create a memory in the fabric
- Bias-cut straps: Straps cut on the diagonal (bias) have natural stretch and will twist under weight
- Single-edge topstitching: Stitching only one long edge allows the other edge to curl and twist
- Uneven folding: If one side of the strap is folded wider than the other, tension creates twist
How to prevent strap twisting:
- Cut on the straight grain: Align the long edge of your strap parallel to the fabric selvage (the finished factory edge)
- Press each fold: Use a hot iron with steam, pressing firmly for 3-5 seconds at each fold
- Topstitch both edges: Sew a line of stitching ⅛” from each long edge to lock the folds in place
- Use interfacing: Iron lightweight fusible interfacing to the wrong side of strap fabric before folding for extra stability
- Increase strap width: Wider straps (1½-2″ finished width) are more stable than narrow ½-1″ straps
Fixing twisted straps on a finished bag:
If your straps are already sewn on and twisting, you can add a line of topstitching down the center of each strap from top to bottom. This center seam helps lock the strap in its current position and prevents further twisting. Alternatively, remove the straps using a seam ripper, press them flat with heavy steam, topstitch both edges, and reattach them to the bag.
Strap width and stability relationship:
- ½-¾” finished width: Prone to twisting; best for lightweight bags carrying minimal weight
- 1-1½” finished width: Standard width with good stability when properly constructed
- 2″ or wider finished width: Very stable; ideal for heavy-duty bags or bags carrying books and groceries
Choose strap width based on your bag’s intended use. A lightweight canvas tote for carrying a sweater needs only 1″ straps, while a heavy-duty grocery bag should have 1½-2″ straps for comfort and stability. If you’re experiencing other construction issues, our sewing troubleshooting guide may help.
Can I Sew a Tote Bag Without a Sewing Machine?
Yes, you can sew a tote bag entirely by hand using a backstitch or running stitch, though it takes 3-5 hours compared to 1-2 hours by machine. Hand-sewn tote bags are durable when stitched with a backstitch and work especially well for smaller bags or when using thick fabrics that are difficult to feed through a machine.
Hand-sewing requirements:
- Needle: Size 7-9 sharp or embroidery needle for medium-weight fabrics
- Thread: Strong thread like buttonhole/carpet thread or doubled all-purpose thread
- Stitch type: Backstitch for seams (strongest), running stitch for basting or hems
- Thimble: Protects your finger when pushing the needle through multiple fabric layers
- Time: 3-5 hours for a simple unlined bag, 5-7 hours for a lined bag with pockets
Backstitch technique for strong seams:
- Thread your needle and knot the end
- Push the needle up through the fabric from the wrong side
- Move backward (toward the knot) about ⅛” and push the needle down through both fabric layers
- Bring the needle up ⅛” ahead of where the thread emerges
- Move backward to where the previous stitch ended and push down again
- Repeat, creating a continuous line of stitches with no gaps
Hand-sewing tips for tote bags:
- Use clips instead of pins: Clips hold thick fabrics together without creating holes or pricking your fingers
- Sew shorter seams: Break long seams into sections, knotting off every 6-8″ to prevent the entire seam from unraveling if thread breaks
- Double your thread: Thread the needle and pull both ends even, then knot them together for double strength
- Pre-punch thick fabrics: Use an awl or large needle to create holes through very thick seams before sewing
When hand-sewing is preferable:
- Very thick fabrics: Heavy canvas, leather, or multiple layers that jam home sewing machines
- Decorative stitching: Visible running stitches in contrasting thread create a rustic, handmade aesthetic
- No machine access: When traveling, living in small spaces, or learning to sew without equipment investment
- Quiet sewing: Hand-sewing is silent and portable, perfect for sewing while watching TV or during travel
When a machine is better:
- Speed: Machine sewing is 3-5 times faster for straight seams
- Uniform stitches: Machines create perfectly even stitches automatically
- Topstitching: Long decorative topstitching lines are tedious and difficult to keep straight by hand
- Multiple bags: If making several bags as gifts, machine sewing saves significant time
Hand-sewn tote bags are completely functional and can be just as durable as machine-sewn versions when proper stitching techniques are used. The backstitch creates a strong seam that won’t pull apart under normal use. If you decide to use a machine later, learning how to insert a sewing machine needle correctly is an essential first step.
What Is the Best Fabric for Sturdy Tote Bags?
The best fabrics for sturdy tote bags are canvas, denim, duck cloth, and heavyweight cotton twill because they’re tightly woven, hold their shape under weight, and resist tearing. Canvas (10-12 oz weight) offers the best combination of durability, availability, and ease of sewing for most tote bag projects.
Top fabric choices ranked by sturdiness:
- Canvas (10-12 oz): Tightly woven cotton or cotton-blend, holds shape well, available in many colors
- Duck cloth (12-15 oz): Heavier than canvas, extremely durable, best for heavy-duty bags
- Denim (10-14 oz): Sturdy twill weave, readily available, great for casual bags
- Heavyweight cotton twill: Diagonal weave adds strength, softer hand than canvas
- Upholstery fabric: Very durable but can be difficult to sew without a heavy-duty machine
Fabric weight guide:
- Lightweight (4-6 oz): Quilting cotton, suitable only for small bags or bags with interfacing
- Medium-weight (7-9 oz): Cotton twill, chambray, suitable for lined bags or bags carrying light items
- Heavyweight (10-12 oz): Canvas, denim, ideal for most tote bags
- Extra-heavy (13+ oz): Duck cloth, upholstery fabric, best for grocery bags or bags carrying heavy loads
Fabric characteristics to look for:
- Tight weave: Hold the fabric up to light; less light passing through means a tighter, stronger weave
- Minimal stretch: Pull the fabric in both directions; it should have little to no give
- Appropriate drape: Canvas should feel slightly stiff, not limp or floppy
- Washability: Pre-wash fabric before cutting to prevent shrinkage in the finished bag
Avoid these fabrics for tote bags:
- Quilting cotton (unless interfaced): Too lightweight, will sag and tear under weight
- Knits: Stretch fabrics lose their shape and require special handling
- Silk or satin: Slippery, weak, and impractical for a utility bag
- Loosely woven fabrics: Burlap or gauze will stretch out and develop holes at stress points
Where to buy tote bag fabric:
- Fabric stores: JoAnn, Hobby Lobby, and independent fabric shops carry canvas and denim by the yard
- Online retailers: Fabric.com, Mood Fabrics, and Etsy shops offer wide selections
- Home improvement stores: Canvas drop cloths (unprimed) make excellent, inexpensive tote bag fabric
- Thrift stores: Repurpose canvas curtains, denim jeans, or upholstery samples
Canvas drop cloths from hardware stores are an economical choice for practice bags or when making multiple bags. They’re typically 10-12 oz weight, pre-washed, and cost $8-15 for enough fabric to make 3-4 standard tote bags. Just ensure you buy unprimed drop cloths (no paint-resistant coating).
How Long Does It Take to Sew a Simple Tote Bag?
A simple unlined tote bag takes 1-2 hours to sew for someone with basic sewing skills, including cutting fabric, sewing seams, making straps, and finishing the top edge. Complete beginners should expect 2-3 hours for their first bag, while experienced sewers can complete a basic tote in 45-60 minutes.
Time breakdown by construction stage:
- Cutting fabric: 15-20 minutes (includes measuring, marking, and cutting all pieces)
- Making straps: 20-30 minutes (folding, pressing, and topstitching both straps)
- Sewing body seams: 10-15 minutes (side seams, bottom seam, and boxed corners)
- Finishing top edge: 15-20 minutes (pressing hem, pinning straps, topstitching)
- Pressing throughout: 10-15 minutes (pressing seams open, pressing hems)
Factors that affect sewing time:
- Skill level: Beginners need extra time to reference instructions and fix mistakes
- Bag complexity: Lined bags with pockets take 2-3 hours; bags with zippers or closures take 3-4 hours
- Fabric type: Thick canvas requires slower sewing and more frequent pressing than lightweight cotton
- Interruptions: Continuous sewing is faster than stopping to answer questions or check your phone
- Machine setup: Properly adjusted thread tension and correct needle size prevent time-consuming troubleshooting
Time estimates by bag type:
| Bag Type | Beginner | Intermediate | Advanced |
|---|---|---|---|
| Simple unlined | 2-3 hours | 1-2 hours | 45-60 min |
| Lined, no pockets | 3-4 hours | 2-3 hours | 1.5-2 hours |
| Lined with pockets | 4-5 hours | 2.5-3.5 hours | 2-2.5 hours |
| Lined with zipper closure | 5-6 hours | 3-4 hours | 2.5-3 hours |
Tips to reduce sewing time:
- Cut multiple bags at once: If making several bags, cut all pieces before starting to sew
- Use an assembly line approach: Make all straps first, then sew all bag bodies, then attach all straps
- Pre-wind bobbins: Wind 2-3 bobbins before starting so you don’t interrupt sewing to wind more
- Press as you go: Don’t save all pressing for the end; press each seam immediately after sewing
- Organize your workspace: Keep tools, thread, and fabric within arm’s reach to minimize movement
Your first tote bag will take longer as you learn the process, but your second and third bags will go much faster. Many sewers find they can complete a simple tote bag during a single evening or weekend afternoon once they’ve made one or two practice bags.
What Are Common Mistakes When Sewing Tote Bag Straps?
The most common mistakes when sewing tote bag straps are inadequate reinforcement at attachment points, uneven strap placement, twisted straps, and straps that are too narrow or too long for the bag’s intended use. These errors lead to straps that pull off, look crooked, twist uncomfortably, or don’t function well.
Top strap mistakes and solutions:
1. Weak attachment points
- Mistake: Sewing straps on with a single line of stitching
- Solution: Create a rectangle of stitching (sew around the strap perimeter) plus an X through the center for maximum strength
- Why it matters: Strap attachment points bear all the bag’s weight; weak attachment leads to torn-off straps
2. Uneven strap placement
- Mistake: Eyeballing strap position instead of measuring
- Solution: Measure and mark strap placement 4″ from each side seam on both front and back
- Why it matters: Uneven straps make the bag hang crooked and look unprofessional
3. Straps sewn on twisted
- Mistake: Not checking that straps lie flat before sewing
- Solution: Pin straps in place, then check from multiple angles before stitching
- Why it matters: Twisted straps are uncomfortable to carry and can’t be fixed without removing and reattaching
4. Wrong strap length
- Mistake: Making straps too short (uncomfortable) or too long (bag drags on ground)
- Solution: For shoulder bags, cut straps 24-26″ long; for hand-carried bags, cut 18-20″ long
- Why it matters: Strap length determines how the bag is carried and affects comfort
5. Straps too narrow for bag weight
- Mistake: Using ½” straps on a large bag that will carry heavy items
- Solution: Match strap width to bag size: 1″ for small bags, 1½” for standard bags, 2″ for large/heavy bags
- Why it matters: Narrow straps dig into shoulders and are more likely to tear under weight
Proper strap attachment technique:
- Position straps on bag exterior, 4″ from side seams, with raw edges aligned at top
- Pin or clip straps in place, ensuring they’re not twisted
- Baste straps in place ⅛” from the top edge
- Complete the bag’s top hem, which will secure the strap ends
- Add reinforcement stitching: sew a 1″ × 1″ square around each strap end, then sew an X through the square
Strap length testing method:
Before cutting your final strap fabric, cut a test strap from scrap fabric or use a measuring tape. Hold the test strap up to your shoulder or in your hand to determine the most comfortable length for your body and intended use. Add 2-3″ to this measurement to account for the portion that will be sewn into the bag.
If you’re experiencing issues with your machine while sewing straps, such as skipped stitches through thick layers, check our guide on common stitch problems.
Do I Need Interfacing for a Tote Bag?
Interfacing is not required for tote bags made from heavyweight fabrics like canvas or denim, but it significantly improves structure, prevents sagging, and adds a professional finish to bags made from medium-weight fabrics. Use fusible interfacing on the bag body and bottom for best results, especially if your bag will carry heavy items.
When interfacing is recommended:
- Medium-weight fabrics: Quilting cotton, lightweight canvas, or cotton twill benefit from interfacing
- Bags carrying heavy items: Books, groceries, or laptops require extra structure
- Professional finish: Interfacing prevents the “homemade” floppy look
- Bottom reinforcement: Even heavy fabrics benefit from interfacing at the bottom to prevent sagging
When you can skip interfacing:
- Very heavy fabrics: 12+ oz canvas, duck cloth, or denim already have sufficient body
- Casual market bags: Bags for carrying lightweight items like produce or clothing
- Intentionally soft bags: Beach bags or laundry bags that need to fold flat when empty
Types of interfacing for tote bags:
- Fusible woven (medium-weight): Best all-purpose choice, irons onto fabric, adds structure without stiffness
- Fusible non-woven (medium to heavy): More affordable, adds significant body, can feel slightly stiff
- Sew-in interfacing: Basted to fabric instead of ironed, best for fabrics that can’t handle iron heat
- Heavyweight interfacing (Peltex, Timtex): Very stiff, used for structured bags or reinforced bottoms
How to apply fusible interfacing:
- Cut interfacing pieces slightly smaller than your fabric pieces (trim ¼” off all edges)
- Place interfacing on the wrong side of fabric, fusible (bumpy) side down
- Cover with a pressing cloth to protect your iron
- Press with a hot, dry iron for 10-15 seconds, applying firm pressure
- Lift and reposition the iron (don’t slide it) to avoid shifting the interfacing
- Allow to cool completely before handling
Interfacing placement options:
- Full interfacing: Apply to all bag body pieces for maximum structure
- Partial interfacing: Apply only to the bottom third of the bag to prevent sagging while keeping the top flexible
- Bottom-only interfacing: Cut a separate piece of heavyweight interfacing for just the bag bottom
Common interfacing mistakes:
- Wrong side up: The fusible (bumpy) side must face the fabric, not the iron
- Insufficient heat or pressure: Interfacing won’t bond properly if you don’t press firmly enough
- Skipping the pressing cloth: Direct iron contact can melt or damage interfacing
- Moving the iron instead of lifting: Sliding the iron can shift interfacing out of position
For a standard tote bag made from quilting cotton or lightweight canvas, use ½ yard of medium-weight fusible interfacing. This provides enough to interface both body pieces and add extra reinforcement at the bottom. The small investment in interfacing (typically $3-5) makes a significant difference in the finished bag’s appearance and durability.
How Do I Reinforce the Tote Bag Bottom So It Doesn’t Sag?
To reinforce a tote bag bottom and prevent sagging, add heavyweight interfacing or a plastic canvas insert to the bottom, create boxed corners for three-dimensional shape, and use double-layer fabric or quilted fabric for the base. The most effective method combines boxed corners with a removable plastic canvas or cardboard insert.
Reinforcement methods ranked by effectiveness:
1. Boxed corners (essential for all bags)
- How: After sewing side and bottom seams, flatten each bottom corner into a triangle and sew across perpendicular to the seam
- Effect: Creates a flat, stable bottom and three-dimensional bag shape
- Measurement: Sew 2-3″ from the corner point for standard bags, 4-5″ for large bags
2. Plastic canvas insert (most effective)
- How: Cut plastic canvas (from craft stores) to fit the bag bottom dimensions minus ½” on all sides
- Effect: Provides rigid support that distributes weight evenly
- Advantage: Removable for washing; can be replaced if damaged
3. Heavyweight interfacing (good for medium-weight fabrics)
- How: Cut a double layer of Peltex or Timtex interfacing and sandwich it between the bag bottom fabric layers
- Effect: Adds stiffness without bulk
- Best for: Bags that need to fold flat when empty
4. Quilted bottom panel (decorative and functional)
- How: Cut the bottom piece from pre-quilted fabric or quilt your own with batting between two fabric layers
- Effect: Adds cushioning and structure
- Best for: Bags carrying fragile items or bags where you want visible quilting detail
5. Double-layer bottom (simple reinforcement)
- How: Cut two bottom pieces instead of one and baste them together before sewing to the bag body
- Effect: Doubles the fabric thickness at the bottom only
- Best for: Quick reinforcement without special materials
Step-by-step: Adding a plastic canvas insert
- Measure your finished bag bottom (after sewing but before turning right-side out)
- Cut plastic canvas ½” smaller than these measurements on all sides
- Round the corners slightly with scissors to prevent poking through fabric
- Optional: Cover the plastic canvas with fabric by wrapping it like a present and hand-stitching the edges
- Drop the insert into the finished bag bottom
- Remove before washing; replace after drying
Creating effective boxed corners:
- Sew the side and bottom seams of your bag with right sides together
- Keep the bag inside-out and flatten one bottom corner so the side seam aligns with the bottom seam
- Measure 2-3″ from the point along the seam line and mark with chalk
- Draw a line perpendicular to the seam at this mark
- Sew along this line, backstitching at both ends
- Trim the corner triangle to ½” from the stitching line
- Repeat on the other bottom corner
Boxed corner depth guide:
- 1-2″ depth: Small, flat bags for carrying papers or tablets
- 2-3″ depth: Standard tote bags for everyday use
- 3-4″ depth: Large bags for groceries or beach gear
- 4-5″ depth: Extra-large bags for bulky items or overnight bags
The combination of boxed corners and a plastic canvas insert creates the most stable, sag-resistant tote bag bottom. The boxed corners provide the three-dimensional shape, while the insert prevents the bottom from collapsing inward when the bag is full. This combination works for bags of any size and fabric weight.
Is Sewing a Tote Bag Good for Beginner Sewers?
Yes, sewing a tote bag is an excellent beginner project because it teaches fundamental skills like cutting fabric accurately, sewing straight seams, pressing, and topstitching while producing a useful finished item in just a few hours. Tote bags require no complex techniques like zippers, buttonholes, or curved seams, making them less frustrating than garment sewing for new sewers.
Why tote bags are ideal for beginners:
- Straight seams only: No curves, circles, or complex shapes to navigate
- Forgiving fit: Unlike clothing, tote bags don’t need to fit a body, so small measurement errors don’t matter
- Quick results: Completing a project in 1-3 hours provides immediate satisfaction and motivation
- Practical outcome: You’ll actually use your finished bag, unlike practice squares that get thrown away
- Skill building: Teaches pressing, seam allowances, topstitching, and reinforcement techniques
- Low fabric cost: ¾ yard of canvas costs $6-10, making mistakes affordable
Skills you’ll learn from making a tote bag:
- Accurate cutting: Measuring and cutting straight lines with consistent seam allowances
- Seam sewing: Maintaining a consistent ½” seam allowance while sewing
- Pressing technique: Understanding how pressing creates crisp, professional results
- Topstitching: Sewing visible decorative stitching that’s straight and even
- Strap construction: Folding, pressing, and sewing narrow fabric strips
- Reinforcement: Adding extra stitching at stress points for durability
Beginner-friendly aspects:
- No pattern pieces: Simple rectangles can be measured and cut directly from fabric
- No fitting required: Bags don’t need to fit anyone, eliminating the most frustrating part of garment sewing
- Visible stitching is decorative: Topstitching is supposed to show, so you don’t need to hide your seams
- Mistakes are fixable: Seam rippers easily remove incorrect stitching, and most mistakes can be corrected
Potential beginner challenges:
- Thick layers: Sewing through multiple fabric layers at strap attachment points can be difficult
- Straight topstitching: Keeping decorative stitching straight takes practice
- Strap twisting: Requires careful pressing and attention to grain line
- Even strap placement: Measuring accurately ensures straps are symmetrical
Tips for first-time tote bag sewers:
- Start with a small bag: A 10″ × 12″ bag uses less fabric and has shorter seams to sew
- Choose medium-weight fabric: Canvas or denim is easier to handle than slippery or stretchy fabrics
- Use a simple pattern: Skip pockets, linings, and closures for your first bag
- Press everything: Pressing is the secret to professional-looking results
- Don’t rush: Take your time measuring and pinning before sewing
After making one simple tote bag, you’ll have the confidence and skills to try variations like adding pockets, using contrasting fabrics, or making larger sizes. Many sewers make 3-4 tote bags in their first month of sewing because the project is quick, satisfying, and produces gifts that friends and family actually want.
If you’re just starting out, check our guide on sewing for beginners for more foundational techniques that will help with tote bag construction.
Frequently Asked Questions
Can I use old jeans to make a tote bag?
Yes, old jeans make excellent tote bags because denim is durable, already broken in, and has interesting details like pockets and seams you can incorporate into your design. Cut the legs off, use the existing hem as your bag bottom, and repurpose the back pockets as exterior decoration.
How do I keep my tote bag from stretching out?
Prevent stretching by using heavyweight fabric (10+ oz), adding fusible interfacing to the bag body, avoiding bias-cut pieces, and reinforcing stress points with extra stitching. Plastic canvas inserts at the bottom also help maintain shape.
What stitch length should I use for tote bags?
Use a stitch length of 2.5-3.0 mm for tote bag seams. This length is strong enough to hold heavy weight while being easy to remove with a seam ripper if you need to fix mistakes. Use 3.5-4.0 mm for decorative topstitching.
Can I make a tote bag waterproof?
Make a tote bag water-resistant by using canvas or duck cloth treated with waterproofing spray, or sew with laminated cotton or oilcloth. For fully waterproof bags, use vinyl or coated nylon and seal seams with waterproof tape.
How do I add a zipper to a tote bag?
Add a zipper by sewing it to the top edge of the bag before attaching the lining. Pin the zipper face-down along the top edge, sew with a zipper foot, then fold the zipper up and topstitch. This technique requires intermediate sewing skills.
Why is my sewing machine struggling with thick seams?
Sewing machines struggle with thick seams when using the wrong needle size, incorrect presser foot pressure, or insufficient motor power. Switch to a size 16 or 18 needle, reduce presser foot pressure, and sew slowly through thick areas. Check our guide on why needles keep breaking for more troubleshooting.
How do I wash a handmade tote bag?
Wash handmade tote bags in cold water on a gentle cycle or hand-wash in a sink. Remove any plastic canvas inserts before washing. Air dry or tumble dry on low heat. Pre-washing fabric before sewing prevents shrinkage in the finished bag.
Can I sell tote bags I make from free patterns?
You can sell tote bags made from free patterns only if the pattern designer explicitly allows commercial use. Many free patterns are for personal use only. Always read the pattern’s terms of use or contact the designer for permission before selling finished items.
What’s the difference between canvas and duck cloth?
Canvas is a general term for heavyweight plain-weave fabric (typically 8-12 oz), while duck cloth is a specific type of tightly woven canvas (typically 12-15 oz) that’s heavier and more durable. Duck cloth is better for heavy-duty bags; canvas works for most standard totes.
How do I make my tote bag straps more comfortable?
Make straps more comfortable by increasing width to 1½-2″, adding a layer of batting or fleece inside the strap fold, or sewing a padded strap cover. Wider straps distribute weight across more shoulder area, reducing pressure and discomfort.
Do I need special thread for tote bags?
Regular all-purpose polyester thread works for most tote bags. For heavy-duty bags carrying significant weight, use upholstery thread or topstitching thread for extra strength. Match thread color to your fabric or use contrasting thread for decorative topstitching.
How do I add a magnetic snap closure?
Add a magnetic snap by marking placement on the bag exterior, cutting small slits for the prongs, pushing the snap through from the right side, and securing with the metal backing plate on the wrong side. Add a small square of interfacing behind the snap for reinforcement.
Conclusion
Learning how to sew a tote bag opens the door to practical, creative sewing that produces items you’ll use every day. This beginner-friendly project teaches essential skills like accurate cutting, straight seam sewing, pressing, and topstitching while requiring minimal materials and time investment. Whether you choose a simple unlined design for your first attempt or add pockets and lining for a more polished finish, the basic construction principles remain the same: cut accurately, press thoroughly, and reinforce stress points.
Your next steps:
- Gather your materials: Purchase ¾ yard of canvas or denim, matching thread, and basic sewing supplies
- Start simple: Make an unlined tote bag with basic straps before attempting lined versions or pockets
- Press everything: Use your iron at every stage for professional-looking results
- Practice strap construction: Make extra straps from scrap fabric to perfect your folding and topstitching technique
- Experiment with variations: Once you’ve completed one basic bag, try different sizes, add pockets, or use contrasting fabrics
The beauty of tote bag sewing is that each bag you make improves your skills while producing a practical item perfect for groceries, books, beach trips, or gifts. Your first bag might take three hours and have slightly crooked topstitching, but your fifth bag will take just over an hour and look professionally made. Start with the simplest pattern, focus on mastering the basic techniques, and soon you’ll be customizing designs and creating tote bags that friends ask you to make for them.
For more beginner sewing guidance and troubleshooting help, explore our sewing techniques resources and machine maintenance guides to keep your sewing projects running smoothly.