


Quick Answer
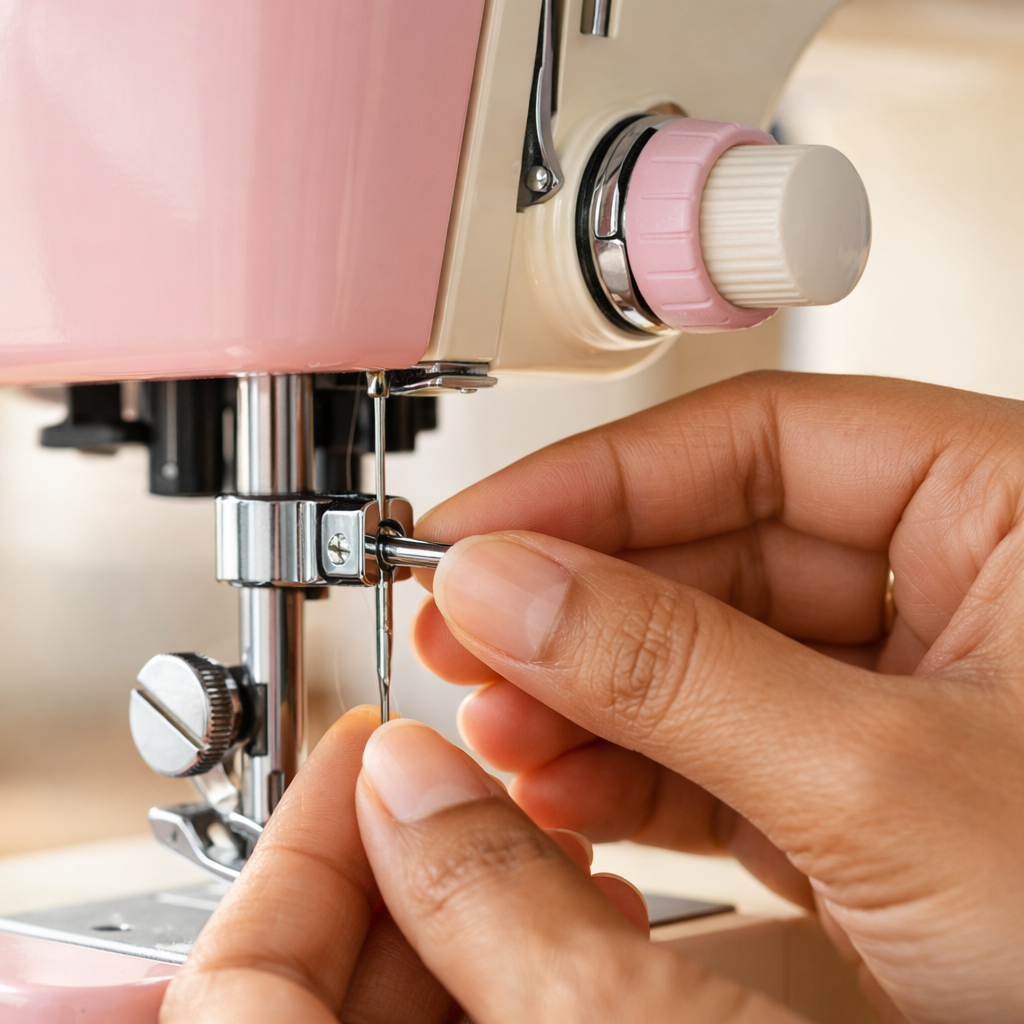
Inserting a sewing machine needle correctly requires sliding the needle upward into the needle clamp with the flat side facing toward the back of the machine (away from you), pushing it as far up as it will go, then tightening the needle clamp screw firmly. The entire process takes less than 30 seconds once you know the correct orientation, and getting it right prevents skipped stitches, thread breaks, and fabric damage.
Key Takeaways
- Always insert the needle with the flat side facing the back of the machine (toward the thread tension mechanism) and the rounded side facing front
- Push the needle shaft all the way up into the clamp until it stops before tightening the screw
- The needle groove (long indentation) should face the same direction as your thread path, typically toward the front
- A correctly installed needle sits straight and doesn’t wobble when you gently tap it
- Turn off and unplug your machine before changing needles to prevent accidental starts and injury
- Needles should be changed every 8-10 hours of sewing time or when switching between fabric types
- If your needle keeps falling out, you’re either not tightening the screw enough or the clamp mechanism needs cleaning
- Using the wrong needle orientation causes skipped stitches, thread shredding, and can damage your bobbin timing
Which Way Does a Sewing Machine Needle Go In
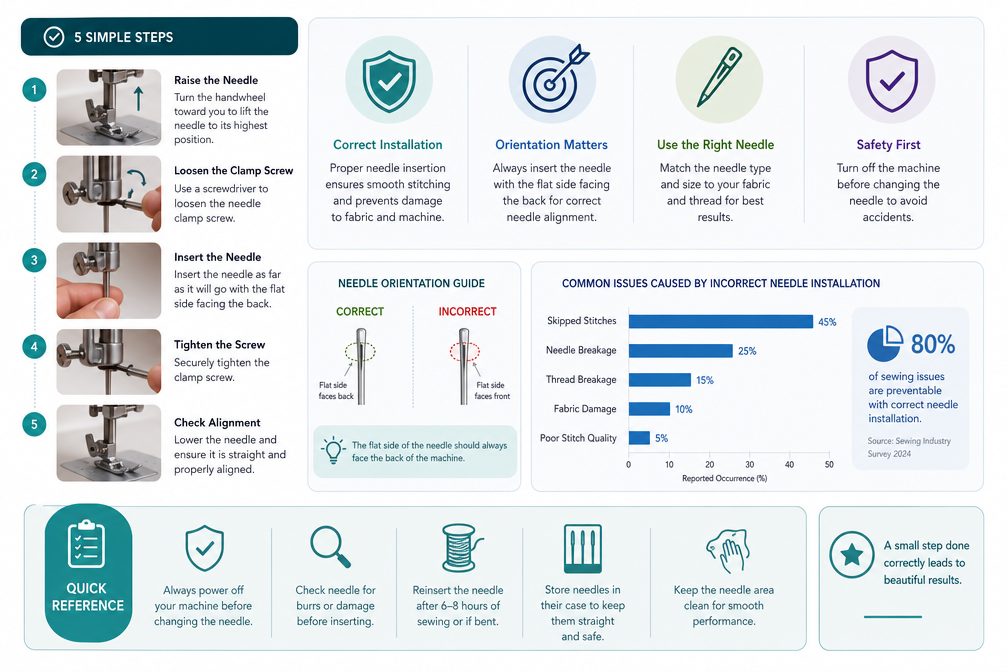
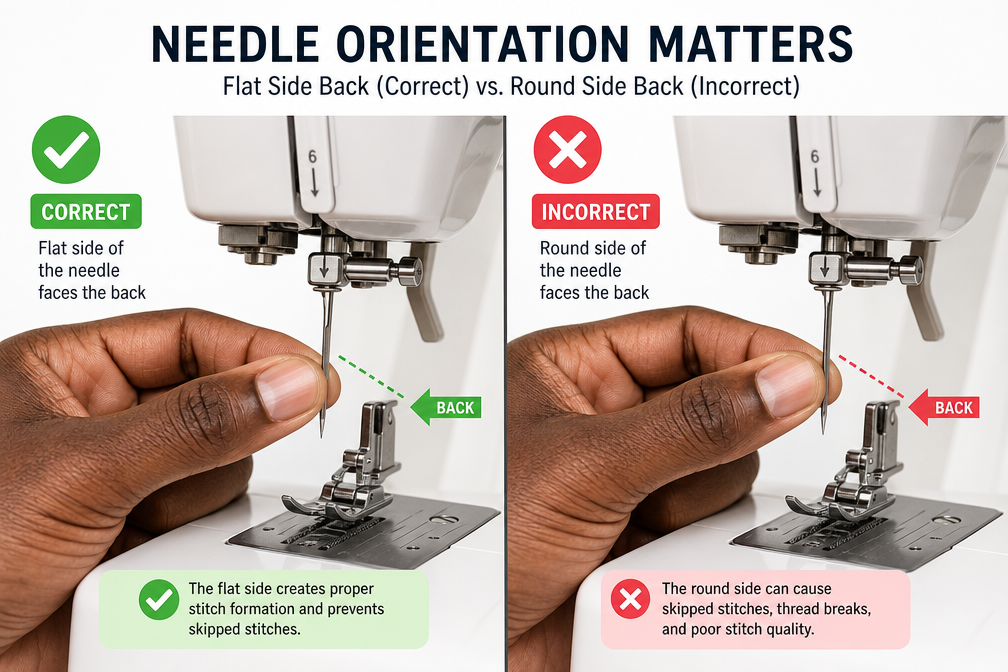
The needle must be inserted with the flat side of the shank facing toward the back of your sewing machine. On nearly all modern domestic and industrial machines, this means the flat side faces away from you (toward the machine’s body) while the rounded side faces forward (toward you).
The needle shank is the thick upper portion that fits into the needle clamp. If you look closely, you’ll notice one side is flat while the opposite side is rounded. This flat side serves as a positioning guide that ensures the needle’s eye and groove align correctly with your machine’s hook mechanism.
Here’s how to identify the correct orientation:
- Hold the needle up to eye level and rotate it slowly
- The flat side is obvious once you know to look for it (about one-third of the circumference is flattened)
- The long groove running down the needle shaft should face the same direction your thread comes from (usually the front)
- The needle’s eye (the hole at the bottom) should be visible when looking at the needle from the front
Some vintage or specialty machines have different orientations, but these are rare. If you’re unsure, check your machine’s manual or look for a diagram near the needle area, which many manufacturers include as a quick reference guide.
How to Insert a Sewing Machine Needle: Step-by-Step Process
Changing a sewing machine needle is straightforward once you understand the basic steps. Turn off and unplug your machine first to prevent accidental foot pedal activation while your fingers are near the needle area.
Follow these steps for proper needle insertion:
- Raise the needle to its highest position by turning the handwheel toward you (counterclockwise when facing the wheel) or using the needle up/down button if your machine has one
- Loosen the needle clamp screw by turning it counterclockwise (lefty-loosey) with a small screwdriver or the built-in screwdriver some machines provide
- Remove the old needle by pulling it straight down and out of the clamp
- Hold the new needle with the flat side facing back and the pointed end facing down
- Push the needle up into the clamp as far as it will go until you feel it stop against the top of the needle bar
- Hold the needle in place with one hand while tightening the clamp screw firmly with the other hand (turn clockwise)
- Test the needle by gently tapping it with your fingernail to ensure it doesn’t wobble or move
The needle should sit perfectly straight and vertical when properly installed. If it appears crooked or tilted, loosen the screw and reinsert it, making sure you’re pushing it all the way up before tightening.
How Do I Know If My Sewing Machine Needle Is In Correctly
A correctly installed needle will be completely vertical, pushed all the way up into the clamp, and secured tightly with no movement when you gently tap or wiggle it. You can verify proper installation by checking several visual and functional indicators.
Visual checks for correct needle installation:
- The needle hangs perfectly straight (not tilted forward, backward, or to either side)
- The flat side of the shank is facing toward the back of the machine
- The needle is pushed up as far as possible into the clamp (no gap visible between the needle and the top of the clamp)
- The long groove on the needle shaft faces the direction your thread comes from
- The needle doesn’t move or rattle when you gently tap it with your fingernail
Functional tests to confirm proper installation:
- Lower the presser foot and manually turn the handwheel through one complete stitch cycle
- The needle should pass cleanly through the needle plate hole without hitting the sides
- Thread the machine and sew a test seam on scrap fabric
- Stitches should form evenly without skipping, and the thread shouldn’t shred or break
If you notice skipped stitches, thread breaks, or unusual noises after installing a needle, remove it and reinsert it, paying careful attention to the flat side orientation and making sure it’s pushed all the way up.
What Happens If You Put a Sewing Machine Needle in Backwards
Installing a needle backwards (with the flat side facing front instead of back) will cause immediate stitching problems and can potentially damage your machine’s timing mechanism. The needle won’t be positioned correctly relative to the bobbin hook, preventing proper stitch formation.
Common problems from backwards needle installation:
- Skipped stitches because the needle’s eye isn’t in the right position for the hook to catch the thread loop
- Thread shredding or breaking as the thread rubs against the wrong side of the needle
- Bent or broken needles from the needle hitting the needle plate or bobbin case at the wrong angle
- Damage to the bobbin hook if the needle strikes it during operation
- Fabric puckering or damage from improper thread tension and stitch formation
The machine may run without making any stitches at all, or it might make a few stitches before the thread breaks. Some sewers describe a “clunking” sound when the needle is backwards because it’s hitting components at the wrong angle.
If you accidentally sew with a backwards needle, stop immediately. Turn off the machine, remove the needle, check for any damage to the needle plate or bobbin area, and reinstall the needle correctly. Most machines can tolerate a few stitches with an incorrect needle without permanent damage, but continued use can throw off your timing and require professional repair.
Do All Sewing Machine Needles Install the Same Way
Nearly all modern domestic sewing machines use the same needle orientation with the flat side facing back, but there are exceptions among vintage, industrial, and specialty machines. The standardization makes it easier for sewers to switch between machines without relearning needle installation.
Standard domestic machines (flat side back):
- Singer, Brother, Janome, Bernina, Pfaff, Husqvarna Viking, Baby Lock, Juki (domestic models)
- These machines use the “130/705 H” needle system, also called “15×1” or “HAx1”
- The flat side always faces toward the back (away from you)
Machines with different orientations:
- Some vintage Singer Featherweights and older machines may have side-loading needle systems
- Certain industrial machines use different needle systems (like 134, 135×5, or DBx1) with varying orientations
- Specialty machines for leather, upholstery, or embroidery may have unique needle clamp designs
The needle system is usually printed on the needle itself near the shank. If you’re working with an unfamiliar machine, check the manual or look for orientation markings near the needle clamp area. Many machines have a small diagram showing the correct flat-side position.
When in doubt, remember that the long groove on the needle shaft should face the direction your thread comes from. Since most machines thread from front to back, the groove faces front and the flat side faces back.
How Tight Should a Sewing Machine Needle Be
The needle clamp screw should be tightened firmly enough that the needle cannot move or rotate when you try to twist it with your fingers, but not so tight that you risk stripping the screw or damaging the clamp mechanism. Think “snug and secure” rather than “as tight as humanly possible.”
Proper tightening technique:
- Use a small screwdriver that fits the screw head properly (usually a small flathead or the built-in tool on your machine)
- Tighten until you feel resistance, then give it about a quarter-turn more
- The needle should not wiggle, rotate, or slide up and down when you test it
- You shouldn’t need excessive force or tools like pliers to achieve proper tightness
Signs the needle is too loose:
- The needle slides down during sewing, causing the timing to be off
- You hear a rattling or clicking sound as the needle moves
- The needle falls out completely during operation
- Stitches become irregular or skipped as the needle position shifts
Signs you’ve over-tightened:
- The screw head becomes damaged or stripped
- The needle clamp mechanism cracks (rare but possible on plastic clamps)
- You have difficulty loosening the screw for the next needle change
If you’re consistently having trouble keeping needles secure, the clamp mechanism may need cleaning (lint and thread buildup can prevent proper grip) or the screw itself may be worn and need replacement.
Why Does My Needle Keep Falling Out of My Sewing Machine
A needle that repeatedly falls out is usually caused by insufficient tightening of the clamp screw, debris in the needle clamp, or a worn clamp mechanism. This problem is frustrating but almost always fixable with basic maintenance.
Most common causes and solutions:
Insufficient tightening, The most frequent culprit. Many sewers don’t realize how firmly the screw needs to be tightened. Use a proper screwdriver (not your fingernail or a coin) and tighten until the needle absolutely cannot move, then add a small additional turn.
Lint and thread buildup, Over time, fiber debris accumulates in the needle clamp groove, preventing the clamp from gripping properly. Turn off and unplug your machine, remove the needle, and use a small brush or compressed air to clean out the clamp area thoroughly.
Wrong needle system, Using a needle with a shank diameter that doesn’t match your machine (like trying to use an industrial needle in a domestic machine) means the clamp can’t grip properly. Verify you’re using the correct needle system for your machine.
Worn or damaged clamp screw, If the screw threads are stripped or the screw head is damaged, it won’t tighten properly. Replacement screws are inexpensive and available from sewing machine dealers or online.
Damaged needle clamp, Less common, but if the clamp itself is cracked or the groove is worn smooth, it may need professional replacement.
Vibration from high-speed sewing, Some machines vibrate enough at high speeds to gradually loosen the needle. Check and re-tighten the needle periodically during long sewing sessions, especially when working with heavy fabrics.
If you’ve tried all these solutions and the needle still falls out, take your machine to a qualified technician. There may be an issue with the needle bar or clamp assembly that requires professional attention.
What Is the Flat Side of a Sewing Machine Needle For
The flat side of the needle shank serves as a positioning guide that ensures the needle’s groove and eye align correctly with your machine’s hook mechanism for proper stitch formation. This simple design feature prevents you from installing the needle in the wrong orientation.
When the flat side faces back (the correct position for most machines), it positions the needle so that:
- The long groove faces forward, providing a channel for the upper thread to nestle into as the needle penetrates the fabric
- The needle eye is oriented correctly for the bobbin hook to catch the thread loop
- The scarf (the indentation above the eye on the back of the needle) is positioned where the hook can pass close to the needle without hitting it
Without the flat side as a guide, you could install the needle rotated to any position, and the machine wouldn’t form stitches properly. The flat side makes it nearly impossible to install the needle incorrectly (as long as you know which direction it should face).
This standardized design has been used for over a century because it’s simple, foolproof, and doesn’t require any special tools or complicated alignment procedures. The flat side is your friend, once you remember “flat to the back,” you’ll never struggle with needle installation again.
Can You Insert a Needle Without Turning Off the Machine
No, you should never change a needle while the machine is powered on. Always turn off the power switch and unplug the machine before removing or inserting a needle. This simple safety step prevents serious injury from accidental activation.
Risks of changing needles with power on:
- Accidental foot pedal activation, Even a slight bump of the pedal can cause the machine to run, driving the needle through your finger
- Electrical shock, Though rare, working near electrical components with the machine plugged in carries some risk
- Sudden machine movement, Some computerized machines perform automatic functions when you touch certain areas
- Dropped tools, If you drop a screwdriver onto the foot pedal while the machine is on, it could activate
The safe needle-changing routine:
- Finish your current seam and raise the needle to its highest position
- Turn off the power switch on the machine
- Unplug the machine from the wall outlet (or at minimum, unplug the foot pedal)
- Change the needle using proper technique
- Plug the machine back in and turn on the power
- Test with a scrap of fabric before resuming your project
This routine takes an extra 10 seconds but could prevent a trip to the emergency room. Sewing machine needles are sharp, and the machine’s motor is powerful enough to drive a needle completely through a finger and out the other side. Professional sewers and instructors universally recommend unplugging before any needle work.
How to Remove a Stuck Sewing Machine Needle
A stuck needle is usually caused by an over-tightened or corroded clamp screw, thread wrapped around the needle shaft, or a bent needle wedged in the clamp. With patience and the right technique, you can remove it without damaging your machine.
Step-by-step removal process:
- Turn off and unplug the machine completely
- Raise the needle to its highest position using the handwheel
- Remove any thread from the needle and cut away any thread wrapped around the needle shaft or clamp
- Apply penetrating oil (like sewing machine oil or WD-40) to the clamp screw if it’s corroded or hasn’t been loosened in a long time
- Let the oil sit for 5-10 minutes to penetrate
- Use the correct screwdriver, one that fits the screw head properly without slipping
- Apply firm, steady pressure while turning counterclockwise (don’t jerk or force it)
- Tap gently on the screwdriver handle with your palm while applying turning pressure if the screw won’t budge
If the screw still won’t turn:
- Try a rubber band between the screwdriver and screw head for extra grip
- Use needle-nose pliers to grip the needle shaft and gently wiggle it while someone else works the screw
- Apply heat with a hair dryer to expand the metal slightly (use caution and don’t overheat plastic components)
If the needle is bent and wedged:
- Don’t force it straight down, as this could damage the needle bar
- Try rotating the needle slightly while pulling down gently
- Use pliers to grip the needle shaft (not the point) and work it free with a gentle rocking motion
When to seek professional help: If the screw head is completely stripped, the needle is broken off inside the clamp, or you can’t remove the needle after trying these methods, take your machine to a repair technician. Forcing it could cause expensive damage to the needle bar or clamp assembly.
What Size Needle Should I Use for Different Fabrics
Needle size refers to the diameter of the needle shaft, with smaller numbers indicating finer needles for lightweight fabrics and larger numbers for heavy materials. Using the correct size prevents fabric damage, skipped stitches, and thread breaks.
Needle sizes are marked with two numbers: European (60-120) and American (8-19). For example, a 70/10 needle is a size 70 in the European system and size 10 in the American system.
Needle size guide by fabric weight:
| Fabric Type | Needle Size | Examples |
|---|---|---|
| Sheer/Delicate | 60/8 or 70/10 | Silk chiffon, organza, fine lace |
| Lightweight | 70/10 or 80/12 | Cotton lawn, voile, lightweight silk |
| Medium Weight | 80/12 or 90/14 | Quilting cotton, linen, chambray, light denim |
| Medium-Heavy | 90/14 or 100/16 | Denim, corduroy, canvas, upholstery fabric |
| Heavy | 100/16 or 110/18 | Heavy denim, duck cloth, multiple layers |
| Very Heavy | 110/18 or 120/19 | Leather, vinyl, heavy canvas, thick upholstery |
Beyond size, needle type matters:
- Universal needles work for most woven fabrics and are a good all-purpose choice
- Ballpoint or stretch needles have a rounded tip that slides between knit fibers instead of piercing them
- Sharp/microtex needles have a very sharp point for precise stitching on tightly woven fabrics
- Denim/jeans needles have a sharp point and strong shaft for penetrating heavy fabrics
- Leather needles have a cutting point that slices through leather and vinyl
General rule: If you’re seeing holes or pulls in your fabric, your needle is too large. If you’re getting skipped stitches or broken needles, your needle is too small for the fabric weight.

Set of 5 universal regular point sewing machine needles, size 70/10

Universal (130/705 H) Sewing Machine Needles

Schmetz universal needle
Difference Between Hand Sewing Needles and Machine Needles
Hand sewing needles and machine needles are completely different tools that are not interchangeable. Machine needles have a flat-sided shank for secure clamping, a scarf for hook clearance, and are designed to withstand the high-speed impact of machine sewing.
Key structural differences:
Machine needles:
- Have a thick shank (top portion) with one flat side for proper orientation
- Include a scarf (indentation) above the eye for the bobbin hook to pass close
- Feature a long groove on one side to protect the thread during penetration
- Are made from hardened steel to withstand thousands of impacts per minute
- Come in standardized systems (130/705 H for most domestic machines)
Hand sewing needles:
- Have a round shank that tapers gradually to the point
- No scarf or groove (not needed for hand sewing)
- The eye is at the top (opposite end from the point)
- Made from softer steel since they don’t experience machine-speed impact
- Come in many specialized types (sharps, betweens, embroidery, tapestry, etc.)
Why you can’t use a hand needle in a machine:
- The round shank won’t stay secure in the needle clamp
- There’s no scarf, so the hook will hit the needle and break
- The eye position is wrong for stitch formation
- The needle will break immediately under machine-speed impact
Why you shouldn’t use a machine needle for hand sewing:
- The flat shank makes it uncomfortable to hold and push through fabric
- The eye is too small and positioned at the bottom, making threading difficult
- The hardened steel is more brittle and can snap if bent
Always use the correct needle type for your sewing method. Machine needles are inexpensive, so keep a variety of sizes and types on hand for different projects.
Do I Need Special Tools to Change a Sewing Machine Needle
Most needle changes require only a small screwdriver, and many machines include a built-in screwdriver or one in the accessory kit. Some newer machines feature tool-free needle clamps that you can loosen by hand, making the process even simpler.
Tools that make needle changing easier:
- Small flathead screwdriver, The most common tool needed; usually 3-4mm wide
- Built-in screwdriver, Many machines have a small screwdriver stored in the free arm or accessory compartment
- Needle inserter/threader tool, Helps grip small needles and position them correctly (especially helpful for people with limited dexterity or vision issues)
- Magnifying glass or lamp, Useful for seeing the flat side clearly and ensuring proper positioning
- Tweezers, Helpful for removing broken needle pieces or handling tiny needles
Machines with tool-free needle clamps:
Some modern computerized machines feature needle clamps that loosen with a lever or button press rather than requiring a screwdriver. These systems are convenient but work on the same principle, the needle must still be inserted with the flat side back and pushed all the way up.
You don’t need:
- Pliers (unless removing a stuck needle)
- Power tools
- Specialized or expensive equipment
Pro tip: Keep a small screwdriver in your sewing kit at all times. Needles break unexpectedly, and you don’t want to stop mid-project to search for tools. Some sewers attach a small screwdriver to their machine with a piece of elastic or Velcro for instant access.

【Package includes】- 1 pcs curved nose tweezers, 1 pcs double-ended fluff brush, 1 pcs needle board screwdriver and 4 pcs screwdrivers, 7 pcs in total. Different styles of screwdrivers, a sufficient number of tools are sufficient for your daily cleaning and repair needs.
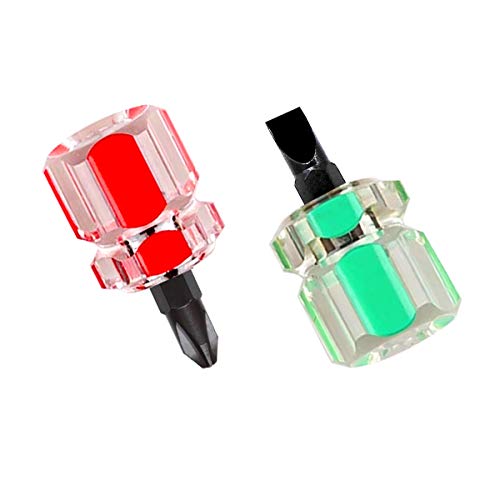
Clear Plastic Handles,Includes the most common slotted and Phillips sizes;flat head width is 1/4 inch; Phillips size PH2

Quality material: transparent plastic handles are made of PVC material; Mini short handle screwdrivers are made of chrome vanadium steel, lightweight design makes it easy to carry and use
How Often Should You Replace Your Sewing Machine Needle
Replace your needle every 8-10 hours of sewing time or after completing one to two major projects, whichever comes first. Needles dull gradually through normal use, and a dull needle causes more problems than most sewers realize.
Signs you need a new needle:
- Popping or punching sounds as the needle penetrates fabric instead of a smooth, quiet entry
- Skipped stitches that weren’t happening before
- Thread shredding or breaking repeatedly with good-quality thread
- Pulls or snags in your fabric, especially on knits
- Visible damage to the needle point (burrs, bends, or a hooked tip)
- Uneven stitches or tension problems that don’t resolve with tension adjustments
When to change needles immediately:
- After hitting a pin, Even if the needle looks fine, the point may be damaged
- When switching fabric types, Use a ballpoint for knits, sharp for wovens, etc.
- When changing thread weight, Match needle size to thread thickness
- After sewing heavy or abrasive fabrics, Denim, canvas, and synthetic fabrics dull needles faster
- If the needle is bent, Even slightly bent needles cause timing problems
Needle lifespan by fabric type:
- Delicate fabrics (silk, chiffon): 6-8 hours
- Standard cotton: 8-10 hours
- Denim or canvas: 4-6 hours
- Synthetic fabrics: 6-8 hours (synthetics dull needles faster than natural fibers)
Cost-benefit reality: Needles cost less than a dollar each, while the fabric you’re sewing likely costs much more. A dull needle can permanently damage expensive fabric, so changing needles regularly is cheap insurance. Many experienced sewers start every new project with a fresh needle regardless of how long the previous needle was used.
Keep a supply of needles in common sizes (80/12 and 90/14 universal needles cover most projects) so you’re never tempted to keep sewing with a questionable needle.

PREMIUM QUALITY MATERIAL: Made of top quality high-strength steel, sharp smooth, sturdy and durable, not easy to bend, and long service life.

Pack of 10 Genuine Singer Sewing Machine Needles

2X STRONGER STEEL — Constructed with reinforced, thick shafts that withstand the resistance of dense, heavy fabrics without bending or breaking, staying sharp longer for consistent, skip-free stitching through any material from start to finish.
My Needle Won’t Stay in Place After Inserting It, What Do I Do
If your needle keeps slipping down or won’t stay secure after you’ve tightened the clamp screw, the problem is usually debris in the needle clamp, an insufficiently tightened screw, or a worn clamp mechanism. This issue requires systematic troubleshooting to identify and fix the root cause.
Troubleshooting steps in order:
1. Verify you’re tightening enough
- Use a proper screwdriver (not a coin or fingernail)
- Tighten until you feel resistance, then add another quarter-turn
- The needle should not move at all when you try to rotate or pull it
2. Clean the needle clamp thoroughly
- Turn off and unplug the machine
- Remove the needle and presser foot for better access
- Use a small stiff brush (an old toothbrush works well) to scrub inside the needle clamp groove
- Blow out debris with compressed air or a can of electronics duster
- Wipe the area with a lint-free cloth
- Apply a tiny drop of sewing machine oil to the screw threads (not inside the clamp itself)
3. Check the needle system
- Verify you’re using the correct needle system for your machine (usually 130/705 H for domestic machines)
- Industrial needles have thicker shanks and won’t fit properly in domestic needle clamps
- Some specialty needles have non-standard shank diameters
4. Inspect the clamp screw
- Look for stripped threads or a damaged screw head
- Try tightening and loosening several times, if it feels “stripped” or doesn’t grip, the screw needs replacement
- Replacement screws are available from sewing machine dealers or online for a few dollars
5. Examine the needle clamp itself
- Look for cracks in the clamp (especially on machines with plastic clamps)
- Check if the clamp groove is worn smooth from years of use
- Verify the clamp hasn’t been bent or damaged
6. Test with multiple needles
- Try several different needles from different packages
- If one needle stays secure but others don’t, the problem is with the needles, not your machine
- Cheap or off-brand needles sometimes have inconsistent shank diameters
If none of these steps work, the needle bar or clamp assembly may need professional service. A qualified technician can replace worn parts and ensure everything is properly aligned. This repair is usually inexpensive and much cheaper than the frustration of dealing with a needle that won’t stay put.
Frequently Asked Questions
How do I know which way the flat side of the needle faces?
The flat side faces toward the back of the machine (away from you) on nearly all modern domestic sewing machines. Hold the needle up and rotate it to find the flat portion of the shank, then position that side toward the back when inserting.
Can I use any brand of needle in my sewing machine?
Yes, as long as the needle system matches your machine. Most domestic machines use the 130/705 H system (also called 15×1 or HAx1), which is standardized across brands. Schmetz, Organ, Klasse, and other quality brands are interchangeable.
Why does my needle keep breaking?
Needles break from hitting pins, using the wrong needle size for the fabric, sewing too fast over thick seams, a bent needle, incorrect needle insertion, or timing problems in the machine. Always remove pins before they reach the needle and use the appropriate needle size for your fabric.
Should I oil my needle clamp?
Apply a tiny drop of sewing machine oil to the clamp screw threads occasionally to prevent corrosion and ensure smooth tightening, but don’t put oil inside the needle clamp groove itself, as this can attract lint and prevent proper gripping.
What’s the difference between a 70/10 and 90/14 needle?
The numbers indicate needle shaft diameter. A 70/10 is a fine needle for lightweight fabrics like silk or voile, while a 90/14 is a medium needle for standard cotton, denim, or canvas. Using the wrong size causes fabric damage or stitching problems.
Can I straighten a bent needle and reuse it?
No, never try to straighten and reuse a bent needle. Even if it looks straight, the metal structure is compromised and it will break during use, potentially damaging your machine’s timing or injuring you. Needles are inexpensive, always replace bent needles.
How far up should the needle go into the clamp?
Push the needle all the way up until it stops against the top of the needle bar. There should be no visible gap between the top of the needle and the needle clamp. If the needle isn’t fully inserted, it will be too low and cause timing problems.
Do I need to change the needle when switching from woven to knit fabric?
Yes, ideally you should switch from a universal or sharp needle to a ballpoint or stretch needle when sewing knits. The rounded tip of a ballpoint needle slides between knit fibers instead of piercing them, preventing runs and holes in the fabric.
What does the number on the needle package mean?
Needle packages show two numbers (like 80/12). The first is the European size (diameter in hundredths of a millimeter), and the second is the American size. Both numbers indicate the same needle, a 80/12 is the same as a size 80 or size 12.
Why are my stitches skipping even with a new needle?
Skipped stitches with a new needle usually mean the needle is inserted incorrectly (flat side facing the wrong direction), the needle isn’t pushed all the way up, you’re using the wrong needle type for the fabric (like a universal needle on knits), or there’s a timing issue with your machine.
Can I leave a needle in my machine when storing it?
Yes, you can leave a needle installed during storage, but it’s good practice to raise it to the highest position and cover your machine to prevent dust accumulation. Some sewers prefer to remove the needle during long-term storage to prevent any possibility of corrosion in the clamp.
What’s the scarf on a sewing machine needle?
The scarf is a small indentation on the back of the needle shaft just above the eye. It allows the bobbin hook to pass very close to the needle to catch the thread loop without actually hitting the needle. This is why needle orientation matters so much, the scarf must face the hook.
Conclusion
Learning how to insert a sewing machine needle correctly is a fundamental skill that takes less than a minute but impacts every stitch you make. Remember the key principle: flat side to the back, push all the way up, and tighten firmly. This simple sequence prevents the vast majority of needle-related sewing problems and keeps your machine running smoothly.
Make needle changing part of your regular sewing routine. Start each new project with a fresh needle matched to your fabric type and weight. Keep a variety of needle sizes and types in your sewing kit, along with a proper screwdriver for quick changes. When you notice any signs of a dull or damaged needle, popping sounds, skipped stitches, thread breaks, or fabric damage, stop immediately and install a new needle.
Your next steps:
- Check your current needle to verify it’s installed correctly (flat side back, pushed all the way up)
- Clean your needle clamp area if you haven’t done so recently
- Stock up on needles in the sizes you use most often (80/12 and 90/14 universal needles are good starting points)
- Practice changing needles a few times so you’re confident when you need to do it mid-project
- Mark your calendar to change needles every 8-10 hours of sewing time
With proper needle installation and regular changes, you’ll experience fewer frustrating sewing problems and achieve better results on every project. The few seconds spent ensuring correct needle insertion pays dividends in stitch quality, fabric preservation, and overall sewing enjoyment.


