


More than 60% of beginner sewers abandon their first project because pattern instructions feel like a foreign language. A sewing glossary: terms every beginner should know bridges that gap by translating common sewing vocabulary into plain English. Understanding basic terms like basting, seam allowance, selvage, and grain direction transforms confusing pattern instructions into clear, actionable steps that help you complete projects with confidence.
Key Takeaways
- Basting means temporary stitching that holds fabric in place before permanent sewing
- Seam allowance is the fabric between the stitch line and raw edge, typically 5/8 inch in garment sewing
- Selvage is the factory-finished edge of fabric that won’t fray and runs parallel to the lengthwise grain
- Grain refers to fabric thread direction: lengthwise (warp), crosswise (weft), and bias (diagonal)
- Right side is the fabric’s front or printed side; wrong side is the back or reverse
- Stay stitching prevents fabric edges from stretching during construction
- You don’t need to memorize every term before starting, learn as you sew
- Pattern instructions become clear once you understand 15-20 core terms
What Does Basting Mean in Sewing?
Basting is temporary stitching used to hold fabric layers together before sewing permanent seams. These long, loose stitches (usually 1/4 inch or longer) are easy to remove after you’ve sewn the final seam. Basting prevents fabric from shifting during construction and lets you test fit before committing to permanent stitches.
Three common basting methods:
- Hand basting: Running stitch sewn by hand with contrasting thread for easy removal
- Machine basting: Longest stitch length on your sewing machine (usually setting 4-5)
- Pin basting: Using pins instead of thread (remove pins as you sew to avoid hitting them with the needle)
Choose hand basting when working with slippery fabrics like silk or satin that shift easily. Use machine basting for long seams on stable fabrics like cotton. Pin basting works well for quilting layers together.
Common mistake: Using regular stitch length for basting makes removal difficult and can damage delicate fabrics. Always use the longest stitch setting or hand-sew with loose tension.
Difference Between Seam Allowance and Seam Line
The seam line is where your stitches go; the seam allowance is the fabric strip between that stitch line and the raw edge. Most commercial patterns use a 5/8-inch seam allowance for garments, while quilting typically uses 1/4 inch. The seam allowance provides room for finishing techniques and prevents seams from pulling apart.
Why this distinction matters:
- Pattern pieces include seam allowance in their size, cutting on the line means cutting the entire piece including allowance
- When patterns say “sew with 5/8-inch seam allowance,” they mean stitch 5/8 inch from the raw edge
- Trimming or grading seam allowances reduces bulk in finished garments
- Different seam allowances affect the final size of your project
Your sewing machine throat plate usually has markings showing common seam allowance measurements. The edge of your presser foot often measures exactly 1/4 inch from needle to edge, making it a built-in guide for quilting.
For detailed guidance on choosing the right measurement for your project, check out our complete seam allowance guide.
Edge case: Vintage patterns sometimes use 1/2-inch or 1-inch seam allowances. Always check pattern instructions before cutting.
What Is a Selvage Edge on Fabric?
The selvage (also spelled selvedge) is the tightly woven factory edge that runs along both lengthwise sides of fabric. This finished edge won’t fray or unravel and often contains manufacturer information like fabric name, designer, and color registration dots. The selvage runs parallel to the lengthwise grain and should usually be trimmed off before cutting pattern pieces.
Key selvage characteristics:
- Tighter weave than the rest of the fabric
- May have small holes from manufacturing pins
- Often printed with color dots, text, or brand information
- Measures roughly 1/2 to 1 inch wide on each side
- Doesn’t shrink or behave the same way as the main fabric
When to remove selvage: Always trim it off before cutting garment pieces because it can cause puckering and won’t press flat. The tighter weave pulls differently than the rest of the fabric, creating distortion in seams.
When to keep selvage: Some quilters intentionally use selvage edges in art quilts or selvage-specific projects for their printed text and dots.
Bias vs Grain in Sewing: Which Direction to Cut?
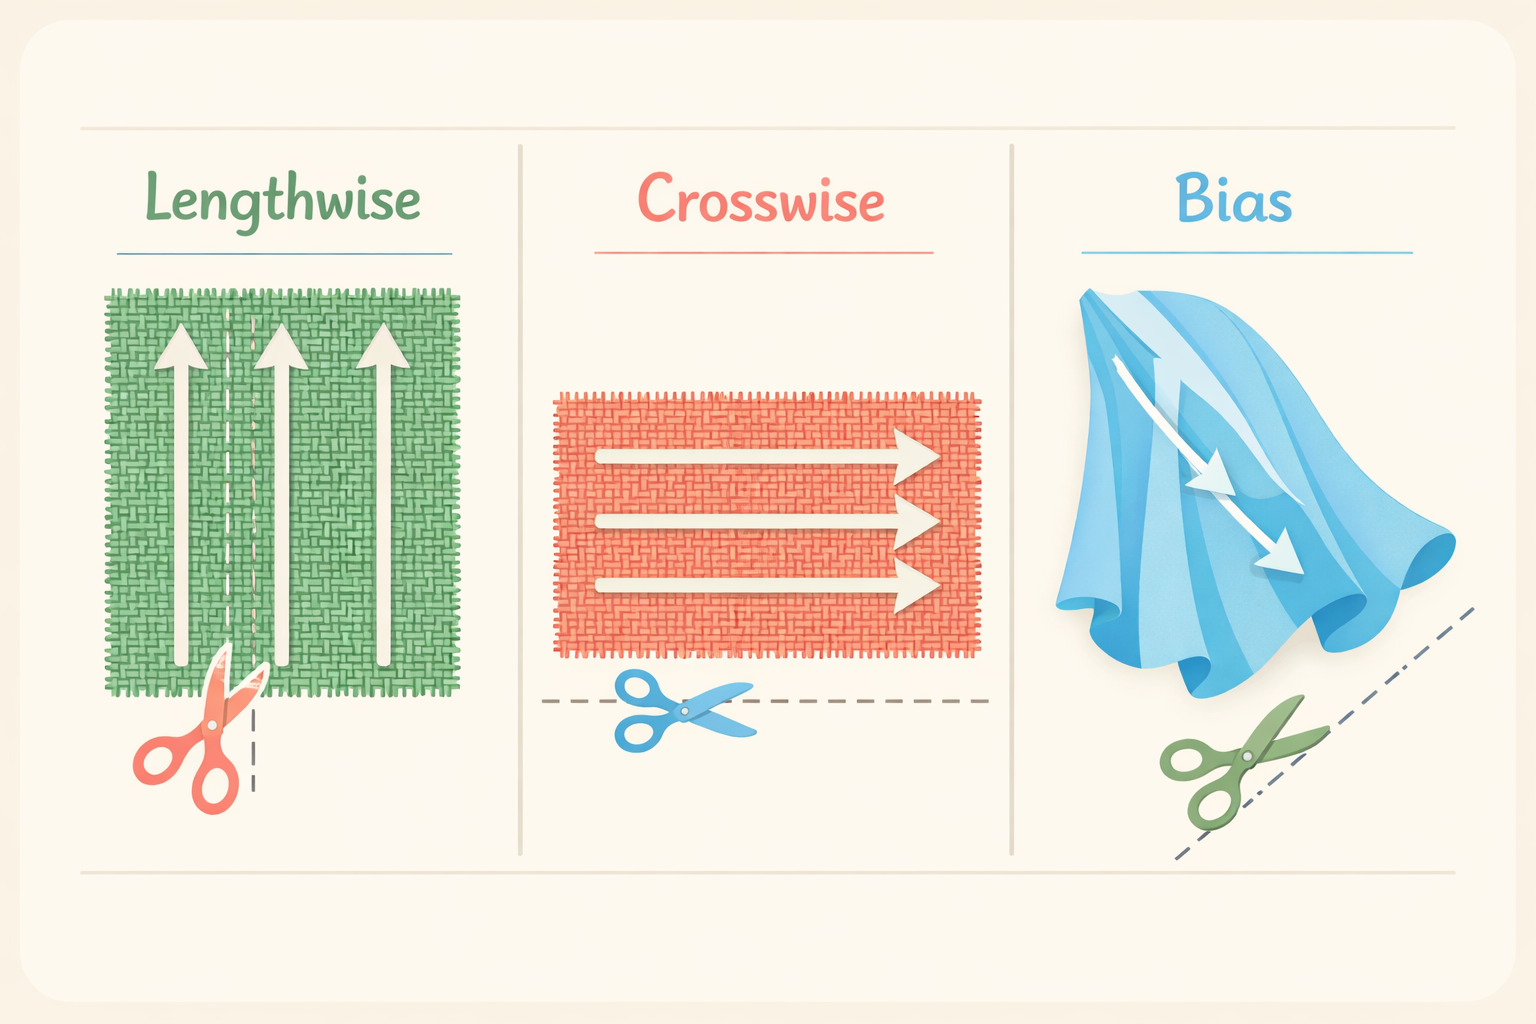
Fabric grain refers to the direction of threads in woven fabric. Lengthwise grain (warp threads) runs parallel to the selvage and has minimal stretch. Crosswise grain (weft threads) runs perpendicular to selvage and has slight stretch. Bias is any diagonal direction, with true bias at exactly 45 degrees offering maximum stretch and drape.

When to cut on each grain:
| Grain Direction | Stretch | Best For | Why |
|---|---|---|---|
| Lengthwise | Almost none | Garment length, vertical pieces | Stability, hangs straight |
| Crosswise | Slight | Horizontal pieces, some skirts | Moderate give, economical cutting |
| True Bias | Maximum | Binding, curved seams, draped necklines | Molds to curves, elegant drape |
Cutting on grain matters because:
- Garments cut off-grain twist and hang awkwardly on the body
- Bias-cut pieces require more fabric and special handling (they stretch while you sew)
- Pattern pieces have grainline arrows showing which direction to align with selvage
- Mixing grain directions in one garment creates fitting problems
Choose lengthwise grain for most garment pieces, it’s the most stable direction. Choose true bias when you need fabric to curve smoothly around necklines, armholes, or when making bias tape. Bias binding wraps around curved edges without puckering.
Common mistake: Ignoring grainline arrows on patterns because “it fits better this way” on your fabric. Off-grain cutting causes garments to twist and sag after wearing.
Do I Need to Know All Sewing Terms as a Beginner?
No, you don’t need to memorize every sewing term before starting your first project. Learning 15-20 core terms covers 90% of beginner pattern instructions. Start with terms related to your specific project, then expand your vocabulary as you tackle new techniques. Most sewers learn terminology naturally through practice rather than memorization.
Essential starter terms (learn these first):
- Seam allowance, right side, wrong side
- Basting, backstitch, topstitch
- Selvage, grain, bias
- Notch, dart, ease
- Press, clip, grade
Intermediate terms (learn as needed):
- Stay stitching, understitching, edge stitching
- Interfacing, stabilizer, fusible
- Pivot, gather, pleat
- Facing, lining, hem allowance
Advanced terms (learn for specific projects):
- Mitering, French seam, Hong Kong finish
- Bagging out, princess seam, gusset
- Muslin (test garment), toile, draping
Most modern patterns include glossaries or diagrams explaining specialized terms. When you encounter an unfamiliar word, look it up in the pattern glossary or search online tutorials. Understanding terms in context (while actually sewing) helps them stick better than studying lists.
Decision rule: If a term appears in your current pattern instructions, learn it. If it doesn’t, skip it for now. You’ll naturally build vocabulary as you complete more projects.
For hands-on learning, explore our collection of beginner sewing techniques that explain terms in context.
What Does Right Side and Wrong Side of Fabric Mean?
The right side of fabric is the front or “public” side intended to show in the finished project, it has brighter colors, clearer prints, or a smoother finish. The wrong side is the back or reverse, often duller or showing loose thread ends. Pattern instructions use “RS” and “WS” abbreviations and assume you can identify which is which before cutting.
How to identify right side:
- Printed fabrics: Right side has sharper, more vibrant colors
- Solid fabrics: Right side is smoother; wrong side may have visible texture or nubs
- Selvage edge: Manufacturer information and color dots are usually on the right side
- Fabric finish: Right side often has a slight sheen or special finish
- Fold test: Fabric is usually folded right sides together on the bolt
When it’s unclear: Some fabrics look identical on both sides (chambray, some knits, reversible fabrics). In these cases, pick one side as “right” and stay consistent throughout your project. Mark the wrong side with tailor’s chalk or a small safety pin.
Why this matters: Pattern instructions tell you to place pieces “right sides together” (RST) or “wrong sides together” (WST) before sewing. Getting this wrong means seams show on the outside of your finished garment.
Common mistake: Mixing up right and wrong sides mid-project, resulting in one seam that shows when others don’t. Mark the wrong side of each cut piece immediately after cutting.
Common Sewing Terms That Confuse Beginners
Several sewing terms sound similar or have meanings that differ from everyday usage, causing confusion for new sewers. Understanding these commonly mixed-up terms prevents mistakes and helps you follow pattern instructions accurately.
Frequently confused pairs:
Clip vs. Notch
- Clip: Small cut into seam allowance (toward but not through the seam line) to help curves lie flat
- Notch: Small triangular cut out of seam allowance or a marking on pattern pieces for alignment
- Use clips on inward curves (necklines), notches on outward curves (princess seams)
Press vs. Iron
- Press: Lift and lower the iron in a stamping motion without sliding
- Iron: Slide the iron across fabric (can stretch or distort seams)
- Always press seams; never iron them during construction
Ease vs. Gather
- Ease: Gently distribute slight excess fabric into a seam without visible puckering
- Gather: Create deliberate, visible ruffles or puckers using long stitches
- Ease is subtle (sleeve caps); gathering is obvious (skirt waistbands)
Trim vs. Grade
- Trim: Cut seam allowance shorter (both layers equally)
- Grade: Cut seam allowance layers to different widths to reduce bulk
- Grade enclosed seams (collars, cuffs); trim open seams
Pivot vs. Turn
- Pivot: Stop with needle down, lift presser foot, rotate fabric, lower foot, continue sewing
- Turn: Finish one seam, cut thread, start a new seam
- Pivot at corners for continuous stitching; turn when changing thread or direction completely
Understanding these distinctions helps you execute techniques correctly. When patterns say “clip curves,” they don’t mean cut notches, they mean make small perpendicular cuts into the seam allowance.
What Is Stay Stitching and When Do I Use It?
Stay stitching is a line of regular-length stitches sewn through a single fabric layer, just inside the seam allowance (usually 1/8 inch from the seam line), immediately after cutting pattern pieces. This stitching stabilizes curved or bias edges, preventing them from stretching out of shape during handling and construction. Stay stitching is never removed.
When to stay stitch:
- Necklines (especially scooped or V-necks)
- Armholes and curved seams
- Any edge cut on or near the bias
- Shoulder seams on knit fabrics
- Waistlines before attaching waistbands
How to stay stitch correctly:
- Sew immediately after cutting, before handling pieces extensively
- Use regular stitch length (2.5mm or 10-12 stitches per inch)
- Stitch directionally with the grain (usually from wide end to narrow end)
- Keep stitching just inside the seam allowance so it won’t show in the finished garment
- Don’t backstitch at ends, these stitches stay hidden inside seams
Why direction matters: Stitching against the grain can push and stretch fabric. Always stitch from the widest part of a curve toward the narrowest (from shoulder toward neckline point, for example).
Common mistake: Skipping stay stitching to save time, then discovering stretched-out necklines that won’t fit properly. The two minutes spent stay stitching saves hours of frustration later.
When to skip it: Straight edges cut on lengthwise grain rarely need stay stitching. Stable fabrics like denim or canvas may not require it either.
Ultra sharp: Made of high carbon steel which is stronger than stainless steel, the thread snips have great qualities including good edge retention and ability to make clean cut through thread.
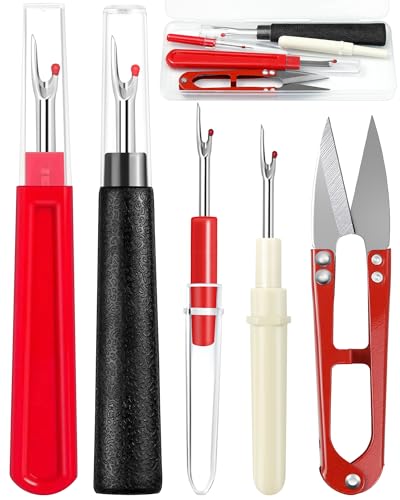
Dual-Style Seam Ripper Set (4-Piece) - Includes 2 complete pairs (1 large + 1 small each) in vibrant red and classic black/white. The 5.5" large rippers handle thick fabrics, while 3.5" small rippers work on delicate materials. Choose colors to match your style or workspace needs.

Topstitch Heavy-Duty Thread 33yd-Bone
Is Interfacing the Same as Stabilizer?
No, interfacing and stabilizer serve different purposes, though both add structure to fabric. Interfacing is a support fabric fused or sewn between layers to add body, shape, and structure to specific garment areas permanently. Stabilizer is a temporary support used during embroidery or decorative stitching to prevent puckering, then removed after sewing.
Interfacing characteristics:
- Becomes permanent part of the garment
- Available in fusible (iron-on) or sew-in types
- Comes in various weights (light, medium, heavy)
- Used in collars, cuffs, waistbands, button plackets, bag bodies
- Adds structure and prevents stretching
Stabilizer characteristics:
- Temporary support removed after stitching
- Types include tear-away, wash-away, cut-away, heat-away
- Used for machine embroidery, appliqué, buttonholes on knits
- Prevents fabric from puckering or tunneling under dense stitching
- Doesn’t add permanent structure
Choose interfacing when: You want to add permanent body to fabric (collar points that stay crisp, waistbands that don’t roll, button areas that don’t pucker).
Choose stabilizer when: You’re adding decorative stitching or embroidery and need temporary support to prevent distortion during sewing.
Can’t substitute one for the other: Using stabilizer where you need interfacing means your collar will be floppy. Using interfacing where you need stabilizer means you can’t remove it and may have stiff, uncomfortable embroidery.
For more on maintaining your machine when working with these materials, see our guide on how often to service your sewing machine.
Sewing Terms for Hand Stitching vs Machine Stitching
Hand stitching and machine stitching use different terminology, though some terms overlap. Understanding which terms apply to which method prevents confusion when following instructions that mix both techniques.
Hand-stitching specific terms:
- Running stitch: Basic in-and-out stitch for seams or gathering
- Backstitch: Strong hand stitch that mimics machine stitching
- Slip stitch: Nearly invisible stitch for hems and closing openings
- Whip stitch: Diagonal stitch over edges for joining or finishing
- Blanket stitch: Decorative edge stitch with perpendicular loops
- Basting stitch: Long, temporary running stitch
Machine-stitching specific terms:
- Backstitch: Reverse stitching to lock thread at seam ends
- Topstitch: Visible decorative stitching on garment right side
- Edge stitch: Stitching very close (1/8 inch or less) to an edge or seam
- Stitch in the ditch: Stitching exactly in the seam groove from the right side
- Zigzag: Side-to-side stitch for stretch or finishing edges
- Overlock: Edge-finishing stitch (requires serger or special machine)
Terms used for both:
- Seam: Joined fabric edges (can be hand or machine sewn)
- Hem: Finished lower edge (can use hand slip stitch or machine topstitch)
- Gathering: Creating ruffles (can use hand running stitch or machine basting)
- Basting: Temporary stitching (both methods work)
Pattern clues: Instructions usually specify “hand stitch” or “machine stitch” when it matters. If not specified, assume machine stitching for structural seams and hand stitching for invisible finishing.
When to choose hand stitching: Invisible hems, closing stuffed toy openings, attaching linings, sewing on buttons, repairs where machine access is difficult.
When to choose machine stitching: All structural seams, topstitching, edge finishing, any seam requiring strength or speed.
What Does Ease Mean in a Sewing Pattern?
In sewing, ease refers to the extra room built into a garment beyond your body measurements, allowing for movement and comfort. Patterns include two types of ease: wearing ease (minimum room needed to move) and design ease (extra fullness for style). Understanding ease helps you choose the right pattern size and predict how a finished garment will fit.
Wearing ease (functional):
- Minimum extra space needed to sit, bend, breathe, and move
- Typically 2-4 inches in bust, 1-2 inches in waist, 2-3 inches in hips
- Fitted garments have minimal wearing ease
- Without adequate wearing ease, garments are uncomfortable or tear
Design ease (stylistic):
- Extra fullness beyond wearing ease that creates the garment’s style
- Oversized sweaters might have 10+ inches of design ease
- Fitted sheath dresses have minimal design ease
- Determines whether a garment looks fitted, relaxed, or oversized
Total ease = Wearing ease + Design ease
Pattern envelope clues: Patterns often describe fit as “close-fitting” (minimal ease), “fitted” (2-3 inches ease), “semi-fitted” (3-4 inches ease), “loose-fitting” (4-5 inches ease), or “very loose-fitting” (5+ inches ease).
Ease also means a technique: When pattern instructions say “ease the sleeve cap into the armhole,” they mean gently distribute slight excess fabric (usually 1/2 to 1 inch) into a seam without creating visible gathers. This technique adds shape and allows the sleeve to curve over your shoulder naturally.
Common mistake: Choosing pattern size based on ready-to-wear clothing size instead of body measurements plus ease. Pattern sizes run larger than store sizes because they include ease.
Mistakes Beginners Make with Sewing Terminology
Misunderstanding sewing terms leads to construction errors that can ruin projects. Recognizing these common terminology mistakes helps beginners avoid frustration and wasted fabric.
Top terminology mistakes:
1. Confusing seam allowance with seam line
- Mistake: Sewing along the cut edge instead of 5/8 inch in
- Result: Garment ends up too small, seams pull apart
- Fix: Always measure from the cut edge to find the seam line
2. Ignoring “right sides together” instructions
- Mistake: Sewing with wrong sides together when pattern says RST
- Result: Seams show on the outside of the garment
- Fix: Double-check fabric orientation before every seam
3. Cutting on the wrong grain
- Mistake: Ignoring grainline arrows to save fabric or “make it fit”
- Result: Garment twists, hangs crooked, or doesn’t drape correctly
- Fix: Always align grainline arrows parallel to selvage, even if it wastes fabric
4. Skipping directional instructions
- Mistake: Not noticing “stitch from A to B” or “press toward darker fabric”
- Result: Stretched seams, visible press marks, or distorted pieces
- Fix: Read complete instructions before starting each step
5. Mixing up press and iron
- Mistake: Sliding the iron across seams instead of lifting and pressing
- Result: Stretched, distorted seams that won’t lie flat
- Fix: Use a stamping motion, lift, press, lift, move, press
6. Treating basting as permanent stitching
- Mistake: Using regular stitch length for basting
- Result: Can’t remove basting stitches without damaging fabric
- Fix: Always use longest stitch length for machine basting
7. Assuming all patterns use the same seam allowance
- Mistake: Not checking pattern instructions for seam allowance width
- Result: Garment doesn’t fit, pieces don’t match up
- Fix: Check every pattern, quilting uses 1/4 inch, garments typically use 5/8 inch, vintage patterns vary
Prevention strategy: Keep a beginner sewing glossary bookmarked or printed near your sewing machine. Look up unfamiliar terms before cutting fabric, not after making mistakes.
Free Printable Sewing Glossary PDF for Beginners
While this article serves as your comprehensive sewing glossary, having a quick-reference sheet at your sewing table helps when you’re mid-project and encounter an unfamiliar term. Many sewing websites and pattern companies offer free downloadable glossary PDFs designed for beginners.
What to look for in a good glossary PDF:
- Alphabetical organization for quick lookups
- Clear definitions in plain language without jargon
- Visual diagrams showing techniques like clipping, grading, and grain direction
- Common abbreviations (RST, WST, SA, CF, CB)
- Measurement conversions (metric to imperial)
- Stitch length guides for different techniques
How to use a printed glossary effectively:
- Print on cardstock or laminate for durability
- Keep it near your sewing machine for quick reference
- Highlight terms you use frequently
- Add your own notes or clarifications in margins
- Update it as you learn new techniques
DIY option: Create your own personalized glossary by writing down terms as you encounter them, with definitions in your own words. This active learning approach helps terms stick better than reading pre-made lists.
Digital alternative: Bookmark reliable sewing websites on your phone or tablet for quick term lookups while sewing. Many sewers keep a dedicated sewing notebook app with their personal glossary, notes, and project ideas.
Beyond basic terms: As you advance, look for specialized glossaries for specific techniques (quilting terms, tailoring vocabulary, knit fabric terminology) to expand your knowledge in areas that interest you.
For troubleshooting common issues while learning, check our guide on why your sewing machine might be jamming.


NOT for Inkjet Printers.

What You Can Get: you will receive 150 pcs of 8.5 x 11 inches printable Semi Gloss cardstock, can be applied for your invitation, cards and so on; Sufficient for your daily using, you can also share them with others
How to Understand Pattern Instructions Without Knowing Terms
Pattern instructions can feel overwhelming when you’re new to sewing, but you don’t need to memorize a complete glossary before starting. Several strategies help you decode instructions and complete projects successfully even when terminology is unfamiliar.
Strategies for decoding pattern instructions:
1. Read instructions completely before cutting
- Identify unfamiliar terms before you start
- Look up 3-5 unknown terms at once rather than stopping repeatedly
- Get an overview of the construction sequence
2. Use pattern diagrams and illustrations
- Most patterns include step-by-step drawings
- Visual guides often clarify confusing written instructions
- Match illustration numbers to instruction steps
3. Watch video tutorials for your specific pattern
- Search “[pattern name] sew-along” on YouTube
- Many pattern designers offer free video instructions
- Seeing techniques demonstrated clarifies terminology
4. Start with beginner-friendly patterns
- Look for patterns labeled “easy” or “beginner”
- Beginner patterns use simpler terminology and fewer techniques
- Some patterns include expanded glossaries and extra guidance
5. Join online sewing communities
- Post questions in sewing forums or Facebook groups
- Other sewers can explain terms in beginner-friendly language
- Many communities offer pattern-specific help threads
6. Keep a running glossary
- Write down new terms as you encounter them
- Define them in your own words after looking them up
- Review your personal glossary before starting new projects
7. Use pattern instruction keys
- Most patterns include a legend explaining abbreviations
- Check the instruction sheet for a glossary section
- Common abbreviations: RS (right side), WS (wrong side), SA (seam allowance), CF (center front), CB (center back)
Pattern instruction reading order:
- Read fabric requirements and notions list
- Review all instruction steps without starting
- Look up unfamiliar terms
- Study diagrams and match them to written steps
- Begin construction, referring back to instructions frequently
When instructions are truly unclear: Contact the pattern company’s customer service. Most designers want you to succeed and will clarify confusing instructions. Independent pattern designers are often especially responsive to questions.
For maintaining your machine as you learn, see our guide on how often to change your sewing needle.

PATTERN S1563 SIZING: Simplicity pattern includes women's, men's, and teens' sizes XS-XL so you can sew your ideal fit. Pattern sizing runs differently from ready-to-wear clothing, so measure and check the body size chart before cutting.


FAQ
What are the most important sewing terms for absolute beginners? The essential terms are seam allowance (fabric between stitch line and edge), right side and wrong side (front and back of fabric), grain (fabric thread direction), selvage (finished fabric edge), basting (temporary stitching), and backstitch (locking stitches at seam ends). These six terms appear in nearly every beginner pattern.
How long does it take to learn basic sewing terminology? Most beginners become comfortable with 15-20 core sewing terms within 2-3 projects or about 10-15 hours of sewing time. You’ll naturally learn terms in context as you follow pattern instructions, making them easier to remember than studying lists. Advanced terminology develops over months as you tackle more complex projects.
Do sewing terms differ between countries? Yes, some terms vary between American and British English. Americans say “notions” while British sewers say “haberdashery.” Americans use “muslin” for test garments; British sewers say “toile.” Seam allowances are measured in inches (US) or centimeters (UK/Europe). Most modern patterns clarify regional terminology differences.
What’s the difference between a dart and a pleat? A dart is a tapered fold sewn to a point, creating shape by removing fabric in a triangular wedge (common in bust, waist, and shoulder areas). A pleat is a fold in fabric that creates fullness, with the fold extending the full length of the fabric section (common in skirts and curtains). Darts shape; pleats add volume.
Why do patterns use abbreviations instead of full words? Pattern instructions use abbreviations (RS, WS, SA, CF, CB) to save space on instruction sheets and make steps easier to scan quickly. Once you learn common abbreviations, they actually speed up your reading and comprehension. Most patterns include an abbreviation key on the instruction sheet.
What does “grade a seam” mean? Grading means trimming seam allowance layers to different widths to reduce bulk in enclosed seams. Typically, you trim the seam allowance closest to the garment body to 1/4 inch and the outer layer to 1/8 inch. This creates a graduated edge that lies flatter and is less visible from the right side, especially important in collars, cuffs, and waistbands.
Is there a difference between hemming and finishing? Yes. Hemming specifically refers to finishing the bottom edge of a garment by folding and stitching fabric to create a clean edge. Finishing is a broader term covering any method of treating raw fabric edges to prevent fraying, including hemming, serging, zigzag stitching, binding, or pinking. All hems are finishes, but not all finishes are hems.
What does “clip corners” mean in sewing instructions? Clipping corners means cutting diagonally across seam allowances at corner points before turning a project right side out. This removes bulk so corners turn sharply and crisply instead of being rounded or lumpy. Cut close to (but not through) the stitching line, typically leaving about 1/8 inch of seam allowance.
Do I need different terms for hand sewing versus machine sewing? Some terms are specific to each method. Machine sewing uses terms like backstitch (reverse stitching), zigzag, and topstitch. Hand sewing uses terms like slip stitch, whip stitch, and blanket stitch. However, many terms (seam, hem, basting, gathering) apply to both methods. Pattern instructions specify which method to use when it matters.
What’s the difference between interfacing and lining? Interfacing is a stabilizing fabric fused or sewn between outer fabric and facing to add structure and body (used in collars, cuffs, waistbands). Lining is a separate fabric layer that covers the inside of a garment to hide seams and make it easier to put on and take off. Interfacing adds structure; lining adds finish and comfort.
Why do some patterns say “press” and others say “iron”? Pressing means lifting and lowering the iron in a stamping motion without sliding, which sets seams without stretching or distorting fabric. Ironing means sliding the iron across fabric, appropriate for removing wrinkles from flat fabric but risky during construction. Quality patterns use “press” for construction steps because it’s the correct technique for seams.
What does “understitch” mean and when do I use it? Understitching is a line of stitching through the facing and seam allowances very close to the seam line, visible only from the inside of the garment. It prevents facings from rolling to the outside and keeps them lying flat inside necklines, armholes, and front openings. Understitch after sewing and grading the seam but before turning the facing to the inside.
Conclusion
A solid understanding of basic sewing terminology transforms pattern instructions from confusing jargon into clear, actionable steps. This sewing glossary covering terms every beginner should know gives you the foundation to tackle projects with confidence, from understanding the difference between seam allowance and seam line to knowing when to cut on the bias versus the grain.
Your next steps:
- Start with one simple project that uses 5-10 terms from this glossary
- Look up unfamiliar terms as you encounter them rather than trying to memorize everything upfront
- Keep this glossary bookmarked or print a quick-reference sheet for your sewing space
- Join a beginner sewing community online where you can ask questions about terminology
- Practice new terms by using them when describing your projects to other sewers
Remember that every experienced sewer started exactly where you are now, puzzling over the difference between basting and stay stitching or wondering which side of the fabric is “right.” Learning sewing terminology is a gradual process that happens naturally as you complete projects. Focus on understanding the terms relevant to your current project, and your vocabulary will expand organically with each new technique you master.
The most important takeaway: you don’t need to know every term before you start sewing. Begin with the basics, learn as you go, and refer back to resources like this glossary whenever you encounter something new. Your sewing journey is just beginning, and understanding these fundamental terms gives you the language to learn, grow, and create beautiful projects for years to come.
For more beginner-friendly guidance, explore our complete collection of sewing tips and techniques.


