


Twin needle sewing creates two parallel rows of topstitching on the fabric surface while forming a zigzag stitch underneath, giving hems and seams a professional, ready-to-wear finish. This technique works on most home sewing machines without special attachments, using two needles mounted on a single shank that share one bobbin thread. Learning how to sew with a twin needle transforms basic hems into polished, stretchy finishes perfect for knit garments.
Key Takeaways
- Twin needles create professional double-topstitched hems with a single pass, ideal for T-shirts, activewear, and knit garments
- Most home sewing machines accommodate twin needles as long as they have a zigzag function and sufficient throat space
- Threading requires two separate thread spools that follow independent paths through the tension discs but share a single bobbin
- Tunneling (fabric ridging between stitches) is preventable by adjusting tension, using a stretch stitch, and choosing the right needle width
- Common sizes range from 1.6mm to 6.0mm spacing, with 2.5mm and 4.0mm being most popular for knit hems
- No special bobbin is needed, use regular thread and standard bobbin setup
- Skipped stitches usually indicate tension problems or incorrect needle-fabric pairing
- Twin needles cost $3-8 per pack and are available at fabric stores, craft retailers, and online
What Is a Twin Needle and How Does It Work?
A twin needle (also called a double needle) consists of two needle shafts attached to a single crossbar that fits into your machine’s needle clamp. The two needles sit parallel to each other, spaced anywhere from 1.6mm to 6.0mm apart depending on the needle size. When you sew, both needles pierce the fabric simultaneously, creating two straight lines of topstitching on the right side.
Underneath the fabric, the magic happens: both top threads loop around a single bobbin thread, forming a zigzag pattern that connects the two parallel lines. This zigzag provides stretch, which is why twin needles are the go-to choice for hemming knit fabrics like T-shirts, leggings, and jersey dresses.
Key components:
- Two needle shafts on one shank
- Single flat side (like regular needles) for proper installation
- Shared bobbin thread creates the connecting zigzag
- Available in universal, stretch, and specialty point types
The technique mimics the double-needle hems you see on store-bought clothing, giving your handmade garments that coverstitch appearance without needing a specialized machine.
Twin Needle vs Regular Needle for Hemming
Twin needles produce a stretchy, professional hem with two visible stitch lines, while regular needles create a single line that may break when stretched on knit fabrics. For woven fabrics like cotton shirting or linen, a regular needle with a straight or zigzag stitch works perfectly fine. But for knits, the twin needle’s built-in stretch prevents popped stitches when the garment is pulled on or worn.
Choose a twin needle when:
- Hemming knit fabrics (T-shirts, sweatshirts, activewear)
- You want a ready-to-wear, double-topstitch look
- The fabric needs to stretch without breaking threads
- Creating decorative parallel topstitching on any fabric type
Stick with a regular needle when:
- Hemming woven fabrics that don’t stretch
- Sewing curved hems (twin needles work best on straight or gently curved seams)
- Your machine throat space is too narrow for the needle width
- You prefer an invisible hem (use a blind hem stitch instead)
The twin needle doesn’t replace your regular needle for all sewing tasks, it’s a specialized tool that excels at specific applications, particularly knit hems and decorative topstitching.

𝑩𝒊𝒓𝒕𝒉𝒅𝒂𝒚 𝑮𝒊𝒇𝒕𝒔 𝑰𝒅𝒆𝒂𝒔: This sewing kit is terrific gifts for people who travel frequently, mother, grandmother, backpacker, adults, kids and teen girls! The emergency kit is also suitable for both men and women, beginners and professionals alike, and it is definitely something that everyone needs in their life

Twin (130/705 H ZWI) Sewing Machine Needles

THICK WAXED THREAD: sturdy upholstery thread, 0.55mm thick and 22 yards per spool. Made from high-quality 100% polyester, ensuring excellent durability
What Fabrics Can You Use a Twin Needle On?
Twin needles work on nearly all fabric types, but they shine brightest on knit fabrics where stretch and recovery matter. Jersey, interlock, French terry, ribbing, and athletic knits all benefit from the twin needle’s stretchy zigzag underside. The technique also works beautifully on stable knits like ponte and double knit.
For woven fabrics, twin needles create attractive decorative topstitching on cotton, linen, denim, and chambray. The stitching won’t have stretch (which wovens don’t need), but you’ll get that professional double-needle look for jeans-style hems, yokes, and design details.
Best fabric matches:
- Lightweight knits (2.5mm or 3.0mm needle spacing)
- Medium-weight knits (3.0mm or 4.0mm spacing)
- Heavy knits and fleece (4.0mm or 6.0mm spacing)
- Woven cotton and linen (any spacing for decorative work)
- Denim (4.0mm spacing with size 100/16 needles)
Avoid or use caution with:
- Very sheer fabrics (may show excessive puckering)
- Thick upholstery fabrics (may exceed machine capacity)
- Leather and vinyl (holes are permanent; practice first)
Always test on a scrap of your project fabric first. Adjust tension and stitch length until you get smooth, flat stitching without tunneling or puckering.
How to Thread a Twin Needle on a Sewing Machine
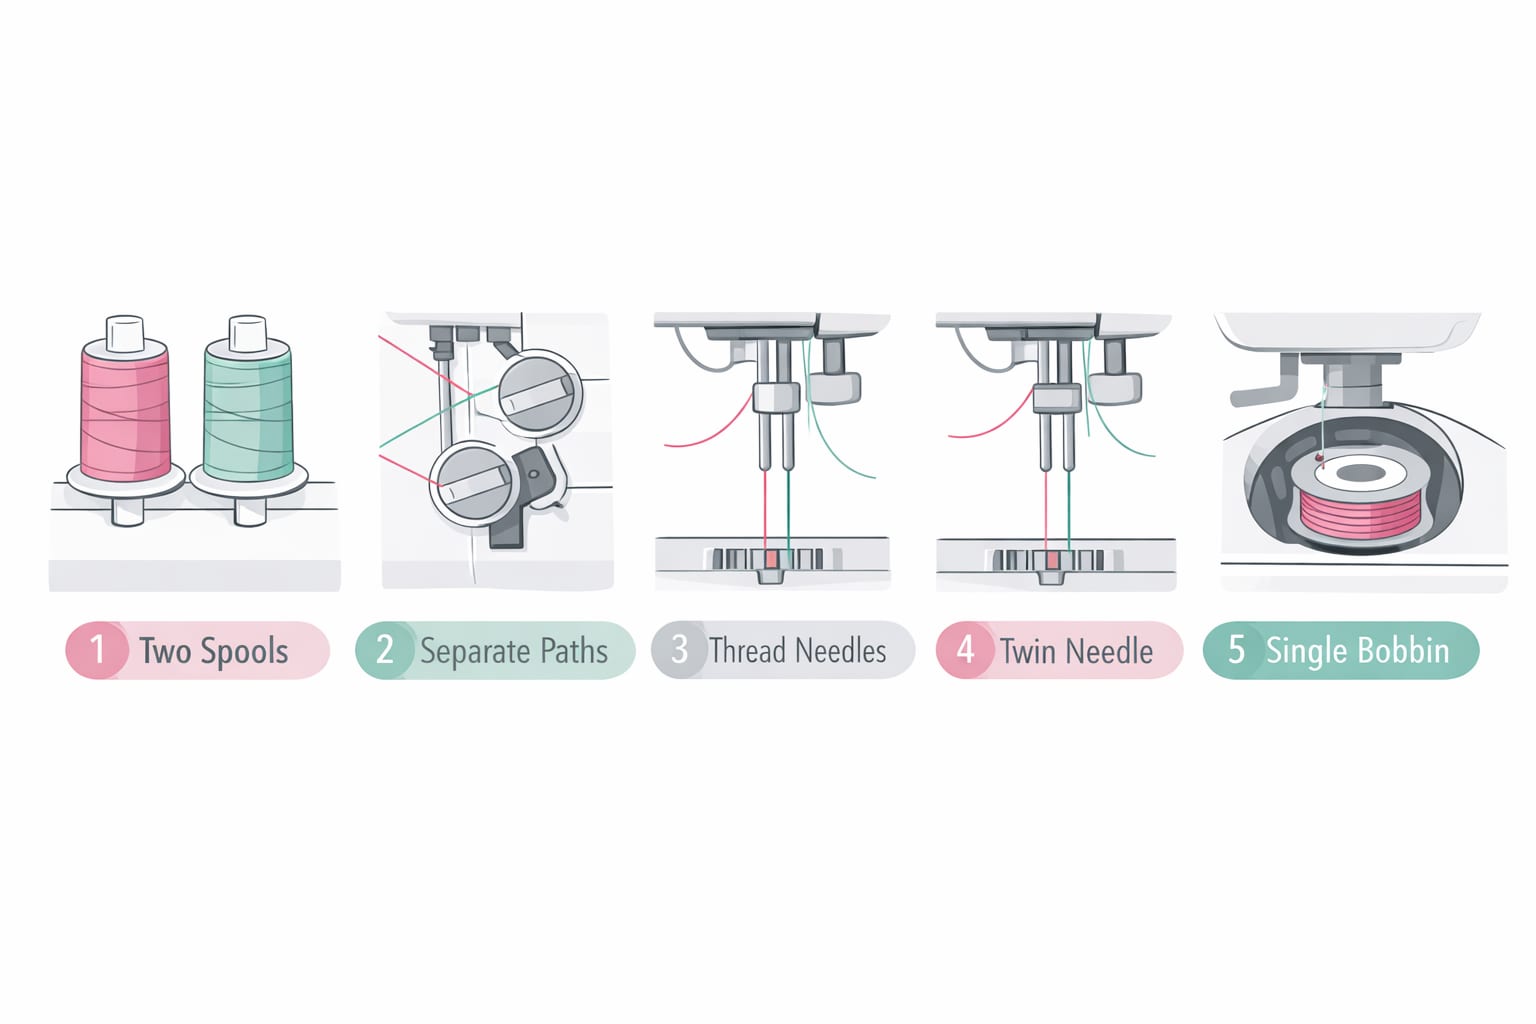
Threading a twin needle requires two separate thread spools that follow independent paths through your machine’s threading system, then each thread goes through its own needle eye. The key is keeping the threads separated until they reach the needles, they should not twist together.
Step-by-step threading process:
Install the twin needle with the flat side facing back, just like a regular sewing machine needle. Tighten the needle clamp screw securely.
Place two thread spools on your machine. If you have two spool pins, use both. If you only have one vertical pin, place one spool on the pin and one on the horizontal auxiliary pin (or use a thread stand).
Thread the first spool through the left side of your tension discs, following your machine’s normal threading path, and thread it through the left needle eye.
Thread the second spool through the right side of the tension discs (or skip the tension discs entirely for the second thread on some machines, check your manual), and thread it through the right needle eye.
Wind and insert your bobbin normally. Use regular thread, no special bobbin thread needed.
Pull both top threads and the bobbin thread to the back before you start sewing.
Common threading mistake: Letting both threads pass through the same tension disc slot creates uneven tension. Keep them separated through the entire threading path until they reach their respective needles. Some sewers find it helpful to use two different thread colors during setup to track each thread’s path clearly.
If your machine manual includes twin needle instructions, follow those specific guidelines, as threading paths vary slightly by brand and model. For more general needle installation tips, see our guide on how to insert a sewing machine needle.
Can All Sewing Machines Use Twin Needles?
Most modern home sewing machines can use twin needles if they have a zigzag function and sufficient throat space, but not every machine accommodates every needle width. The critical measurement is the distance from the needle position to the inside of the presser foot or throat plate, your needle width must fit within that space without hitting metal.
Machine requirements:
- Zigzag capability (the needle must be able to move side-to-side)
- Adequate throat space (measure the widest zigzag your machine allows)
- Front-loading bobbin or drop-in bobbin (both work fine)
- Two spool pins (or one vertical pin plus a horizontal auxiliary pin)
To check compatibility:
- Set your machine to its widest zigzag stitch
- Manually turn the handwheel to lower the needle
- Measure the distance the needle travels left-to-right
- Choose a twin needle narrower than that measurement
For example, if your machine’s maximum zigzag width is 5mm, you can safely use twin needles up to 4.0mm spacing. Using a 6.0mm needle on that machine would cause the needles to strike the presser foot or throat plate, breaking the needles and potentially damaging your machine.
Machines that typically don’t support twin needles:
- Straight-stitch-only vintage machines
- Some mini/portable machines with very narrow throat plates
- Industrial single-needle machines
When in doubt, consult your machine manual or test with the presser foot raised and the machine unplugged, manually turning the handwheel to verify clearance. Many machines have a twin needle setting that limits the stitch width automatically for safety.
Best Twin Needle Size for Knit Fabric Hems
For most knit fabric hems, a 4.0mm/75 or 4.0mm/90 twin needle delivers the best results, creating that classic ready-to-wear hem spacing with enough stretch to prevent thread breakage. The first number (4.0mm) indicates the distance between the two needles, while the second number (75 or 90) indicates the needle thickness in European sizing.
Needle size selection guide:
| Fabric Weight | Recommended Spacing | Needle Size | Best For |
|---|---|---|---|
| Lightweight jersey, modal | 2.5mm or 3.0mm | 75/11 | Baby clothes, lingerie, lightweight tees |
| Medium-weight T-shirt knit | 4.0mm | 75/11 or 90/14 | Most T-shirts, casual knit tops |
| Sweatshirt fleece, French terry | 4.0mm or 6.0mm | 90/14 or 100/16 | Hoodies, sweatpants, activewear |
| Athletic/performance knits | 2.5mm or 4.0mm | Stretch 75/11 | Leggings, sports bras, yoga wear |
Choosing needle thickness:
- 75/11: Lightweight to medium knits, prevents large holes
- 90/14: Medium to heavy knits, most versatile choice
- 100/16: Heavy knits and fleece only
Stretch vs. universal points: Use stretch-point twin needles (marked “Stretch” or with a yellow band on Schmetz needles) for very stretchy fabrics like spandex blends, athletic knits, and swimwear. Universal-point twin needles work fine for standard jersey and interlock knits.
The 4.0mm spacing mimics commercial garment construction and provides enough stretch for comfortable wear without looking too wide or too narrow. If you’re just starting with twin needles, buy a 4.0mm/90 universal twin needle first, it handles about 80% of typical knit hemming projects.

Twin (130/705 H ZWI) Sewing Machine Needles
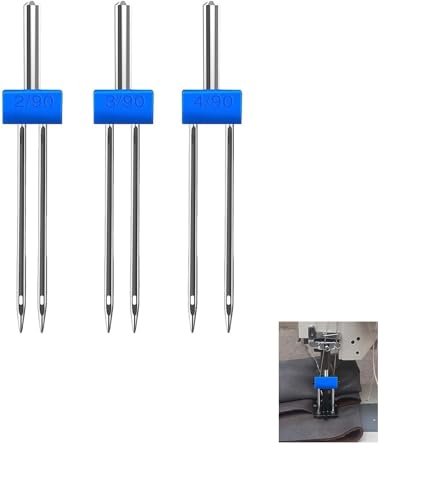
Package Includes - 3 x Twin Needles 2.0/ 90, 3.0/ 90, 4.0/ 90, the sizes are clearly marked on the blue area.

Twin (130/705 H ZWI) Sewing Machine Needles
Why Does My Twin Needle Keep Skipping Stitches?
Twin needle stitch skipping usually happens when the needle can’t properly catch the bobbin thread, most often caused by incorrect tension settings, a dull or damaged needle, or using the wrong needle type for your fabric. The problem appears as gaps in one or both stitch lines where the needle failed to form a complete stitch.
Primary causes and fixes:
1. Tension too tight
- Loosen the upper thread tension by 1-2 numbers
- Check that both threads move freely through the tension discs
- Ensure threads aren’t tangled or caught anywhere in the thread path
2. Dull or damaged needle
- Replace the twin needle if you’ve sewn more than one project with it
- Check for bent needle tips or burrs
- Change needles regularly to prevent skipped stitches
3. Wrong needle type for fabric
- Use stretch-point needles for high-stretch knits
- Use ballpoint needles for standard knits
- Universal needles may skip on very stretchy fabrics
4. Sewing too fast
- Slow down, especially on thick seams or stretchy fabrics
- Let the machine feed the fabric at its own pace
- Don’t pull or push the fabric
5. Incorrect needle size
- Too-small needles can’t penetrate thick fabrics properly
- Too-large needles create holes that don’t grip the thread
- Match needle size to fabric weight
Quick troubleshooting checklist:
- Rethread both top threads completely
- Check that the bobbin is wound smoothly and inserted correctly
- Clean lint from the bobbin area and feed dogs
- Test on a fabric scrap with adjusted tension before returning to your project
If skipping persists after trying these fixes, the issue may be with your machine’s timing or hook mechanism, which requires professional service. For more needle troubleshooting, see our guide on why needles keep breaking.
Twin Needle Tunneling: How to Fix It
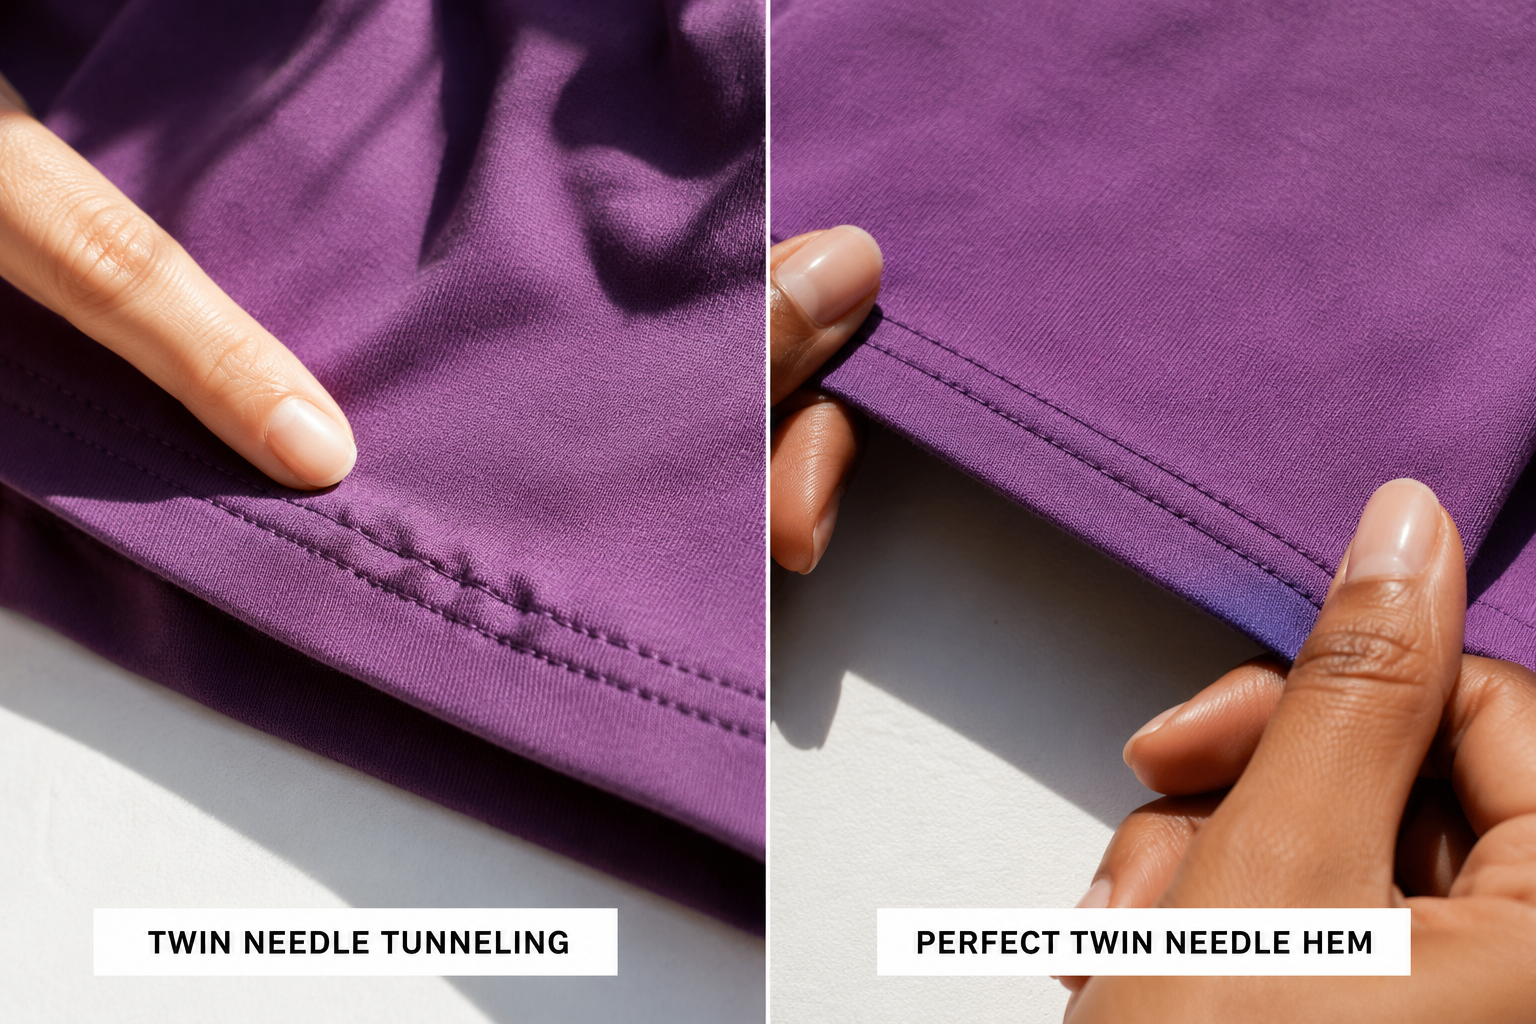
Tunneling is the raised ridge of fabric that forms between the two lines of twin needle stitching, creating a visible “tunnel” or “tram line” effect that looks unprofessional. This happens when the fabric gets pushed up between the needles due to tight tension, incorrect stitch settings, or the fabric’s natural tendency to compress.
Most effective solutions:
1. Loosen upper thread tension
- Reduce tension by 1-2 settings from your normal straight stitch tension
- Test on scrap fabric and adjust incrementally
- Some machines have a specific twin needle tension setting
2. Use a stretch stitch instead of straight stitch
- Set your machine to a narrow zigzag (0.5mm width) or lightning/stretch stitch
- The slight side-to-side motion prevents fabric compression
- This is the single most effective anti-tunneling technique
3. Increase stitch length
- Use 3.0mm to 3.5mm stitch length instead of shorter stitches
- Longer stitches reduce fabric compression between needle penetrations
- Too-short stitches (under 2.5mm) almost always cause tunneling on knits
4. Use a stabilizer
- Place water-soluble stabilizer or tissue paper under the fabric while sewing
- Tear away after stitching
- Particularly helpful on very stretchy or lightweight knits
5. Press with steam after sewing
- Many minor tunneling issues relax with steam pressing
- Hold the iron above the fabric and steam without pressing down
- Let the fabric cool completely before handling
6. Choose a narrower twin needle
- Switch from 4.0mm to 2.5mm spacing
- Narrower spacing reduces the fabric area that can tunnel
- Works well on lightweight knits
Fabric-specific tip: Some fabrics tunnel more than others. Thin, stretchy jerseys and ribbing are most prone to tunneling. Stable knits like ponte and double knit rarely tunnel. If you’ve tried all adjustments and tunneling persists, the fabric itself may not be suitable for twin needle hemming, consider a coverstitch machine or a different hem technique.
For more on tension adjustments, see our detailed guide on sewing machine tension.
Do You Need a Special Bobbin for Twin Needle Sewing?
No special bobbin is required for twin needle sewing, use your machine’s standard bobbin wound with regular thread in a color that matches your fabric or top thread. The twin needle setup uses one bobbin thread that zigzags between the two top threads on the underside of the fabric, so the bobbin thread will be visible on the wrong side of your work.
Bobbin setup guidelines:
- Thread type: Use the same thread you’d use for regular sewing (polyester all-purpose thread works great)
- Bobbin winding: Wind the bobbin at normal tension, not too tight or too loose
- Thread color: Choose a color that matches your fabric’s wrong side or blends with your top threads
- Bobbin tension: Keep bobbin tension at the standard setting (don’t adjust unless you’re experiencing specific problems)
Common bobbin-related mistakes:
Using bobbin thread that’s too thick
- Thick bobbin thread creates bulky zigzags underneath
- Stick with regular-weight thread for smoothest results
Over-tightening bobbin tension
- Causes the fabric to pucker and the top threads to pull through to the underside
- Leave bobbin tension at factory settings unless your manual specifies otherwise
Underfilled or overfilled bobbins
- Can cause uneven tension and thread breakage
- Wind bobbins to about 80% capacity for consistent feeding
The underside zigzag pattern is normal and expected with twin needle sewing. If you’re seeing loops, bunching, or thread nesting underneath, the problem is usually with top thread tension or threading, not the bobbin itself.
Twin Needle Breaking Thread Underneath: Troubleshooting
When the bobbin thread breaks repeatedly during twin needle sewing, the most common culprits are excessive upper thread tension, a rough bobbin case, or the bobbin thread catching on burrs in the hook mechanism. This is frustrating because you may not notice the break until you’ve sewn several inches and see the stitches unraveling.
Systematic troubleshooting steps:
1. Check and adjust upper tension
- Loosen upper tension by 1-2 settings
- Too-tight top threads pull excessively on the bobbin thread
- Test on scrap fabric after each adjustment
2. Inspect the bobbin case
- Remove the bobbin and case
- Run a cotton swab or soft cloth through the bobbin case slot
- Feel for rough spots or burrs that could catch thread
- A tiny burr can shred thread repeatedly
3. Check bobbin thread path
- Ensure the bobbin thread is correctly threaded through the tension spring
- Verify the bobbin is inserted in the correct direction
- Some machines are very particular about bobbin orientation
4. Examine the needle plate
- Look for scratches or burrs around the needle holes
- A damaged needle plate can catch and break bobbin thread
- Replace if damaged
5. Verify needle installation
- Confirm the twin needle is fully inserted and tightened
- A loose needle creates erratic stitching that stresses the bobbin thread
- The flat side must face the back
6. Slow down your sewing speed
- High speed increases thread stress
- Sew at moderate speed, especially through thick seams
- Let the machine do the work without forcing
7. Use quality thread
- Cheap or old thread breaks more easily
- Polyester thread is stronger than cotton for twin needle work
- Check that thread isn’t dried out or brittle
When to seek professional help: If you’ve tried all these fixes and thread still breaks consistently, your machine’s timing or hook mechanism may need adjustment. This requires a technician’s expertise. Learn more about when to service your sewing machine.
Is Twin Needle Good for Beginners or Too Advanced?
Twin needle sewing is absolutely beginner-friendly once you understand the basic threading and tension concepts, though it does require a bit more setup than regular single-needle sewing. If you can thread your machine and sew a straight seam, you can learn to use a twin needle in one practice session.
Why it’s beginner-accessible:
- No special machine features required (just zigzag capability)
- Threading is only slightly more complex than regular threading
- Mistakes are easy to spot and fix
- Results look impressively professional with minimal practice
- Inexpensive to try (needles cost $3-8)
Skills you should have first:
- Comfortable threading your machine
- Understanding of basic tension concepts
- Ability to sew straight seams
- Experience with your machine’s stitch length and width settings
Learning curve expectations:
- First attempt: Expect some trial and error with tension and tunneling
- After 2-3 practice runs: You’ll understand how your machine behaves with twin needles
- After one complete project: You’ll feel confident using twin needles regularly
Beginner-friendly first projects:
- Hemming a simple T-shirt or tank top
- Adding decorative topstitching to a tote bag
- Hemming knit pajama pants
- Creating pintucks on a pillow cover
Start with these settings:
- 4.0mm/90 universal twin needle
- Medium-weight cotton jersey fabric
- Stitch length 3.0mm
- Tension reduced by 1 from your normal setting
- Moderate sewing speed
The key to success is practicing on scrap fabric first. Make a test sandwich of your project fabric, sew a 6-inch line, and examine both sides. Adjust tension and stitch length until you get smooth, flat stitching with no tunneling. Then move to your actual project with confidence.
Twin needle sewing is one of those techniques that seems intimidating until you try it, then you wonder why you waited so long. It’s a fantastic skill for beginners to add to their repertoire early on.
Common Mistakes When Sewing With a Twin Needle
Even experienced sewers make predictable mistakes when starting with twin needles, but knowing what to watch for prevents frustration and wasted fabric. These errors account for about 90% of twin needle problems reported by beginners.
Top mistakes and how to avoid them:
1. Not testing on scrap fabric first
- Always sew a test strip on the same fabric you’re using for your project
- Check both sides for tunneling, puckering, and stitch quality
- Adjust settings before touching your actual garment
2. Using the wrong needle width for the machine
- Measure your machine’s maximum zigzag width before buying needles
- A too-wide needle will strike the presser foot or throat plate
- When in doubt, start with 2.5mm or 3.0mm spacing
3. Threading both threads through the same tension disc
- Keep threads separated through the entire threading path
- Each thread needs its own path through the tension system
- Use different colored threads during setup to track each path
4. Sewing too close to the edge
- Twin needles need stable fabric on both sides
- Stay at least 3/8 inch from raw edges
- The fabric can pull or distort if needles are too close to the edge
5. Forgetting to reduce tension
- Twin needles almost always need lower tension than single-needle sewing
- Start by reducing tension by 1-2 settings
- Tight tension causes tunneling and thread breakage
6. Using a straight stitch on stretchy knits
- Straight stitches compress the fabric between needles
- Use a narrow zigzag or stretch stitch instead
- This single change eliminates most tunneling problems
7. Pulling or pushing the fabric
- Let the feed dogs move the fabric at their own pace
- Pulling creates uneven stitches and can break needles
- Guide the fabric gently without forcing
8. Not changing needles frequently enough
- Twin needles dull faster than single needles (two points hitting fabric)
- Replace after each major project or every 6-8 hours of sewing
- Dull needles cause skipped stitches and poor stitch quality
9. Choosing the wrong stitch length
- Too-short stitches (under 2.5mm) cause tunneling and stiffness
- Use 3.0mm to 3.5mm for most knit hemming
- Longer stitches also sew faster and use less thread
10. Sewing over thick seams without preparation
- Thick seam intersections can break needles or cause skipped stitches
- Sew slowly over bulky areas
- Consider trimming seam allowances or grading seams before hemming
One mistake that’s easy to make: forgetting you have a twin needle installed and trying to sew a regular seam. Always remove the twin needle and reinstall a single needle when you’re done with your twin needle project. This prevents accidentally breaking the needles on tasks they’re not designed for.
How to Prevent Fabric Puckering With Twin Needle
Fabric puckering with twin needles shows up as gathered or wrinkled fabric along the stitch lines, caused by too much thread tension pulling the fabric together or by the fabric being compressed as it feeds under the presser foot. Unlike tunneling (which creates a ridge between stitches), puckering affects the entire fabric surface around the stitching.
Prevention strategies:
1. Reduce upper thread tension significantly
- Start 2 settings lower than your normal tension
- Test and adjust until stitches lie flat without pulling
- Very lightweight fabrics may need tension reduced by 3-4 settings
2. Use a walking foot or even-feed foot
- Helps feed top and bottom fabric layers evenly
- Particularly effective on slippery or stretchy fabrics
- Prevents the top layer from being pushed ahead of the bottom layer
3. Increase stitch length
- Longer stitches (3.5mm to 4.0mm) reduce fabric compression
- Short stitches pack too much thread into a small area
- Longer stitches also look more professional on knit hems
4. Support the fabric properly
- Don’t let the fabric hang off the table edge
- Support the weight of the fabric both in front and behind the needle
- Gravity pulling on unsupported fabric causes puckering
5. Use stabilizer underneath
- Tear-away or wash-away stabilizer prevents fabric from being pushed down into the throat plate
- Particularly helpful on lightweight knits and wovens
- Remove stabilizer after sewing
6. Check presser foot pressure
- Reduce presser foot pressure if your machine has this adjustment
- Too much pressure compresses the fabric excessively
- Lighter pressure lets fabric feed more naturally
7. Hold threads when starting
- Hold both top threads and the bobbin thread behind the needle for the first few stitches
- Prevents threads from being pulled into the bobbin area
- Reduces initial puckering at the seam start
Fabric-specific considerations:
- Lightweight knits: Use stabilizer and reduce tension significantly
- Woven cotton: Usually needs less tension adjustment than knits
- Slippery fabrics (satin, rayon): Use a walking foot and support fabric well
- Heavy fabrics: Rarely pucker; focus on needle size instead
If puckering persists after adjusting tension and stitch length, the fabric itself may be too lightweight or unstable for twin needle sewing. Consider using a single needle with a stretch stitch instead, or choose a different hem technique like a rolled hem or bias binding.
Where to Buy Twin Needles and How Much Do They Cost
Twin needles are widely available at fabric stores, craft retailers, and online marketplaces, typically costing between $3 and $8 per package depending on brand and specialty type. Most packages contain one or two needles, and you’ll find the best selection online where specialty sizes and point types are easier to source.
Where to buy:
Local retailers:
- Joann Fabrics (carries Schmetz and Singer brands)
- Hobby Lobby (occasional sales bring prices under $3)
- Local independent fabric shops (often carry premium brands)
- Walmart (limited selection, usually basic universal types)
Online sources:
- Amazon (widest selection, fast shipping)
- Nancy’s Notions (specialty sewing supplier)
- Wawak (bulk pricing for frequent sewers)
- Schmetz website (direct from manufacturer)
Price ranges by type:
- Universal twin needles: $3-5 per pack
- Stretch twin needles: $4-6 per pack
- Specialty types (metallic, embroidery, jeans): $5-8 per pack
- Multi-packs: $12-20 for assorted sizes
Popular brands:
- Schmetz: Industry standard, color-coded by type, excellent quality
- Organ: Japanese brand, very sharp, great for delicate fabrics
- Singer: Widely available, budget-friendly, good for beginners
- Klasse: Premium option, long-lasting
Buying tips:
Start with a variety pack
- Get an assorted pack with 2.5mm, 4.0mm, and maybe 6.0mm needles
- Lets you test different spacings without buying multiple packages
- Usually costs $8-12 for 3-4 needles
Match needle type to your projects
- Universal for general sewing and wovens
- Stretch for athletic knits and high-stretch fabrics
- Ballpoint for standard knits (though universal works fine for most)
Buy extras
- Twin needles are fragile and can break or bend easily
- Having backups prevents project delays
- Needles should be replaced after each major project anyway
Check compatibility first
- Verify the needle width fits your machine before buying
- Most home machines accommodate up to 4.0mm; some handle 6.0mm
- When in doubt, start with 2.5mm or 3.0mm
Storage: Store twin needles in their original packaging or a needle case to protect the delicate points. Label packages with the size and type so you can grab the right needle quickly. Keep them dry and away from moisture to prevent rust.
Twin needles are an inexpensive investment that dramatically upgrades your sewing results, especially for knit garments. A basic universal 4.0mm needle costs about the same as a fancy coffee and will hem multiple T-shirts before needing replacement.
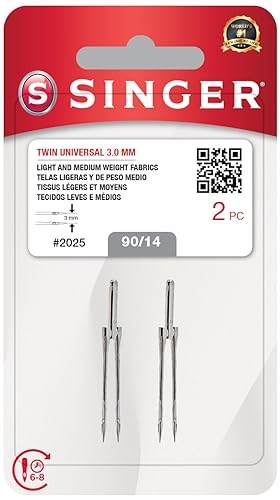
Package contains 2 Genuine

Constructed to provide trouble free sewing

Abundant quantity: each package comes with 18 pieces of twin needles pins with plastic box and 1 piece of automatic needle threader, the twin needles are in 3 different size, 2.0/90, 3.0/90 and 4.0/90, 6 pieces for each size
FAQ
Can you backstitch with a twin needle? Avoid backstitching with a twin needle because the needles can strike each other when the machine reverses, potentially breaking one or both needles. Instead, leave long thread tails at the start and end of your seam, then pull them to the wrong side and tie them off manually, or use a lockstitch function if your machine has one.
What’s the difference between a twin needle and a double needle? Twin needle and double needle are two names for the same tool, two needles mounted on a single shank. Some manufacturers and regions prefer one term over the other, but they’re completely interchangeable. Both create two parallel lines of topstitching with a zigzag underneath.
Can you use a twin needle on a serger? No, twin needles are designed for standard sewing machines only, not sergers. Sergers use a different needle system and stitch formation that isn’t compatible with twin needle construction. For a similar look on a serger, use a coverstitch machine or a serger with coverstitch capability.
How do you turn corners with a twin needle? Turning sharp corners with a twin needle is difficult and can break needles. For corners, stop with the needles down, lift the presser foot, pivot the fabric slightly (not a full 90-degree turn), lower the foot, and continue. For true corners, it’s better to stop the twin needle stitching, switch to a single needle, or plan your design to avoid sharp turns.
Why is one needle thread looser than the other? Uneven thread tension between the two needles usually means one thread isn’t properly seated in the tension discs or one thread is catching somewhere along its path. Rethread both threads completely, ensuring each follows its own path through the tension system. Check that neither thread is caught on the spool or tangled.
Can you use two different colored threads in a twin needle? Yes, using two different colored threads creates attractive decorative effects and is a popular technique for topstitching. Thread each needle with a different color following the same threading path as usual. The bobbin thread will zigzag between both colors on the underside, so choose a bobbin color that blends with both or matches your fabric.
Do you need to change the presser foot for twin needle sewing? Most standard presser feet work fine with twin needles as long as the needle spacing fits within the foot opening. Check that your presser foot has a wide enough slot or opening to accommodate both needles. If your standard foot is too narrow, switch to a zigzag foot, embroidery foot, or open-toe foot.
How do you remove twin needle stitching if you make a mistake? Use a seam ripper to carefully cut one of the two top threads every few stitches, then pull out both top threads. The bobbin thread will come out easily once the top threads are removed. Work slowly to avoid damaging the fabric, especially on delicate knits where the needle holes may be visible.
Can you use metallic thread in a twin needle? Yes, but metallic thread requires special handling because it’s more fragile than regular thread. Use a metallic or topstitch twin needle (which has a larger eye), reduce your sewing speed, loosen tension slightly more than usual, and use a thread lubricant or silicone spray. Test thoroughly on scrap fabric first.
What stitch setting should you use for twin needle hemming? For most knit hemming, use a narrow zigzag stitch (0.5mm width) or a stretch stitch rather than a straight stitch. Set stitch length to 3.0-3.5mm. The slight side-to-side motion prevents tunneling while maintaining a professional appearance. For woven fabrics, a straight stitch works fine.
How close to the edge can you sew with a twin needle? Stay at least 3/8 inch (about 1cm) from any raw edge when using a twin needle. Sewing too close to the edge can cause the fabric to pull or distort, and the needles may catch the edge and break. For hems, fold and press the hem allowance first, then topstitch with the twin needle on stable, folded fabric.
Can you use a twin needle for quilting? Yes, twin needles create beautiful decorative quilting effects with parallel lines. Use a 3.0mm or 4.0mm spacing with a walking foot to feed all quilt layers evenly. Reduce tension slightly and use a longer stitch length (3.5-4.0mm). Twin needle quilting works best on straight or gently curved lines rather than intricate designs.


