


Quick Answer
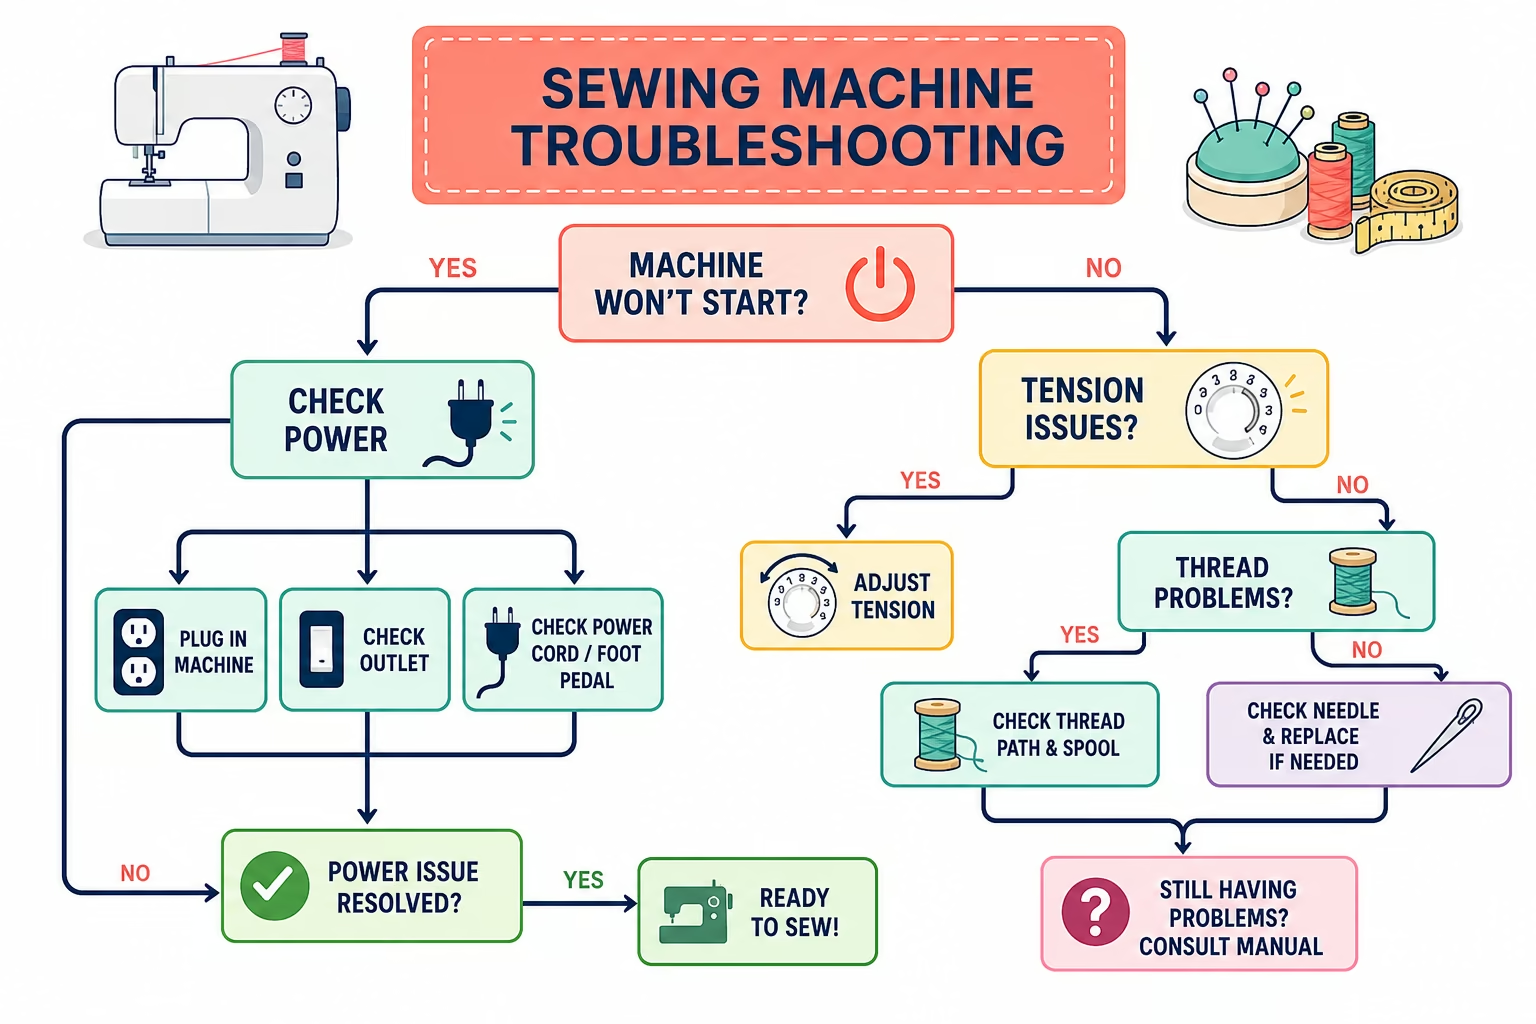
Learning how to troubleshoot any sewing machine using a decision tree approach means following a systematic path from symptom to solution, checking the most common causes first before moving to complex repairs. Start by identifying your machine’s specific problem (won’t turn on, skips stitches, breaks thread, or creates tension issues), then work through targeted checks in order: power and basic settings, threading and needle condition, tension adjustments, and finally mechanical timing. This methodical approach works for mechanical, computerized, and industrial machines, helping you fix 80% of issues at home while knowing when professional service is needed.
Key Takeaways
- Follow a decision tree structure to diagnose sewing machine problems systematically, starting with simple fixes before complex repairs
- Most common issues stem from incorrect threading, wrong needle type, improper tension settings, or lack of regular cleaning
- Tension problems show as loose loops on fabric top (too loose upper tension) or thread bunching underneath (too tight upper tension or bobbin issues)
- Breaking needles usually indicate wrong needle size for fabric, bent needle, improper insertion, or timing problems
- Thread bunching underneath typically means incorrect bobbin threading, damaged bobbin case, or upper tension too tight
- DIY troubleshooting handles 80% of home machine problems; seek professional help for timing issues, motor problems, or computerized errors
- Mechanical vs. computerized machines share the same basic troubleshooting steps for threading, tension, and needles, but computerized models add error codes and electronic diagnostics
- Essential tools include small screwdrivers, tweezers, lint brush, sewing machine oil, spare needles, and your machine’s manual
- Regular maintenance every 8-10 hours of sewing time prevents most problems before they start
What Are the Most Common Sewing Machine Problems and Fixes?
The five most common sewing machine problems are skipped stitches, thread breaking, thread bunching underneath fabric, tension issues creating loose or tight stitches, and needles breaking repeatedly. These account for roughly 80% of all home sewing machine troubles and usually stem from threading errors, wrong needle selection, or tension misadjustment rather than mechanical failure.
Top problems and their quick fixes:
- Skipped stitches, Replace dull or bent needle, rethread machine completely, check needle is inserted correctly with flat side facing back
- Thread keeps breaking, Use fresh quality thread, reduce upper tension slightly, check for burrs in thread path, ensure needle size matches thread weight
- Thread bunching underneath, Rethread bobbin following manual exactly, clean lint from bobbin case, check upper threading path
- Loose or uneven stitches, Adjust tension dial (usually between 3-5 for normal sewing), ensure presser foot pressure is correct for fabric weight
- Needle breaking, Use correct needle type and size for fabric, insert needle fully and tighten screw, slow down on thick seams
Common mistake: Many sewers jump to tension adjustments first, but 60% of “tension problems” are actually threading errors. Always rethread both top and bobbin completely before touching the tension dial.
For a comprehensive guide on the most frequent issue, check out our article on why sewing machines skip stitches.

PREMIUM QUALITY MATERIAL: Made of top quality high-strength steel, sharp smooth, sturdy and durable, not easy to bend, and long service life.

2X STRONGER STEEL — Constructed with reinforced, thick shafts that withstand the resistance of dense, heavy fabrics without bending or breaking, staying sharp longer for consistent, skip-free stitching through any material from start to finish.

SEWING MADE SIMPLE: SCHMETZ Universal Needles work with all home sewing machines and handle everything from delicate silks to heavy denim, making them perfect for any quilting, embroidery, craft, or home décor project
How Do I Know If My Sewing Machine Tension Is Wrong?
Your sewing machine tension is wrong if you see loops of thread on either the top or bottom of your fabric, or if the fabric puckers when you sew. Correct tension creates stitches where the upper and lower threads interlock exactly in the middle of the fabric layers, invisible from both sides.
Visual signs of tension problems:
- Loops on top surface = upper tension too loose (turn dial to higher number)
- Loops on bottom surface = upper tension too tight (turn dial to lower number) OR bobbin tension incorrect
- Fabric puckering = tension too tight on both threads
- Stitches pull apart easily = tension too loose on both threads
How to test tension properly:
- Thread machine with contrasting thread colors (different color in bobbin vs. top)
- Sew a test seam on two layers of medium-weight cotton
- Examine both sides, you should see only one thread color on each side
- If you see dots of the opposite color, that thread is being pulled too hard
Important distinction: Before adjusting tension, confirm your machine is threaded correctly with the presser foot UP (which opens tension discs), then lower the foot before sewing. Threading with the foot down is the number one cause of “tension problems” that aren’t actually tension issues.
For detailed guidance with visual examples, see our complete guide on sewing machine tension explained with test strips.

TENSION GAUGE: The Towa Bobbin Tension Gauge is a must-have tool that helps measure thread bobbin tension

Please pay attention to the product you want£¡£¡£¡

Sewing Machine Needle Keeps Breaking: What Am I Doing Wrong?
Needles break repeatedly when you’re using the wrong needle size for your fabric thickness, the needle is bent or inserted incorrectly, you’re pulling fabric while sewing, or your machine has a timing problem. A needle should last 6-8 hours of sewing time under normal conditions.
Most common causes of needle breakage:
- Wrong needle size, Size 70/10 needles break on denim; use 90/14 or 100/16 for heavy fabrics
- Bent needle, Even slightly bent needles hit the throat plate or bobbin case; replace immediately
- Incorrect insertion, Needle must be pushed all the way up into the clamp with flat side facing correct direction (usually back)
- Pulling fabric, Let feed dogs move fabric; pulling or pushing causes needle deflection and breakage
- Sewing over pins, Hitting pins bends or breaks needles instantly
- Timing issues, If needle hits bobbin case or hook, machine timing needs professional adjustment
Quick diagnostic: If you break three needles in one session after checking size and insertion, stop sewing and consult a technician. Repeated breakage despite correct needle use indicates a mechanical timing problem you shouldn’t attempt to fix yourself.
For proper needle installation technique, visit our guide on how to insert a sewing machine needle.
Thread Bunching Underneath Fabric: How to Fix
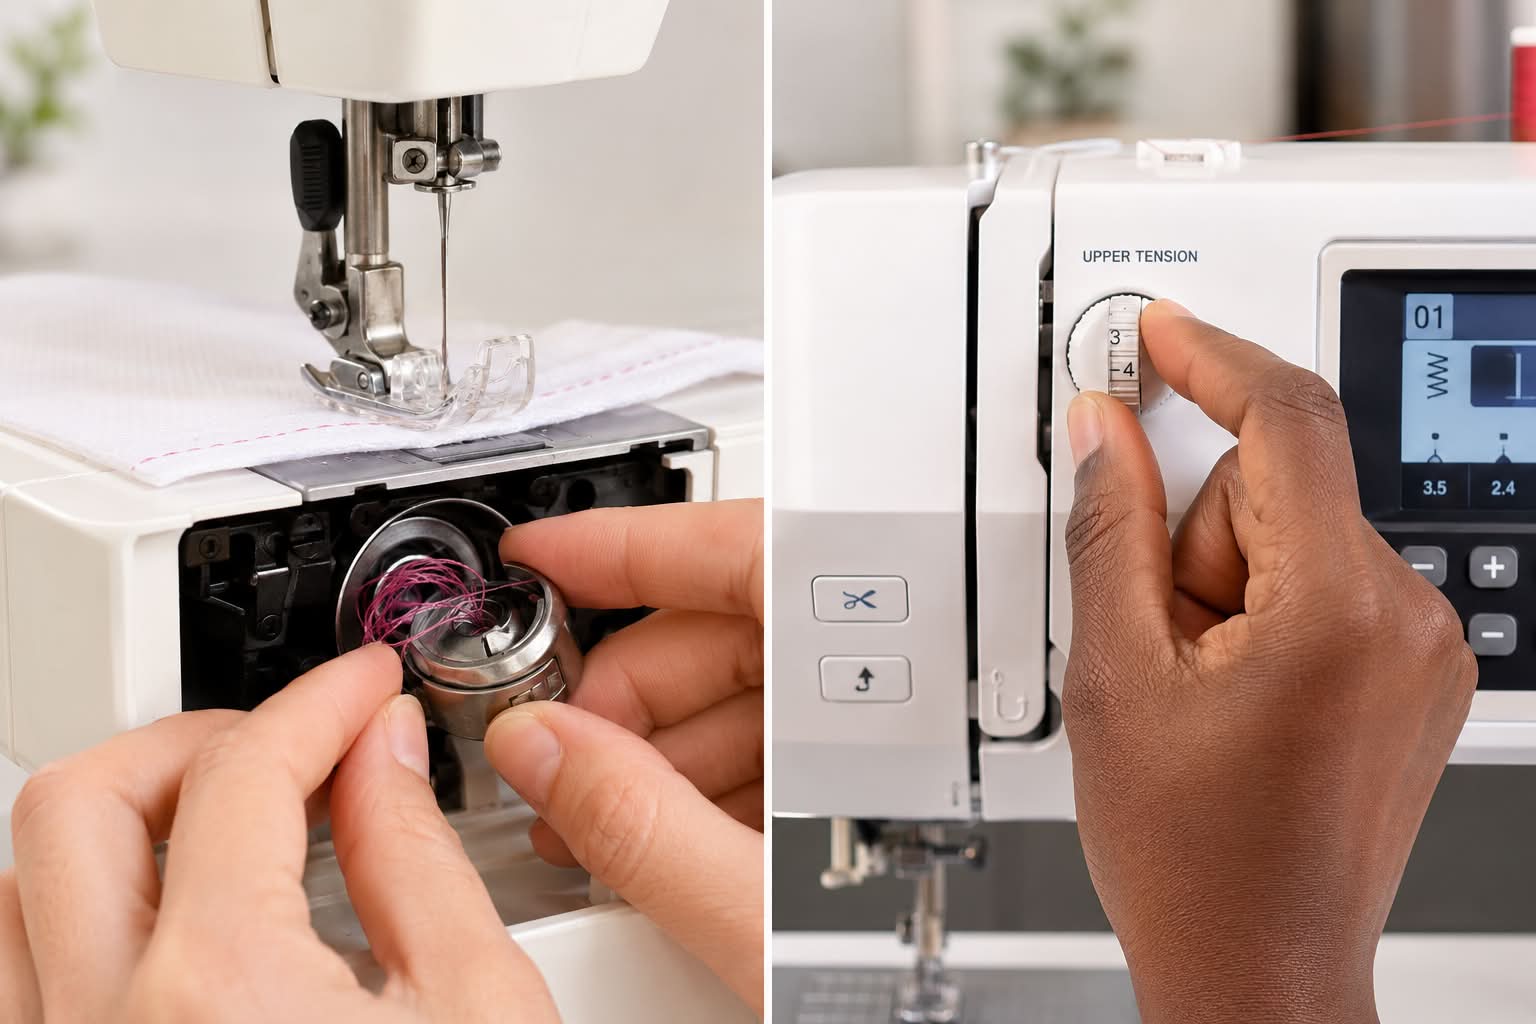
Thread bunching underneath your fabric (often called “bird’s nesting”) happens when the upper thread isn’t properly caught in the tension discs, the bobbin is threaded incorrectly, or the bobbin case has damage or lint buildup. This is rarely a bobbin tension problem despite appearing on the bobbin side.
Step-by-step fix:
- Remove all thread from machine and bobbin area
- Clean bobbin case thoroughly, Remove lint with small brush or compressed air
- Check bobbin case for burrs, Run finger gently around inside; any rough spots need professional smoothing
- Rethread bobbin following your manual’s exact path (direction matters for some machines)
- Rethread upper thread with presser foot UP, ensuring thread seats fully in tension discs
- Hold thread tails when starting to sew, hold both top and bobbin threads behind presser foot for first few stitches
Common mistake: Tightening upper tension when you see bunching underneath actually makes the problem worse. The bunching means upper thread isn’t engaging tension at all, so it’s pulling unlimited thread down, creating loops below.
When it’s actually a bobbin problem: If bunching continues after perfect rethreading, check if your bobbin is wound evenly (thread should lay flat, not pyramid-shaped) and that you’re using the correct bobbin type for your machine. Using generic bobbins that are 1mm different in size causes major tension issues.
For related thread issues, see our troubleshooting guide on why thread keeps breaking.
When Should I Take My Sewing Machine to a Repair Shop vs. Fix It Myself?
Take your sewing machine to a professional repair shop for timing issues (needle hitting bobbin case), motor problems, computerized error codes that won’t clear, broken internal parts, or any problem that persists after you’ve correctly rethreaded, changed the needle, and cleaned the machine. DIY troubleshooting handles threading, tension, needle, and basic cleaning issues, which represent about 80% of home machine problems.
DIY-friendly fixes you can handle:
- Rethreading top and bobbin
- Changing needles and adjusting needle position
- Adjusting tension dials
- Cleaning lint from feed dogs, bobbin area, and thread path
- Oiling (if your machine requires it, many modern machines don’t)
- Replacing presser feet
- Winding bobbins correctly
Professional repair needed for:
- Timing problems, Needle hits hook, bobbin case, or throat plate
- Motor issues, Machine won’t turn on, runs very slowly, or makes burning smell
- Broken parts, Cracked bobbin case, broken tension assembly, damaged feed dogs
- Computerized errors, Persistent error codes, touchscreen malfunction, software issues
- Unusual noises, Grinding, clicking, or knocking sounds from inside machine
- Annual service, Deep cleaning, timing check, and lubrication of internal parts
Cost consideration: Basic repairs typically cost $75-150, while a full service runs $100-200. If your machine is worth less than $200 and needs major repairs, replacement might be more economical. Learn more about typical costs in our sewing machine repair cost guide.
When to call it: If you’ve spent more than 30 minutes troubleshooting a problem using your manual and online resources without success, it’s time for professional help. Continuing to force a malfunctioning machine can turn a simple fix into expensive damage.
How to Troubleshoot a Sewing Machine That Won’t Turn On
A sewing machine that won’t turn on usually has a power connection issue, tripped safety feature, or blown fuse rather than a dead motor. Check power sources and safety mechanisms before assuming motor failure.
Systematic power troubleshooting:
- Check wall outlet, Plug in a lamp to confirm outlet works
- Examine power cord, Look for fraying, cuts, or damage along entire length
- Verify foot pedal connection, Unplug and reconnect pedal firmly to machine
- Test foot pedal, Some machines won’t power on if pedal isn’t connected properly
- Check on/off switch, Some machines have a separate power switch on the body
- Look for reset button, Many computerized machines have a small reset button (check manual)
- Inspect fuse, Some machines have a replaceable fuse in the power cord plug or machine body
Computerized machine specific checks:
- Unplug machine for 30 seconds, then plug back in (hard reset)
- Check if screen lights up but motor won’t run (different problem than no power)
- Look for error codes on display that might lock machine
Safety feature triggers: Many modern machines won’t run if the bobbin cover isn’t closed completely, the presser foot lever is in the wrong position, or the needle threader is still engaged. Check all covers and levers are in sewing position.
When it’s the motor: If you’ve confirmed power reaches the machine but nothing happens (no lights, no hum, no movement), the motor or internal wiring may have failed. This requires professional diagnosis and is often not economical to repair on machines under $300.
Difference Between Timing Issues and Tension Issues in Sewing Machines
Timing issues occur when the needle and bobbin hook don’t synchronize correctly, causing the needle to hit metal parts, skip stitches consistently, or create irregular stitch formation. Tension issues create loose or tight stitches but the needle and hook still work together without contact or skipping.
How to tell them apart:
| Timing Problem | Tension Problem |
|---|---|
| Needle hits bobbin case or hook | Needle never touches anything |
| Skips every stitch or regular pattern | Stitches form but look wrong |
| Metallic clicking or tapping sound | Quiet operation |
| Started after machine was dropped or jammed | Gradual change or after rethreading |
| Can’t be fixed by rethreading | Often fixed by rethreading |
Timing problem symptoms:
- Needle strikes the bobbin case or hook assembly
- Consistent skipped stitches (every stitch or every other stitch)
- Needle thread doesn’t catch bobbin thread at all
- Visible needle deflection toward hook
- Started suddenly after a jam or dropping machine
Tension problem symptoms:
- Loops of thread on top or bottom of fabric
- Stitches form but look loose or tight
- Fabric puckers or stitches pull out easily
- Gradual change over time
- Varies with different fabrics or threads
Critical distinction: Never attempt to adjust timing yourself unless you’re trained. Timing adjustment requires special tools and knowledge of precise measurements. Tension adjustment is user-serviceable and expected. If you suspect timing issues, take your machine to a professional, incorrect timing adjustment can cause permanent damage.
What Tools Do I Need to Troubleshoot My Sewing Machine at Home?
Essential troubleshooting tools include small screwdrivers (Phillips and flathead), tweezers or hemostats, a stiff brush or compressed air, sewing machine oil (if your machine requires it), a bright flashlight or headlamp, spare needles in multiple sizes, and your machine’s manual. These tools handle 90% of home troubleshooting tasks.
Basic troubleshooting toolkit:
- Small screwdriver set, For removing throat plate, presser foot holder, and bobbin case cover
- Tweezers or hemostats, Removing broken thread and lint from tight spaces
- Lint brush, Stiff bristles for cleaning feed dogs and bobbin area (often included with machine)
- Compressed air, Blowing lint from hard-to-reach areas (use short bursts)
- Sewing machine oil, Only if your manual specifies oiling (many modern machines are self-lubricating)
- Bright light source, Headlamp or clip-on light for seeing into bobbin area
- Magnifying glass, Inspecting needle eye, tension discs, and small parts for damage
- Spare needles, Sizes 70/10, 80/12, 90/14 in universal and stretch varieties
- Seam ripper, Removing test stitches during troubleshooting
Nice-to-have additions:
- Small container for screws and parts
- Cotton swabs for precision cleaning
- Needle threader (if vision is a challenge)
- Spare bobbins (correct type for your machine)
- Thread snips or small scissors
Most important tool: Your machine’s manual (or downloaded PDF from manufacturer’s website). The manual shows correct threading paths, maintenance schedules, and model-specific quirks that generic advice can’t cover.
What you don’t need: Specialized timing tools, voltage meters, or internal adjustment gauges. If troubleshooting requires these, the repair is beyond DIY scope. For more on when to seek help, visit our guide on professional sewing machine service.

Product Includes: The sewing machine tool kit includes 1 black curved nose tweezers, 1 double headed lint brush, 1 needle board screwdrivers, 4 flat head cross head screwdrivers, 2 seam rippers, 5 silicone brushes and 1 storage bag, 15 pieces in total. Different styles of screwdrivers and brushes, a sufficient number of tools are enough to meet your daily needs for cleaning and repairing your sewing machine, and the storage bag allows you to better store this set

【Package includes】- 1 pcs curved nose tweezers, 1 pcs double-ended fluff brush, 1 pcs needle board screwdriver and 4 pcs screwdrivers, 7 pcs in total. Different styles of screwdrivers, a sufficient number of tools are sufficient for your daily cleaning and repair needs.

Packing list: The sewing machine tool kit includes 1 curved nose tweezers, 1 double headed lint brush, 1 needle board screwdrivers, 4 flat head cross head screwdrivers, 2 seam rippers, 12 silicone brushes, 21 pieces in total;For daily cleaning and maintenance of sewing machines.
Is Troubleshooting the Same for Mechanical vs. Computerized Sewing Machines?
Basic troubleshooting steps for threading, tension, needles, and cleaning are identical for mechanical and computerized sewing machines because both use the same fundamental stitch-forming mechanism. Computerized machines add a layer of electronic diagnostics through error codes and automatic features that can malfunction, but the underlying mechanical problems and fixes remain the same.
Shared troubleshooting steps (both types):
- Rethreading upper thread and bobbin
- Changing and properly inserting needles
- Adjusting tension dials
- Cleaning lint from bobbin area and feed dogs
- Checking presser foot pressure
- Verifying correct needle and thread for fabric
Computerized-specific troubleshooting:
- Error codes, Display shows codes indicating specific problems (check manual for meanings)
- Hard reset, Unplug for 30 seconds to clear electronic glitches
- Touchscreen calibration, Some models need periodic recalibration
- Automatic features, Thread cutter, needle threader, or tension may malfunction independently
- Software updates, High-end models may need firmware updates from manufacturer
- Sensor issues, Automatic thread sensors or presser foot sensors can fail
Mechanical-specific considerations:
- More user-serviceable parts (you can often access and adjust more)
- Fewer things to go wrong (no electronics to fail)
- Timing issues more common with age
- Requires manual oiling on regular schedule
Common mistake: Assuming computerized machines are too complex to troubleshoot. In reality, 80% of computerized machine problems are the same threading, needle, and tension issues that affect mechanical machines. The error codes actually make diagnosis easier by pointing to specific problems.
When electronics fail: If a computerized machine shows error codes that won’t clear after hard reset, has a non-responsive touchscreen, or has automatic features that stopped working, these require professional repair. Don’t attempt to open the electronic housing yourself.
How Often Should I Clean and Oil My Sewing Machine to Prevent Problems?
Clean your sewing machine’s bobbin area, feed dogs, and thread path after every 8-10 hours of sewing time, or at minimum once per project. Oil your machine only if your manual specifies it (many modern machines are self-lubricating and should never be oiled), and schedule professional servicing annually if you sew regularly or every 2-3 years for occasional sewers.
Regular cleaning schedule:
- After every project, Remove lint from bobbin case, under throat plate, and around feed dogs
- Every 8-10 hours of sewing, Deep clean including thread path, tension discs (with thread removed), and presser foot area
- When changing thread type, Lint accumulation varies by thread; fuzzy threads need more frequent cleaning
- Before long storage, Clean thoroughly and cover machine
Oiling guidelines (machine-specific):
- Check your manual first, Many machines made after 2000 are self-lubricating and adding oil causes problems
- If oiling is required, Use only sewing machine oil (not 3-in-1 or household oil)
- Typical oiling points, Bobbin hook race, needle bar, and other points specified in manual
- Frequency, Usually every 8-10 hours of sewing for machines that require oil
- After oiling, Sew on scrap fabric to absorb excess oil before starting projects
Professional servicing schedule:
- Heavy users (20+ hours/month), Annual professional service
- Regular users (5-20 hours/month), Every 18-24 months
- Occasional users (less than 5 hours/month), Every 2-3 years
- After problems, If machine jammed badly, was dropped, or stored for years
What professional service includes: Complete disassembly and cleaning, timing check and adjustment if needed, lubrication of internal parts, tension calibration, and replacement of worn parts. This typically costs $100-200 but prevents major repairs. Learn more about timing in our article on how often to service your sewing machine.
Prevention payoff: Regular cleaning prevents 70% of common problems. Lint buildup in the bobbin case alone causes tension issues, skipped stitches, and thread breaking. Five minutes of cleaning after each project saves hours of troubleshooting later.
Sewing Machine Skipping Stitches: Troubleshooting Steps
Skipped stitches occur when the needle and bobbin hook fail to catch the upper thread loop, leaving gaps in your seam. This usually indicates a dull or incorrect needle, improper threading, or wrong needle-thread-fabric combination rather than a mechanical problem.
Systematic fix for skipped stitches:
- Replace the needle, Use a fresh needle in correct size for your fabric (most common fix)
- Check needle insertion, Needle must be fully inserted with flat side facing correct direction
- Rethread completely, Remove all thread and rethread both top and bobbin with presser foot UP
- Match needle to fabric, Use ballpoint/stretch needle for knits, sharp for wovens
- Check thread quality, Old or cheap thread breaks and skips; use quality thread
- Slow down, Sewing too fast on thick fabrics causes skipped stitches
- Stabilize knits, Use stretch needle and possibly stabilizer for very stretchy fabrics
Needle-fabric-thread matching:
- Lightweight fabrics (silk, chiffon), Size 70/10 or 80/12 needle, fine thread
- Medium fabrics (cotton, linen), Size 80/12 or 90/14 needle, all-purpose thread
- Heavy fabrics (denim, canvas), Size 90/14 or 100/16 needle, heavy-duty thread
- Knit fabrics, Ballpoint or stretch needle in appropriate size, polyester thread
When it’s not the needle: If you’ve replaced the needle, rethreaded correctly, and matched needle to fabric but still get skipped stitches, check these:
- Presser foot pressure too light (increase pressure for better fabric control)
- Feed dogs worn down (visible on very old machines)
- Timing off (needle and hook not synchronized, needs professional repair)
For a complete deep-dive into this specific issue, see our dedicated guide on sewing machine skipping stitches.
Can I Troubleshoot an Industrial Sewing Machine the Same Way as a Home Machine?
Industrial sewing machines follow the same basic troubleshooting principles as home machines for threading, tension, needles, and cleaning, but they run at higher speeds, use different needle systems, have more powerful motors, and require more frequent maintenance. The decision tree approach works for both, but industrial machines need more specialized knowledge for adjustments and repairs.
Similarities in troubleshooting:
- Threading paths follow same logic (upper thread through tension to needle, bobbin in case)
- Tension adjustments work the same way (balance between upper and lower thread)
- Needle problems (breaking, wrong size) diagnosed identically
- Cleaning and lint removal equally important
- Basic power troubleshooting similar
Key differences:
- Speed, Industrial machines run 3-5 times faster, amplifying any small problem
- Needle systems, Often use different needle types (DBx1, 134, 135×5) than home machines (130/705H)
- Lubrication, Industrial machines require frequent oiling (often daily) and have oil reservoirs
- Adjustments, More user-adjustable parts but require technical knowledge
- Specialization, Many industrial machines do one task (straight stitch only, serging only)
- Power, Clutch motors or servo motors with different troubleshooting than home machine motors
Industrial-specific maintenance:
- Check oil level daily
- Clean lint after every 4-6 hours of use
- Monitor belt tension and condition
- Check thread stand and guides for wear
- Verify correct needle system for machine model
When to call a technician: Industrial machine repairs often require specialized knowledge of timing, hook systems, and high-speed adjustments. Unless you’re trained on industrial equipment, limit DIY troubleshooting to threading, needle changes, and basic cleaning. For more on industrial maintenance, visit our industrial sewing machine maintenance resources.
What Are Signs My Sewing Machine Needs Professional Servicing?
Your sewing machine needs professional servicing when you hear unusual grinding or clicking noises, the machine skips stitches after trying all DIY fixes, stitches become consistently irregular, the motor runs hot or slow, or it’s been more than two years since the last service. These signs indicate internal wear, timing issues, or mechanical problems beyond home troubleshooting.
Clear signs to schedule service:
- Unusual noises, Grinding, clicking, knocking, or squealing from inside machine
- Persistent skipped stitches, After replacing needle, rethreading, and cleaning
- Timing symptoms, Needle hits bobbin case or hook
- Motor issues, Runs very slowly, gets hot, smells like burning, or loses power under load
- Irregular stitches, Stitch length varies randomly despite correct settings
- Stuck parts, Handwheel hard to turn, feed dogs don’t move smoothly
- After a jam, If machine jammed badly with thick fabric or broke needle into bobbin area
- Visible wear, Feed dogs worn smooth, bobbin case has grooves, tension discs damaged
Preventive service indicators:
- Two years since last professional service (regular users)
- Three years since last service (occasional users)
- Before starting a major project (wedding dress, quilt)
- After purchasing a used machine
What happens during professional service:
- Complete disassembly and cleaning of internal parts
- Timing check and adjustment if needed
- Lubrication of all moving parts
- Tension calibration
- Feed dog and presser foot inspection
- Electrical system check (computerized machines)
- Replacement of worn parts
Cost vs. value: Professional service costs $100-200 but extends machine life by years and prevents major repairs. If your machine is worth less than $200 and needs service plus repairs, consider whether replacement makes more sense. For guidance on repair economics, check our sewing machine repair cost breakdown.
Finding a good technician: Look for certified technicians through your machine’s brand dealer, ask at local quilt shops for recommendations, or check reviews for independent repair shops. Avoid “we fix all brands” shops that don’t specialize in sewing machines.
Beginner Mistakes When Trying to Fix a Sewing Machine Yourself
The most common beginner mistakes when troubleshooting sewing machines are threading with the presser foot down (preventing thread from entering tension discs), adjusting bobbin tension unnecessarily, using the wrong needle type for fabric, and attempting to fix timing issues without proper training. These mistakes often make problems worse or create new issues.
Top DIY troubleshooting mistakes:
1. Threading with presser foot down
- Presser foot must be UP when threading so tension discs open
- This single mistake causes 60% of “tension problems” that aren’t really tension issues
- Always raise foot, thread machine, then lower foot before sewing
2. Adjusting bobbin tension
- Bobbin tension is factory-set and rarely needs adjustment
- Most “bobbin tension” problems are actually upper threading or tension issues
- Only adjust bobbin tension as a last resort after trying everything else
3. Using wrong needle type
- Universal needles don’t work well on knits (need ballpoint/stretch)
- Dull needles cause more problems than wrong size
- Needle should be changed every 6-8 hours of sewing
4. Over-tightening tension
- When stitches look wrong, beginners often crank tension to maximum
- Correct tension is usually 3-5 on the dial; rarely needs to go above 6
- Test tension changes on scrap fabric before continuing project
5. Forcing stuck parts
- If handwheel won’t turn, don’t force it (may be in bobbin-winding mode)
- Forcing jammed fabric damages feed dogs and timing
- Stop and investigate rather than powering through
6. Skipping the manual
- Every machine has specific threading paths and quirks
- Generic advice doesn’t account for model differences
- Download PDF manual if you lost the original
7. Using wrong oil or over-oiling
- Many modern machines should never be oiled
- Using 3-in-1 or household oil damages machines
- Only use sewing machine oil and only if manual specifies
8. Attempting timing adjustments
- Timing requires specialized tools and training
- Incorrect timing adjustment causes permanent damage
- Always take timing issues to professionals
9. Ignoring cleaning
- Lint buildup causes tension, skipping, and breaking problems
- Clean after every project, not just when problems appear
- Prevention is easier than troubleshooting
10. Not testing on scrap fabric
- Always test fixes on scrap before returning to project
- Sew several inches to confirm problem is solved
- Prevents ruining project fabric with ongoing issues
Better approach: Follow the decision tree systematically, starting with simplest fixes (rethread, new needle, clean) before moving to complex adjustments. If you’ve tried the basic three (rethread, new needle, clean machine) and the problem persists, it’s time for professional help.
FAQ
How do I start troubleshooting when my sewing machine has multiple problems at once?
Start with a complete reset: turn off the machine, remove all thread, clean the bobbin area thoroughly, insert a fresh needle, and rethread both top and bobbin following your manual exactly. This single process fixes multiple interconnected problems about 70% of the time because many issues stem from threading or lint buildup.
Can I use any needle in my sewing machine?
No, you must use needles designed for your machine’s needle system (most home machines use 130/705H system, but some use HAx1 or other systems). Within the correct system, choose needle type (universal, ballpoint, sharp, denim) and size (70/10 through 110/18) based on your fabric weight and type.
Why does my machine work fine on some fabrics but not others?
Different fabrics require different needle types, thread weights, and tension settings. Knits need ballpoint or stretch needles while wovens need sharp or universal needles. Heavy fabrics need larger needles (90/14 or 100/16) and may need tension adjustments, while lightweight fabrics need smaller needles (70/10 or 80/12) and lighter tension.
How tight should my bobbin thread be when I pull it?
Bobbin thread should have slight resistance when pulled from a properly installed bobbin case, but shouldn’t require hard tugging. If the bobbin case dangles from the thread without dropping, tension is in the right range. Most bobbin tension is factory-set and rarely needs adjustment.
Is it normal for my sewing machine to make noise?
Some noise is normal (rhythmic clicking of the needle bar, quiet whirring of the motor), but grinding, squealing, knocking, or loud clicking indicates a problem. Unusual noises often mean the machine needs cleaning, oiling (if applicable), or professional service to check timing and internal parts.
Can I troubleshoot my sewing machine without the manual?
You can perform basic troubleshooting (rethreading, needle changes, cleaning) without the manual, but for model-specific issues, tension ranges, oiling requirements, and threading paths, you need your manual. Download a PDF from the manufacturer’s website using your model number if you’ve lost the original.
What’s the difference between cleaning and servicing my sewing machine?
Cleaning is routine maintenance you do at home (removing lint, wiping down surfaces, basic oiling if required) after every 8-10 hours of sewing. Servicing is professional maintenance (complete disassembly, internal cleaning, timing check, calibration) done annually or every 2-3 years by a trained technician.
Why do I need to hold thread tails when I start sewing?
Holding both the upper and bobbin thread tails behind the presser foot for the first few stitches prevents thread from being pulled down into the bobbin area, which causes bird’s nesting and jamming. After 2-3 stitches, the fabric holds threads in place and you can release them.
Can cheap thread really damage my sewing machine?
Yes, low-quality thread sheds lint that builds up in your machine faster, breaks frequently causing jams, and may have uneven thickness that affects tension. Quality thread costs slightly more but prevents problems and actually saves money by reducing troubleshooting time and potential repairs.
How do I know if my problem is the machine or my technique?
Test on different fabric with fresh thread and a new needle. If the problem persists across multiple fabrics and after rethreading, it’s likely the machine. If the problem only occurs with specific fabrics or techniques (like sewing curves), it’s more likely technique that needs adjustment.
Should I troubleshoot differently for vintage sewing machines?
Vintage machines (pre-1980) follow the same basic troubleshooting steps but often need more frequent oiling, may have different threading paths, and typically use all-metal parts that last longer but need more maintenance. They rarely have timing issues if they’ve been working correctly. Check out our vintage sewing machine care guide for specific tips.
What should I do if my machine jams completely and won’t move?
Stop immediately and turn off the machine. Don’t force the handwheel. Remove the throat plate and bobbin case to access the jam. Cut away tangled thread carefully with scissors. Remove fabric gently, cutting it free if necessary rather than pulling. Clean the area thoroughly before rethreading and testing. If the handwheel still won’t turn, the machine needs professional service.
Conclusion
Learning how to troubleshoot any sewing machine using a decision tree approach transforms frustrating breakdowns into systematic problem-solving. By starting with the most common issues (threading, needles, and cleaning) and working methodically through each possibility, you’ll fix 80% of problems yourself without needing professional help. Remember that most “complicated” sewing machine issues actually stem from simple causes: incorrect threading, dull needles, or lint buildup.
Your next steps:
- Bookmark this guide and keep your machine’s manual easily accessible
- Assemble your troubleshooting toolkit with basic tools, spare needles, and cleaning supplies
- Establish a cleaning routine after every project to prevent problems before they start
- Practice the basics, proper threading with presser foot up, correct needle insertion, and tension testing on scrap fabric
- Know your limits, attempt DIY fixes for threading, tension, and cleaning, but call professionals for timing, motor, or persistent issues
The decision tree method works because it eliminates guesswork and prevents the common mistake of jumping to complex solutions when simple fixes would work. Whether you’re working with a basic mechanical machine, a computerized model, or even an industrial workhorse, the fundamental troubleshooting principles remain the same.
Start every troubleshooting session with the “big three” reset: rethread completely, insert a fresh needle, and clean the bobbin area. This simple routine solves most problems in under five minutes. For issues that persist beyond basic troubleshooting, don’t hesitate to seek professional service, catching problems early prevents expensive repairs and extends your machine’s life by years.
Keep sewing, stay patient during troubleshooting, and remember that every problem you solve builds your skills and confidence. Your sewing machine is a mechanical tool that responds predictably to systematic diagnosis, and with this decision tree approach, you’re equipped to handle whatever issues come up.


