


Quick Answer
Common beginner sewing mistakes include using the wrong needle for the fabric, incorrect tension settings, skipping backstitching, and choosing difficult fabrics to start with. Most of these errors stem from rushing through setup steps or not understanding how the machine and materials work together. The good news is that nearly every beginner sewing mistake has a simple fix once you know what to look for.
Key Takeaways
- Thread tension issues cause 70% of beginner sewing problems and can be fixed by rethreading both the top thread and bobbin correctly
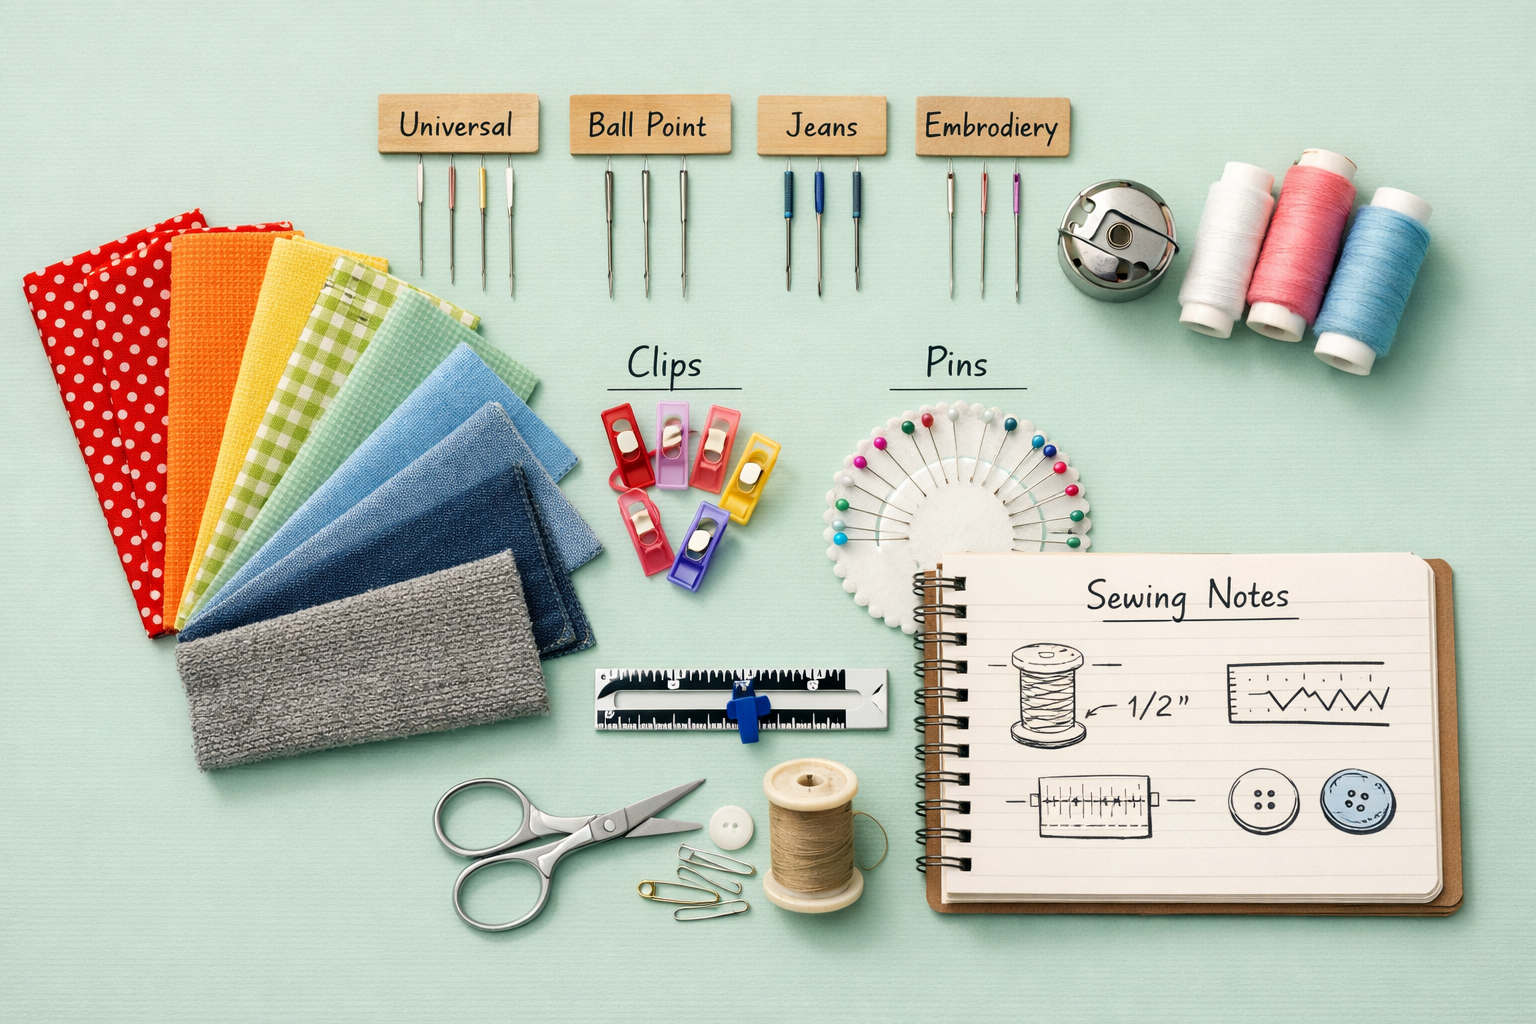
- Needle selection matters, using a universal 80/12 needle works for most cotton fabrics, but knits and heavy materials need specialized needles
- Backstitching at the start and end of every seam prevents unraveling and takes only 2-3 extra seconds per seam
- Fabric choice dramatically affects success rates, beginners should start with quilting cotton and avoid slippery satins or stretchy knits
- Regular machine maintenance including cleaning the bobbin case and changing needles every 8 hours of sewing prevents most mechanical issues
- Pins versus clips depends on fabric type, pins work for wovens, clips prevent damage on knits and leather
- Test stitches on scrap fabric before starting any project saves time and frustration by revealing tension or needle problems early
What Are the Most Common Mistakes Beginners Make When Learning to Sew?
The most common beginner sewing mistakes include incorrect thread tension, using dull or wrong needles, skipping the backstitch, choosing inappropriate fabrics, and not testing settings before sewing. These errors account for the majority of frustration new sewers experience and can make even simple projects feel impossible.
Top mistakes beginners make:
- Ignoring the manual, Every machine has specific threading paths and tension recommendations
- Using old or wrong needles, Dull needles cause skipped stitches and fabric damage
- Incorrect tension settings, Too tight or too loose creates puckered or loose seams
- Rushing through setup, Not securing thread tails or checking bobbin winding
- Poor fabric choices, Starting with slippery, stretchy, or thick materials
- Skipping practice, Jumping into projects without testing on scraps
- Not backstitching, Seams unravel at stress points
- Wrong presser foot pressure, Causes fabric bunching or stretching
Many beginners assume sewing should work perfectly right away, but sewing for beginners requires understanding the relationship between fabric, thread, needle, and machine settings. Each element affects the others.
Choose to practice on scrap fabric if you’re trying a new technique, working with unfamiliar material, or adjusting machine settings. This 5-minute investment prevents wasted fabric and frustration on actual projects.
How Do I Fix Uneven Stitches on My Sewing Machine?
Uneven stitches result from incorrect thread tension, improper threading, or a damaged needle. Start by rethreading both the upper thread and bobbin, making sure the thread sits properly in all tension discs and guides, then test on scrap fabric.
Step-by-step fix for uneven stitches:
- Turn off the machine and raise the presser foot to release tension discs
- Remove the top thread completely and check for knots or tangles
- Rethread from the spool following your manual’s exact path, ensuring thread clicks into each guide
- Check the bobbin, remove it and rewind if thread is loose or unevenly wound
- Replace the needle, even slightly bent needles cause uneven stitches
- Test tension settings, start at the middle setting (usually 4 or 5) and adjust in small increments
- Sew test stitches on scrap fabric that matches your project material
For more detailed guidance on achieving perfect tension, see our comprehensive guide to sewing machine tension.
Common mistake: Adjusting tension before checking threading. Always rethread first, as 80% of tension problems come from incorrect threading, not the tension dial itself.

Packing list: The sewing machine tool kit includes 1 curved nose tweezers, 1 double headed lint brush, 2 needle board screwdrivers, 4 flat head cross head screwdrivers, 2 seam rippers, 4 silicone brushes, 14 pieces in total; Different styles of screwdrivers and brushes, a sufficient number of tools are enough to meet your daily needs for cleaning and repairing your sewing machine
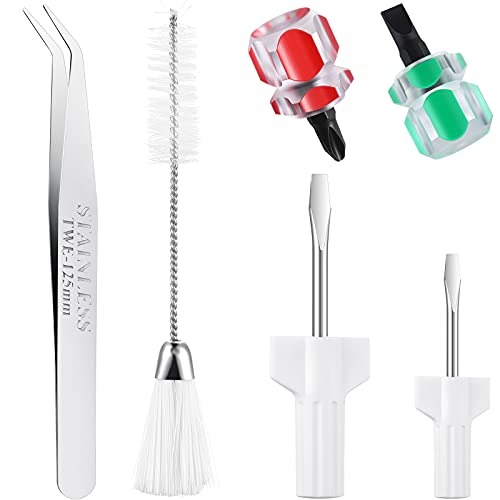
The package contains: we have prepared 1 piece of tweezers, 4 pieces of screw drivers and 1 piece of double head lint brush for you, with a total of 6 pieces, different styles of screwdrivers and adequate quantity can meet your repair requirements in daily life

Product Includes: The sewing machine tool kit includes 1 black curved nose tweezers, 1 double headed lint brush, 1 needle board screwdrivers, 4 flat head cross head screwdrivers, 2 seam rippers, 5 silicone brushes and 1 storage bag, 15 pieces in total. Different styles of screwdrivers and brushes, a sufficient number of tools are enough to meet your daily needs for cleaning and repairing your sewing machine, and the storage bag allows you to better store this set
Why Does My Thread Keep Breaking While Sewing?
Thread breaks when it’s too old and brittle, the needle is too small for the thread weight, tension is set too tight, or the thread path has a snag. Old thread (over 2-3 years) loses strength and breaks easily, especially bargain thread with inconsistent thickness.
Quick fixes for thread breaking:
- Replace old thread, Quality thread matters more than most beginners realize
- Match needle size to thread, Use 80/12 needles for standard thread, 90/14 for thicker thread
- Loosen upper tension, Reduce by 1-2 numbers and test
- Check the thread path, Run your finger along guides to feel for burrs or rough spots
- Slow down, High-speed sewing increases thread stress
- Use the correct spool cap, Thread should unwind smoothly without catching
Choose a larger needle if you’re using thicker thread or sewing through multiple fabric layers. The needle eye should accommodate the thread without forcing it through.
Thread quality varies significantly. Cheap thread often has thick and thin spots that catch in the tension discs and break. Investing in quality thread from brands like Gutermann or Coats & Clark prevents most thread-breaking issues.

20 spools Allesn her 100 m in the most popular basic colours

Gutermann 26 Spool Cotton Thread Box is a brand new thread set from Gutermann
![72Pcs Professional Sewing Thread Kit 36 Colors, [Max Strength & Low Lint] All Purpose Sewing Thread with Prewound Bobbins, Polyester Sewing Machine Thread for Sewing Quilting Repair (400 Yards/Spool)](https://m.media-amazon.com/images/I/519ofFamUPL._SL500_.jpg)
【Top-Tier Professional Sewing Thread Kit with Prewound Bobbins】Since 1980, we’ve combined AAA-grade polyester with our 4-Ply tight-twist technology for the first time to create a thread with industry-leading strength, smoothness, and abrasion resistance. It’s more costly to produce, but it delivers truly professional-grade quality. We choose higher standards, so your work can speak for itself.
How to Prevent Fabric from Bunching Under the Presser Foot
Fabric bunches when the presser foot pressure is too high, feed dogs aren’t engaging properly, or you’re pulling the fabric instead of letting the machine feed it. The machine’s feed dogs should move fabric at a consistent pace without help.
Solutions for fabric bunching:
- Reduce presser foot pressure, Most machines have an adjustment dial on top or back
- Clean the feed dogs, Lint buildup prevents proper fabric grip
- Check feed dog height, They should rise slightly above the needle plate
- Use the right presser foot, A walking foot helps with thick or slippery fabrics
- Don’t pull or push, Guide fabric gently without forcing it
- Start seams correctly, Hold thread tails behind the presser foot for the first few stitches
For persistent feeding issues, our article on why fabric won’t feed through covers advanced troubleshooting steps.
Edge case: Very lightweight fabrics like chiffon may need tissue paper underneath to prevent bunching. Sew through both fabric and paper, then tear away the paper afterward.


Open toe for decorative stitching: The open toe design allows space for dense decorative stitches to glide easily under the foot, for more consistent stitching

Enhanced Compatibility: This walking foot attachment is compatible with Brother sewing machines, as well as part Singer and Janome models, making it a versatile addition to your crafting tool kit

SMOOTH FABRIC FEEDING: The SINGER Even Feed Walking Presser Foot ensures even fabric feeding for professional results, especially on thick or layered fabrics. Perfect for sewing challenging materials like velvet, denim, and quilts without shifting.
Sewing Machine Needle Keeps Breaking, What Am I Doing Wrong?
Needles break when they’re bent, hit pins, are the wrong type for the fabric, or when you pull fabric while sewing. A needle should last 8 hours of sewing time or one large project before replacement, but improper use causes premature breakage.
Common causes of needle breakage:
- Sewing over pins, Always remove pins before they reach the needle or use a magnetic pin cushion to grab them
- Wrong needle type, Universal needles break on knits; ballpoint needles break on wovens
- Pulling fabric, Creates sideways pressure that bends and breaks needles
- Needle hits the bobbin case, Usually from incorrect needle insertion
- Fabric too thick, Multiple denim layers need a 100/16 or 110/18 needle
- Bent needle, Even invisible bends cause breakage
Learn the correct technique for inserting a sewing machine needle to prevent installation errors that lead to breakage.
Choose a heavier needle (90/14 or 100/16) if you’re sewing denim, canvas, upholstery fabric, or multiple layers. The needle must be strong enough to penetrate without bending.
Should I Use Pins or Clips for Sewing Projects as a Beginner?
Use pins for woven fabrics like cotton and linen, and clips for knits, leather, vinyl, or any fabric that shows permanent pin holes. Pins work well for most beginner sewing projects, but clips prevent damage on delicate or stretchy materials.
Pins are best for:
- Quilting cotton and other stable wovens
- Holding layers that need precise alignment
- Temporary marking of placement points
- Projects where you’ll remove pins as you sew
Clips are best for:
- Knit fabrics that stretch when pinned
- Leather, vinyl, or laminated fabrics that show holes
- Thick layers like fleece or batting
- Binding edges where pins would fall out
Pro tip: Insert pins perpendicular to the seam line (across, not along) so you can sew over them if needed, though removing them before the needle reaches them is safer.
Many beginners over-pin, using 10-15 pins on a short seam. For most cotton projects, pins every 3-4 inches provide adequate hold without slowing you down.
How to Fix Puckered Seams After Sewing
Puckered seams happen when thread tension is too tight, you’re stretching fabric while sewing, or using the wrong stitch length for the fabric weight. The fabric gathers along the seam line instead of lying flat.
Fixes for puckered seams:
- Loosen upper tension, Reduce by 1-2 numbers and test on scraps
- Lengthen stitch length, Try 2.5-3mm for medium-weight fabrics
- Don’t stretch while sewing, Let the feed dogs move fabric naturally
- Press seams properly, Press flat first, then open, using steam
- Use a stabilizer, Tear-away stabilizer under lightweight fabrics prevents puckering
- Check needle sharpness, Dull needles pull fabric instead of piercing cleanly
Choose a longer stitch length if you’re sewing lightweight fabrics like voile or lawn. Short stitches (under 2mm) on thin fabric almost always cause puckering.
If seams are already puckered, you can sometimes improve them by pressing with steam and gently pulling the fabric perpendicular to the seam. For severe puckering, removing the stitches and resewing with corrected settings is the only real fix.
What Tension Setting Should My Sewing Machine Be On?
Most sewing machines should be set between 4 and 5 for standard cotton fabric with all-purpose thread. This middle setting works for 80% of projects, but you’ll need to adjust based on fabric weight, thread type, and specific machine characteristics.
Tension adjustment guidelines:
- Lightweight fabrics (chiffon, voile), Slightly lower tension (3-4)
- Medium-weight fabrics (quilting cotton, linen), Standard tension (4-5)
- Heavy fabrics (denim, canvas), Slightly higher tension (5-6)
- Thick thread, Lower tension to accommodate thread bulk
- Thin thread, May need slightly higher tension
How to test tension:
- Sew a test seam on scrap fabric that matches your project
- Examine both sides, stitches should look identical
- Pull the seam gently, it should have slight give but not pucker
- Check the fabric between stitches, it should lie flat
If the bobbin thread shows on top, upper tension is too tight. If the top thread shows on the bottom, upper tension is too loose. Our detailed tension troubleshooting guide includes visual examples of correct and incorrect tension.
Common mistake: Adjusting bobbin tension before trying upper tension adjustments. Always adjust upper tension first, as bobbin tension rarely needs changing on modern machines.
Is It Normal to Skip Stitches When First Learning to Sew?
Skipped stitches are not normal and indicate a problem with the needle, threading, or timing. While beginners experience this issue frequently, it signals a fixable problem rather than a learning curve issue.
Primary causes of skipped stitches:
- Dull or damaged needle, Replace needles every 8 hours of sewing
- Wrong needle type, Knit fabrics need ballpoint or stretch needles
- Improper threading, Thread must sit fully in the tension discs
- Needle inserted incorrectly, Flat side must face the correct direction
- Sewing too fast, Slow down, especially on thick seams
- Machine timing issues, Requires professional service if other fixes don’t work
For comprehensive troubleshooting, see our guide on why sewing machines skip stitches.
Choose a ballpoint needle if you’re sewing knit fabrics like t-shirt material or jersey. Universal needles pierce knit fibers instead of sliding between them, causing skipped stitches and fabric damage.
If you’ve replaced the needle, rethreaded correctly, and still get skipped stitches, the machine may need professional service to adjust timing. This is especially common in older machines or after a needle break.
How Do I Stop My Bobbin Thread from Tangling Underneath?
Bobbin thread tangling (called “bird’s nesting”) happens when the upper thread isn’t properly tensioned, the bobbin is wound incorrectly, or the bobbin case is dirty. This creates loops of thread under the fabric instead of neat stitches.
Step-by-step fix for bobbin tangling:
- Raise the presser foot before threading, this opens the tension discs
- Remove and rethread the upper thread completely
- Check bobbin winding, thread should be smooth and even, not loose or lumpy
- Clean the bobbin case, Remove lint with a small brush
- Reinsert the bobbin correctly, thread should pull counterclockwise for most machines
- Hold thread tails when starting a seam, hold both threads behind the presser foot for the first 2-3 stitches
Our detailed guide on thread bunching under fabric includes photos of correct bobbin insertion for different machine types.
Edge case: If bird’s nesting happens only at the start of seams, you’re not holding the thread tails. Always hold both the upper and bobbin threads behind the presser foot when you begin sewing.
Regular sewing machine maintenance including bobbin case cleaning prevents most tangling issues. Lint accumulation in the bobbin area is the second most common cause after incorrect threading.
What Fabrics Should Beginners Avoid When Starting Out?
Beginners should avoid slippery fabrics (satin, silk), very stretchy knits (jersey, spandex), thick materials (upholstery, canvas), and anything with a nap or pile (velvet, corduroy). These fabrics require specialized techniques and equipment that make learning basic skills unnecessarily difficult.
Best fabrics for beginners:
- Quilting cotton, Stable, forgiving, easy to handle
- Medium-weight linen, Doesn’t stretch or slip
- Cotton poplin, Smooth surface, predictable behavior
- Chambray, Similar to denim but lighter and easier
Fabrics to avoid until you have experience:
- Satin and silk, Slip and slide, show every mistake
- Jersey knits, Stretch and curl at edges
- Velvet, Nap direction affects appearance, shifts while sewing
- Chiffon, Too lightweight and slippery
- Leather and vinyl, Show every pin hole, need special needles
- Heavy denim, Requires industrial needles and strong machines
Choose quilting cotton if you’re making your first 5-10 projects. It’s available in thousands of prints, costs $8-12 per yard, and behaves predictably. Once you can sew straight seams and follow patterns with cotton, you’re ready to try other fabrics.
Many beginners pick fabric based on the final garment they want rather than their skill level. A slippery satin dress might be the goal, but starting with a cotton version builds skills without frustration.
Do I Really Need to Backstitch at the Beginning and End?
Yes, backstitching secures seam ends and prevents unraveling, especially at stress points like armholes, crotch seams, and pocket openings. Skipping this step is one of the most common beginner mistakes and causes seams to come apart during wear or washing.
When backstitching is essential:
- Garment seams, Any seam that will experience stress
- Bag construction, Handles and stress points
- Home decor, Pillow openings, zipper ends
- Anywhere seams intersect, Prevents unraveling from multiple directions
When you can skip backstitching:
- Basting stitches, Temporary stitches you’ll remove
- Seams that will be crossed by another seam, The crossing seam secures them
- When you’ll tie thread tails, Hand-tying works for quilting and some crafts
How to backstitch correctly:
- Start sewing 1/2 inch from the fabric edge
- Press the reverse button and sew backward to the edge
- Release the button and sew forward along your seam line
- At the end, sew to the edge, then reverse 1/2 inch
- Release and sew forward to the edge again
Backstitching takes 2-3 extra seconds per seam but prevents hours of repair work later. It’s a habit worth building from your very first project.
How to Fix a Wavy Hem on Knit Fabric
Wavy hems on knits happen when you stretch the fabric while sewing, use the wrong stitch type, or press too aggressively with an iron. Knit fabrics need special handling because they stretch in ways woven fabrics don’t.
Solutions for wavy knit hems:
- Use a stretch stitch, Zigzag or specialized stretch stitch, not straight stitch
- Don’t pull fabric, Let the machine feed it naturally
- Use a walking foot, Feeds top and bottom layers evenly
- Reduce presser foot pressure, Prevents stretching as fabric moves under the foot
- Stabilize with clear elastic, Sew 1/4-inch clear elastic into the hem as you sew
- Press gently, Use steam but don’t drag the iron, which stretches fabric
For more guidance on working with stretchy materials, explore resources on knit fabric sewing.
Choose a twin needle if you want a professional-looking hem on knit garments. Twin needles create two parallel lines of stitching on top with a zigzag underneath that allows stretch.
Edge case: If the hem is already wavy, you can sometimes fix it by steaming (not pressing) and letting the fabric relax on a flat surface overnight. Severe waves require removing the hem and resewing with correct technique.
Why Is My Sewing Machine Jamming Every Few Minutes?
Frequent jamming indicates lint buildup in the bobbin area, incorrect threading, a damaged needle, or thread quality issues. Machines should run smoothly for hours without jamming when properly maintained and threaded.
Quick fixes for jamming:
- Clean the bobbin case, Remove the bobbin and brush out all lint
- Check for thread nests, Remove any tangled thread from under the needle plate
- Replace the needle, Bent needles cause thread to catch
- Rethread completely, Both upper thread and bobbin
- Use quality thread, Cheap thread sheds fibers that cause jams
- Check the needle plate, Burrs or damage can catch thread
Our comprehensive guide on why sewing machines jam covers advanced troubleshooting for persistent problems.
Common mistake: Continuing to sew after a small jam. Always stop, clean the bobbin area, and rethread before continuing. Small jams become big problems if ignored.
If your machine jams frequently despite cleaning and correct threading, it may need professional service. Timing issues or worn parts require a technician’s expertise. Learn more about sewing machine repair costs to budget appropriately.
FAQ
How often should I change my sewing machine needle? Change your needle every 8 hours of sewing time or after completing one large project. Needles dull gradually and cause skipped stitches, uneven seams, and fabric damage long before they visibly break.
Can I use hand sewing thread in my sewing machine? No, hand sewing thread is too thick and often has a coating that causes tension problems in machines. Always use thread specifically labeled for machine sewing.
Why do my seams pucker even with correct tension? Puckering despite correct tension usually means you’re stretching fabric while sewing, using too short a stitch length, or working with fabric that needs stabilizer. Try lengthening stitches to 2.5-3mm and letting the machine feed fabric without pulling.
How do I know if my bobbin is wound correctly? A correctly wound bobbin has thread distributed evenly across its width without gaps or lumps, and the thread doesn’t feel loose when you tug gently. If thread wobbles or has thick and thin areas, rewind it.
Should I oil my sewing machine? Modern machines with nylon gears don’t need oiling, but older metal-gear machines require oil every 8-10 hours of use. Check your manual, oiling a machine that doesn’t need it can cause problems.
What’s the difference between a universal needle and a ballpoint needle? Universal needles have a slightly rounded point for general fabrics, while ballpoint needles have a more rounded tip that slides between knit fibers instead of piercing them. Use ballpoint for any stretchy fabric.
Can I sew over pins? You can sew over pins placed perpendicular to the seam, but it risks breaking needles and damaging your machine. Removing pins just before they reach the presser foot is safer and only slightly slower.
Why does my thread keep coming out of the needle? Thread unthreads when you don’t leave a long enough tail (leave 4-6 inches), start sewing without holding thread tails, or have too much tension. Always hold both threads behind the presser foot for the first few stitches.
How tight should my bobbin case screw be? The bobbin case screw should be snug but not overtightened. If you’ve adjusted it, return it to the position where the bobbin thread pulls out with slight resistance, it shouldn’t fall freely or require hard tugging.
What’s the best first project for absolute beginners? Start with a simple drawstring bag or pillowcase using quilting cotton. These projects teach straight seams, corners, and basic construction without requiring zippers, buttonholes, or fitting.
Can I use old thread I found in my grandmother’s sewing box? Thread older than 3-5 years becomes brittle and breaks easily. Test it by pulling firmly, if it snaps with moderate pressure, it’s too old to use reliably.
Why does my fabric bunch up under the needle at the start of seams? Fabric bunching at seam starts happens when you don’t hold thread tails or when the presser foot pressure is too high. Hold both threads behind the foot and reduce pressure for lightweight fabrics.
Conclusion
Common beginner sewing mistakes (and easy fixes) are part of every sewer’s learning journey, but understanding the causes prevents frustration and wasted materials. Most problems stem from incorrect threading, wrong needle selection, poor tension settings, or inappropriate fabric choices, all fixable with knowledge and practice.
Your next steps:
- Create a pre-sewing checklist, Verify threading, needle type, tension setting, and bobbin before every project
- Build a scrap fabric collection, Test settings on scraps that match your project fabric
- Start a sewing journal, Note what settings work for different fabrics
- Practice one skill at a time, Master straight seams before attempting curves or corners
- Join a sewing community, Online forums and local groups provide support and answers
Remember that even experienced sewers encounter these issues occasionally. The difference is they know how to diagnose and fix problems quickly. With the fixes outlined in this guide, you’re equipped to troubleshoot the most common issues and spend more time creating and less time frustrated.
For ongoing support, explore our beginner sewing resources and troubleshooting guides. Every mistake is a learning opportunity that makes you a better sewer.


