Quick Answer
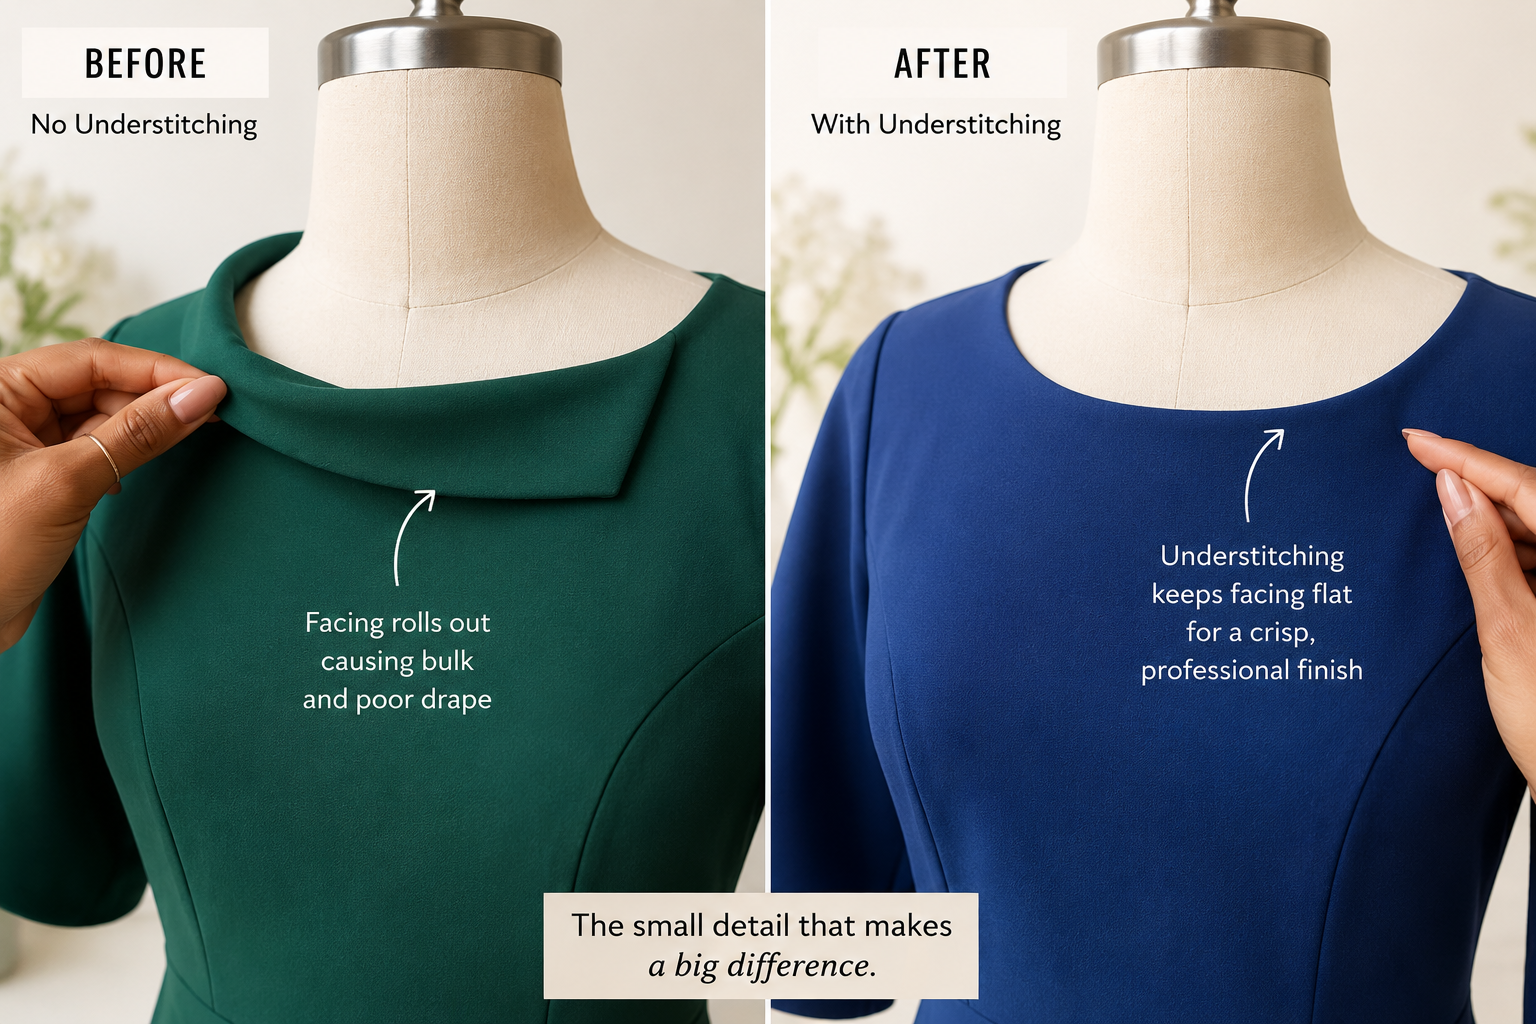
Understitching is a row of stitching sewn through a facing and seam allowances (but not the garment body) very close to the seamline, securing the layers together and preventing the facing from rolling to the outside. This simple technique keeps necklines, armholes, and other faced edges lying flat and invisible from the right side, creating a professional finish that separates homemade-looking garments from polished, ready-to-wear quality.
Key Takeaways
- Understitching anchors facings to seam allowances, preventing them from rolling out and showing on the garment exterior
- The technique works on necklines, armholes, waistbands, and any faced edge where you want a clean, invisible finish
- You stitch approximately 1/8 inch from the seamline through the facing and both seam allowances together, never catching the garment body
- Understitching differs from topstitching because it’s sewn on the facing side and remains invisible from the outside
- No special presser foot is required, your standard foot works perfectly for most understitching applications
- Skipping understitching often results in facings that flip out, creating visible bulk and an unfinished appearance
- The technique works on woven fabrics but requires modification for knits and stretchy materials
- Clipping and grading seam allowances before understitching improves results, especially on curves
- Beginners should master understitching early because it dramatically improves garment quality with minimal extra effort
What Is Understitching in Sewing?
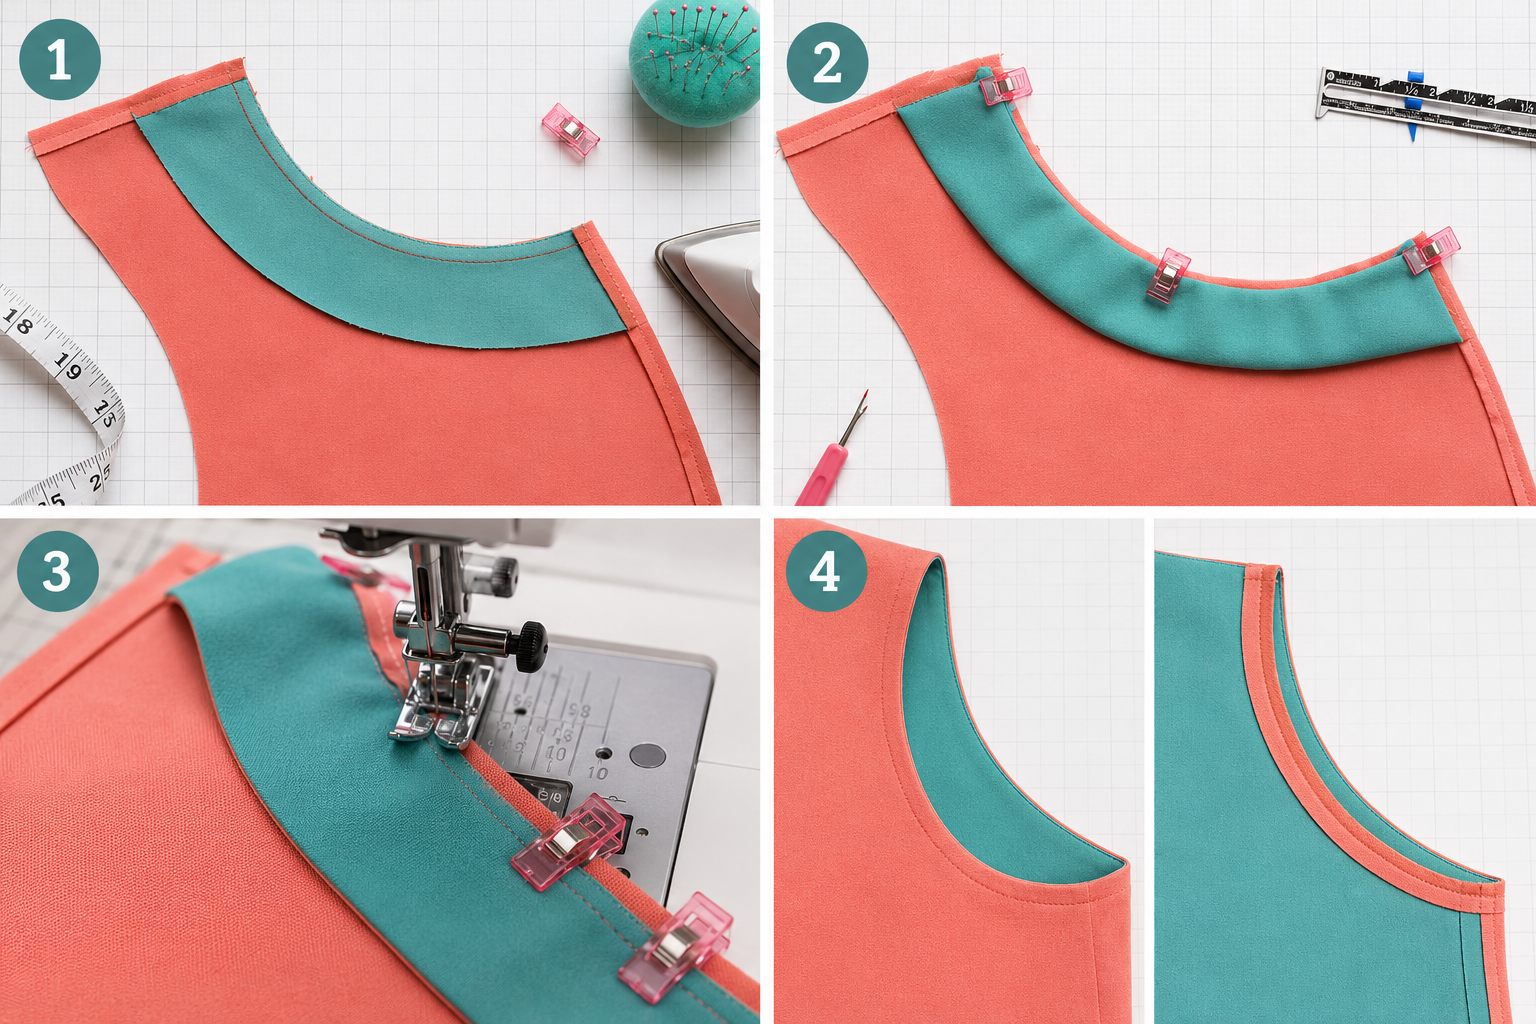
Understitching is a line of straight stitching sewn on the facing side of a garment, approximately 1/8 inch from the seamline, that catches the facing and both seam allowances together without penetrating the garment body. This technique secures the layers and encourages the facing to roll toward the inside of the garment, keeping it hidden from view.
The stitch runs parallel to the original seam that joined the facing to the garment. After sewing the facing to the neckline, armhole, or other edge and pressing the seam allowances toward the facing, you sew through all those layers at once. The garment body stays free, which is what makes understitching invisible from the outside.
When you look at a professionally finished garment, you’ll notice the facings lie perfectly flat against the body with no hint of rolling or peeking out. That’s understitching at work. The technique creates a “memory” in the fabric that trains it to stay in position, even after multiple wearings and washings.
Most sewists use a standard stitch length (2.5mm) and matching thread for understitching. The goal is function rather than decoration, so the stitching doesn’t need to be perfectly visible, it just needs to hold the layers securely.

★ The industrial thread and needle Best Selling Upholstery Repair Kit for Carpets, Canvas, Upholstery, Coats, Tents, Mattresses, Furs and Leather.

Value Sewing Thread Kit: You will get 72pcs sewing thread set, including 36pcs thread spools (about 400 yards), 36 prewound bobbins (about 40yards) needles. Sufficient quantity to meet your usage requirements. Neatly arranged in the box for convenient use.

Complete Sewing Essentials in One Pack: This sewing thread set contains 30 assorted spools of high-quality polyester sewing thread, each offering 50 yards (45m) of vibrant color, along with five easy-to-thread large-eye needles and a needle threader for your convenience.
How Does Understitching Prevent Facings from Rolling Out?
Understitching prevents facings from rolling out by mechanically anchoring the seam allowances to the facing layer, creating resistance that keeps the facing pulled toward the garment interior. The stitching line acts as a hinge point that the fabric naturally wants to fold along, directing the facing inward rather than allowing it to flip outward.
When you sew a facing to a garment edge, the seam creates bulk at the fold line. Without understitching, this bulk can push the facing outward, especially on curved areas like necklines where the fabric is under tension. The facing has no reason to stay inside, it’s just as likely to roll out as stay in.
The physics of understitching work in your favor:
- The stitch line creates a defined fold point very close to the seamline
- Seam allowances are secured flat against the facing, reducing bulk that could push outward
- The thread itself adds a tiny amount of stiffness that resists rolling
- Pressing after understitching sets the fold, training the fabric to maintain its position
For curved seams like necklines, understitching is especially critical. The curve naturally wants to straighten out, which can pull the facing toward the outside. Understitching counteracts this tendency by holding everything in the correct position.
Common mistake: Sewing the understitch too far from the seamline (more than 1/4 inch away) reduces its effectiveness. The closer you stitch to the original seam, the better the facing will stay in place. For more on achieving clean seams, check out our guide on seam finishing techniques.
Understitching vs Topstitching: What’s the Difference?
Understitching is sewn on the facing side and remains invisible from the garment exterior, while topstitching is sewn on the right side of the garment and serves as both a functional and decorative element. The two techniques have completely different purposes and placements, though both involve stitching near a seam.
Key differences between understitching and topstitching:
| Feature | Understitching | Topstitching |
|---|---|---|
| Placement | On facing/lining side | On garment right side |
| Visibility | Hidden from outside | Visible and often decorative |
| Purpose | Keeps facings from rolling out | Adds detail, flattens seams, reinforces |
| Thread choice | Matching thread, standard weight | Can use contrasting or heavier thread |
| Distance from seam | 1/8 inch from seamline | Varies (1/4 inch to 1 inch typical) |
| Layers caught | Facing + seam allowances only | All layers including garment body |
Topstitching appears on collars, pockets, waistbands, and anywhere you want visible detail or extra reinforcement. It’s a design choice that can make a garment look more casual or sporty. Understitching is purely functional, you’d never see it on the finished garment unless you looked inside.
Choose understitching when you want a clean, invisible finish on faced edges. Choose topstitching when you want visible detail or need to flatten bulky seams from the outside. Many garments use both techniques in different areas, understitching on the neckline facing and topstitching on the collar, for example.
You can’t substitute one for the other. Topstitching won’t prevent a facing from rolling out because it doesn’t secure the seam allowances to the facing. And understitching won’t give you the decorative effect of topstitching because it’s hidden inside the garment.

One spool of clear 100% nylon thread
Package Height of the Product: 9.25"

Made in China
When Should You Use Understitching on a Garment?
Use understitching on any faced edge where you want the facing to remain invisible from the outside, including necklines, armholes, front plackets, waistbands, and pocket openings. The technique is essential whenever a facing or lining meets a garment edge and you need a clean, professional finish.
Specific applications where understitching makes the biggest difference:
- Necklines (crew, V-neck, scoop, square), prevents the facing from peeking out around your neck
- Armholes on sleeveless garments, keeps facings hidden and comfortable against skin
- Front button plackets, maintains a crisp, flat closure
- Waistbands on skirts and pants, prevents the inner waistband from rolling out
- Pocket openings, keeps pocket facings from showing at the opening
- Jacket and coat front edges, maintains clean lapel lines
- Sleeve vents and cuffs with facings
Skip understitching when:
- The facing will be topstitched (topstitching serves the same purpose and will show)
- You’re working with very thick fabrics where additional stitching adds too much bulk
- The design intentionally shows the facing as a decorative element
- You’re sewing a reversible garment where both sides will be visible
For beginners working on their first garments with facings, understitching should be considered a required step rather than optional. The time investment is minimal (usually 2-3 minutes per seam), but the quality improvement is dramatic. A $15 pattern can look like a $150 ready-to-wear piece simply because the facings stay where they belong.
Pro tip: Understitch before you finish the outer edges of the facing. This gives you room to maneuver at your machine and makes the process much easier than trying to understitch after everything is trimmed and turned.
How to Do Understitching Step by Step
To understitch a facing, sew the facing to the garment edge, press seam allowances toward the facing, then stitch through the facing and seam allowances together approximately 1/8 inch from the seamline without catching the garment body. The process takes just a few minutes but requires attention to keep the garment layer free.
Complete understitching process:
Sew the facing to the garment edge using your pattern’s specified seam allowance (typically 5/8 inch)
Trim the seam allowances to reduce bulk, trim the facing seam allowance to 1/4 inch and the garment seam allowance to 3/8 inch (this is called grading)
Clip curves on necklines and armholes by making small cuts perpendicular to the seamline, stopping about 1/8 inch from the stitching
Press the seam allowances toward the facing, this is critical; both seam allowances must be rolled away from the garment body
Position the facing under your presser foot with the right side up, keeping the garment body pulled away to your left
Stitch 1/8 inch from the seamline through the facing and both seam allowances, keeping the garment body free, you should feel only three layers under your needle
Press the facing to the inside of the garment, rolling the seam slightly toward the inside so it won’t show from the outside
Common mistakes to avoid:
- Accidentally catching the garment body in your understitching (you’ll know immediately because the facing won’t turn to the inside)
- Pressing seam allowances toward the garment instead of toward the facing before understitching
- Stitching too far from the seamline, which reduces effectiveness
- Skipping the clipping step on curves, which creates puckering
For sewists struggling with stitch quality issues, make sure your machine is properly threaded and your needle is sharp before starting. Understitching requires smooth, even stitches to be effective.

𝑩𝒊𝒓𝒕𝒉𝒅𝒂𝒚 𝑮𝒊𝒇𝒕𝒔 𝑰𝒅𝒆𝒂𝒔: This sewing kit is terrific gifts for people who travel frequently, mother, grandmother, backpacker, adults, kids and teen girls! The emergency kit is also suitable for both men and women, beginners and professionals alike, and it is definitely something that everyone needs in their life

Mini sewing kit with all the essentials for basic sewing and repairs; suitable for novice and expert sewers alike

All In One DIY SEWING KIT - This Travel Sewing Kit contains all the sewing tools you need,including 38 high quality XL thread spools,needles, buttons, pins, hook, thimbles, pencil, threader, buttons, sewing pins, scissors, magnifier, measuring tape etc.With this repair sewing kit, no worry about rips, tears, holes, unraveled hems, missing buttons and other emergency clothes repairs.A best professional sewing set.
Do You Need a Special Foot for Understitching?
You don’t need a special presser foot for understitching, your standard presser foot works perfectly for this technique. The key to successful understitching is fabric control and seam allowance positioning rather than specialized equipment.
Your regular straight-stitch or zigzag presser foot provides everything you need. The foot holds the layers flat while you guide the fabric to maintain the correct distance from the seamline. Some sewists prefer a foot with a center guide mark to help maintain consistent spacing, but this is optional.
Presser feet that work well for understitching:
- Standard presser foot, the default choice that comes with every machine
- Edgestitch foot, has a guide blade that can help you maintain consistent distance from the seamline
- 1/4-inch foot, if you prefer to understitch slightly farther from the seam
- Clear or open-toe foot, provides better visibility of the seamline
The edgestitch foot is the only specialty foot that offers a real advantage for understitching. The guide blade runs along the seamline, automatically maintaining the correct distance. But this is a convenience feature, not a necessity.
What matters more than the foot:
- Keeping the garment body pulled away from the facing as you sew
- Maintaining consistent distance from the seamline
- Using the correct needle for your fabric (a dull needle can cause skipped stitches)
- Adjusting your presser foot pressure if layers are shifting
If you’re interested in expanding your presser foot collection, our guide on what presser feet are for explains which specialty feet offer the most value for different sewing techniques.
What Happens If You Skip Understitching on a Neckline?
Skipping understitching on a neckline typically results in the facing rolling outward and becoming visible from the garment exterior, creating an unfinished, homemade appearance. The facing may also shift and bunch during wear, causing discomfort and requiring constant adjustment.
Without understitching, the seam allowances have no anchor point and can shift freely inside the garment. Every time you put the garment on or move, the facing can work its way toward the outside. On curved necklines, this problem is especially pronounced because the curve naturally wants to straighten, pulling the facing outward.
Specific problems caused by skipping understitching:
- Visible facing edges peeking out around the neckline, especially at center front and back
- Bulk and puffiness at the neckline where seam allowances bunch up
- Facing that flips out completely, requiring you to tuck it back in repeatedly
- Uneven neckline appearance where some areas lie flat and others don’t
- Reduced garment lifespan because the facing edges may fray from exposure
Some sewists try to compensate by hand-tacking the facing to shoulder seams or using fusible interfacing to add stiffness. These workarounds help but don’t fully solve the problem. Hand-tacking only secures the facing at specific points, leaving the rest of the edge free to roll. Interfacing adds body but doesn’t create the mechanical advantage that understitching provides.
When you might get away without understitching:
- Very stiff fabrics that naturally hold their shape (though understitching still improves the finish)
- Garments that will be topstitched around the neckline (topstitching serves the same purpose)
- Facings that will be permanently secured with decorative stitching or trim
For most garments, especially those made from medium-weight wovens like cotton, linen, or lightweight wool, understitching is the difference between a garment that looks handmade and one that looks professionally constructed.
Is Understitching Necessary for Beginners?
Understitching is essential for beginners because it’s one of the simplest techniques that produces the most dramatic improvement in garment quality, requiring only basic straight stitching skills while delivering professional-looking results. Learning understitching early prevents beginners from developing habits of skipping finishing techniques.
Many beginners skip understitching because patterns sometimes list it as optional or because they’re eager to finish the garment quickly. This is a mistake that becomes obvious the first time you wear the garment and notice the facing rolling out. Going back to add understitching after the garment is complete is nearly impossible.
Why beginners should prioritize learning understitching:
- Requires no advanced skills, if you can sew a straight seam, you can understitch
- Takes only 2-3 minutes per seam, minimal time investment for major quality improvement
- Uses no special equipment, works with your standard presser foot and regular thread
- Provides immediate visual feedback, you’ll see the difference as soon as you turn the facing to the inside
- Builds good construction habits, teaches the importance of finishing techniques
The technique does require attention to keep the garment body free from the stitching line. Beginners sometimes accidentally catch the garment body, which means unpicking the stitches and trying again. This is a normal part of the learning process and becomes second nature after a few attempts.
Learning progression for beginners:
- Practice on straight edges first (waistbands, pocket openings) where fabric control is easier
- Move to gentle curves (shallow necklines) once you’re comfortable
- Progress to tight curves (armholes, deep necklines) as your skills develop
For sewists just starting out, our guide on beginner sewing tips covers other essential techniques that pair well with understitching to create professional-looking garments.
Common beginner question: “Can I just press the facing really well instead of understitching?” Pressing helps but doesn’t provide the mechanical hold that understitching creates. The facing will eventually work its way out with wear and washing, no matter how well you press it.
How to Understitch Curved Seams Successfully
To understitch curved seams successfully, clip the seam allowances at regular intervals before pressing them toward the facing, then stitch slowly while gently guiding the curve through the machine without stretching or distorting the fabric. Curved seams require more preparation than straight edges but follow the same basic understitching process.
Curves present a challenge because the seam allowances naturally resist lying flat. On an inward curve like a neckline, the seam allowances are longer than the seamline they’re trying to fold against. Clipping releases this tension and allows the curve to relax.
Step-by-step process for curved understitching:
Clip the seam allowances every 1/2 to 3/4 inch on curves, cutting perpendicular to the seamline and stopping 1/8 inch from the stitching
Grade the seam allowances by trimming the facing layer to 1/4 inch and the garment layer to 3/8 inch
Press carefully using the tip of your iron to roll the seam allowances toward the facing, don’t stretch the curve
Start understitching at a straight section if possible (like the center back of a neckline) to establish your stitching line
Sew slowly around curves, stopping with the needle down to pivot slightly as needed
Keep the garment body pulled away to your left, checking frequently that you’re not catching it
Don’t pull or stretch the fabric as you sew, let the feed dogs move the fabric naturally
Tight curves require extra attention:
- Clip more frequently (every 1/4 to 1/2 inch) on very tight curves like high necklines
- Consider notching (removing small triangles) instead of clipping on outward curves like armholes
- Use a shorter stitch length (2.0mm instead of 2.5mm) for better curve control
- Press in sections rather than trying to press the entire curve at once
Common mistake: Pulling the fabric through the machine to speed up the process. This stretches the curve and can cause the facing to ripple or wave. Let the machine feed the fabric at its own pace, using your hands only to guide direction.
For sewists dealing with fabric handling issues, understanding how your machine’s feed dogs work can help you achieve smoother results on curves.
Can You Understitch Knit Fabrics?
You can understitch knit fabrics, but the technique requires modification to preserve the fabric’s stretch and prevent rippling. Use a narrow zigzag stitch instead of a straight stitch, and avoid pulling or stretching the fabric as you sew. Many sewists skip understitching on knits entirely and use alternative methods instead.
Knit fabrics stretch, which means a straight line of understitching can restrict that stretch and create a stiff, uncomfortable edge. The facing needs to move with the garment body, so your understitching must allow for this movement.
Modified understitching technique for knits:
- Use a narrow zigzag (1.0mm width, 2.5mm length) instead of straight stitching
- Reduce presser foot pressure slightly to prevent stretching the fabric
- Don’t pull the fabric, let it feed naturally through the machine
- Use a ballpoint or stretch needle to prevent skipped stitches
- Consider woolly nylon thread in the bobbin for extra stretch
Alternative methods for knit facings:
- Topstitching with a twin needle, secures the facing while adding decorative detail and maintaining stretch
- Fusing the facing with lightweight fusible interfacing before construction
- Using self-fabric binding instead of a facing for necklines and armholes
- Hand-tacking at seams only, secures the facing at strategic points without restricting stretch
Many commercial knit patterns skip understitching entirely and rely on the fabric’s natural tendency to roll inward. Knit facings often behave better than woven facings without understitching because the stretch helps them conform to the body.
When to understitch knits:
- Stable knits with minimal stretch (like ponte or double knit)
- Necklines that will be worn close to the body where the facing needs extra security
- Garments made from knit-woven combinations where the facing is woven
When to skip understitching on knits:
- Very stretchy fabrics (jersey, rib knit) where any stitching restricts movement
- Activewear or garments that need maximum stretch
- Necklines that will be topstitched with a twin needle
If you’re working with knits and experiencing skipped stitches, check that you’re using the correct needle type and that your machine is properly threaded before attempting understitching.
Common Mistakes When Understitching Facings
The most common understitching mistakes include accidentally catching the garment body in the stitching line, pressing seam allowances toward the garment instead of the facing, and stitching too far from the seamline. These errors reduce the effectiveness of understitching or make it impossible to turn the facing to the inside.
Catching the garment body is the mistake beginners make most often. You’ll know immediately because when you try to turn the facing to the inside, it won’t move, you’ve sewn it to the garment. The fix is to carefully unpick the understitching and try again, being more careful to keep the garment layer pulled away.
Detailed breakdown of common mistakes:
1. Wrong seam allowance direction
- The mistake: Pressing seam allowances toward the garment body instead of toward the facing
- Why it matters: You can’t understitch if the seam allowances aren’t positioned correctly
- The fix: Always press seam allowances toward the facing before understitching
2. Stitching too far from the seamline
- The mistake: Sewing 1/4 inch or more away from the original seam
- Why it matters: Reduces the mechanical advantage that keeps the facing from rolling
- The fix: Aim for 1/8 inch from the seamline, closer is better
3. Skipping the clipping step
- The mistake: Trying to understitch curves without clipping the seam allowances first
- Why it matters: Creates puckering and prevents the curve from lying flat
- The fix: Always clip curves before pressing and understitching
4. Using a dull needle
- The mistake: Understitching with a needle that’s been used for multiple projects
- Why it matters: Causes skipped stitches and can snag fabric
- The fix: Change your needle before starting a new project
5. Pulling or stretching the fabric
- The mistake: Pulling fabric through the machine to speed up the process
- Why it matters: Stretches the edge and causes rippling or waving
- The fix: Let the feed dogs move the fabric naturally
6. Understitching before grading
- The mistake: Understitching with full-width seam allowances still attached
- Why it matters: Creates excessive bulk that shows through on the outside
- The fix: Trim and grade seam allowances before understitching
7. Inconsistent stitch distance
- The mistake: Wandering closer and farther from the seamline as you sew
- Why it matters: Creates an uneven appearance and reduces effectiveness
- The fix: Watch the seamline, not the needle, and maintain steady distance
For sewists experiencing thread bunching or other stitch problems while understitching, addressing basic machine maintenance issues will improve results across all sewing techniques.
Does Understitching Show on the Outside of Clothes?
Understitching does not show on the outside of properly constructed clothes because it’s sewn on the facing side and remains hidden inside the garment. When done correctly, understitching is completely invisible from the exterior, which is what makes it different from topstitching.
The technique works specifically because you sew through the facing and seam allowances without catching the garment body. This means the stitching line exists only on the layers that will be turned to the inside. Once you flip the facing to the wrong side of the garment, the understitching goes with it.
What you should see from the outside:
- A clean, smooth edge with no visible stitching
- The facing completely hidden from view
- A slightly rolled edge where the seamline sits just inside the garment edge
What indicates a problem:
- Visible stitching near the edge (you accidentally caught the garment body)
- The facing peeking out (you didn’t understitch close enough to the seamline)
- Puckering or rippling (seam allowances weren’t clipped or graded properly)
The only time understitching might be slightly visible is if you press the edge too aggressively and roll the seamline exactly to the edge rather than slightly to the inside. Even then, you’d only see a hint of the stitching line, not the full stitch. The solution is to press the facing so the seamline rolls about 1/8 inch to the inside of the garment.
Some sewists worry that understitching will create a ridge or line that shows through from the outside. This doesn’t happen with properly graded seam allowances. The key is trimming the facing seam allowance shorter than the garment seam allowance (grading) so there’s no step or bulk at the stitching line.
Pressing technique matters:
- After understitching, press the facing to the inside
- Roll the seamline slightly toward the inside so it won’t show from the outside
- Use a pressing cloth on delicate fabrics to avoid shine
- Press from the right side to check that nothing shows through
If you’re seeing visible lines or ridges from understitching, the issue is usually with seam allowance preparation rather than the understitching itself. Make sure you’re trimming, grading, and clipping before you understitch.
Alternatives to Understitching for Clean Edges
The main alternatives to understitching include topstitching from the right side, hand-tacking the facing at seam intersections, using fusible interfacing to add body to the facing, or eliminating the facing entirely in favor of binding or self-facing techniques. Each alternative has different visual and functional results.
Topstitching is the most common alternative because it serves a similar function, securing the facing and preventing it from rolling out. The difference is that topstitching is visible and becomes a design element. Choose topstitching when you want the stitching to show or when you’re working with fabrics too thick to understitch easily.
Comparison of alternatives:
Topstitching
- Sewn from the right side, 1/4 to 1/2 inch from the edge
- Visible and decorative
- Secures facing and adds design detail
- Works well on casual garments, jackets, and sportswear
- Can use contrasting thread for emphasis
Hand-tacking
- Small hand stitches at shoulder seams and other intersections
- Invisible from outside
- Secures facing at strategic points but doesn’t prevent rolling between tack points
- Time-consuming but useful for delicate fabrics
Fusible interfacing
- Applied to facing before construction
- Adds body and helps facing stay in place
- Doesn’t mechanically secure seam allowances like understitching
- Best used in combination with understitching, not as replacement
Binding instead of facing
- Eliminates the facing entirely
- Creates a visible edge finish (can be matching or contrasting)
- Reduces bulk and works well on sheer or lightweight fabrics
- Requires different construction technique
Self-facing (extended facing)
- Facing cut as part of the garment piece
- Reduces bulk from seam allowances
- Still benefits from understitching at the fold line
- Common on sleeveless tops and dresses
Stitch-in-the-ditch
- Stitching in the seamline from the right side
- Catches the facing underneath
- Nearly invisible but requires precision
- Works best on straight edges
When to choose alternatives:
- Use topstitching on casual garments, outerwear, or anywhere you want visible detail
- Use hand-tacking on delicate fabrics like silk or sheer materials where machine stitching might show through
- Use binding on lightweight fabrics, children’s clothes, or when you want a decorative edge
- Use fusible interfacing in addition to (not instead of) understitching for extra stability
For most garments, understitching remains the best choice because it’s quick, effective, and invisible. The alternatives work better for specific situations rather than as general replacements. Understanding seam allowance options helps you choose the right finishing technique for each project.
Conclusion
Understitching transforms garment construction from homemade to handmade-with-pride by solving one of the most common finishing problems: facings that roll out and show from the outside. This simple technique, a single row of stitching through the facing and seam allowances, takes just minutes but delivers professional results that last through years of wear and washing.
The technique works because it creates a mechanical advantage, anchoring the seam allowances to the facing and establishing a fold line that naturally keeps everything hidden inside the garment. Whether you’re sewing your first dress with a faced neckline or constructing a tailored jacket, understitching should be part of your standard construction process, not an optional step.
Your next steps for mastering understitching:
- Practice on scrap fabric first, sew a practice seam, press the allowances to one side, and understitch to get the feel of keeping one layer free
- Start with straight edges like waistbands or pocket openings before moving to curves
- Make it a habit, add understitching to your mental checklist for every faced edge
- Invest in good tools, a sharp needle, quality thread, and a good iron make the process easier
- Press thoroughly at each step, pressing is just as important as the stitching itself
The difference between a garment that looks homemade and one that looks professionally constructed often comes down to finishing techniques like understitching. Master this simple skill, and you’ll see immediate improvement in every garment you make. Your necklines will lie flat, your armholes will stay invisible, and your finished pieces will have that polished, ready-to-wear quality that makes people ask, “Where did you buy that?”
Start incorporating understitching into your next project with a faced edge. The technique becomes second nature quickly, and once you see the results, you’ll never skip this step again.
Frequently Asked Questions
How close to the seamline should I understitch?
Understitch approximately 1/8 inch from the seamline for best results. Stitching closer (1/16 inch) works even better but requires more precision. Stitching farther away (1/4 inch or more) reduces the effectiveness of the technique because the facing has more room to roll outward.
Can I understitch after the facing is already turned and pressed?
You cannot effectively understitch after the facing is turned to the inside because you need access to the facing side with the seam allowances pressed toward it. Understitching must be done before the facing is turned. If you forgot to understitch, your best option is topstitching from the outside or hand-tacking the facing at key points.
Do I need to backstitch at the beginning and end of understitching?
Backstitching at the start and end of understitching is recommended but not critical since the facing will be secured by other seams and the outer edge will be finished. A few backstitches (3-4) at each end prevents the understitching from unraveling during construction and wear.
What thread color should I use for understitching?
Use thread that matches the facing fabric since understitching is sewn on the facing side. If your facing is a different color than your garment body, match the facing. The thread won’t show from the outside, so exact matching isn’t critical, a close match is fine.
Can I understitch with a serger instead of a regular sewing machine?
You cannot understitch with a serger because sergers cut and trim as they sew, which would cut through your garment. Understitching requires a regular sewing machine with a straight stitch. However, you can serge the raw edge of the facing after understitching to prevent fraying.
Should I understitch before or after trimming the seam allowances?
Trim and grade the seam allowances before understitching. Reducing bulk first makes it easier to press the seam allowances toward the facing and creates a flatter, less bulky finished edge. The typical order is: sew the seam, trim and grade, clip curves, press toward facing, then understitch.
Why does my facing still roll out even after understitching?
If your facing rolls out after understitching, you likely stitched too far from the seamline (more than 1/4 inch away), didn’t press the seam allowances firmly toward the facing before stitching, or skipped clipping curves. The solution is to check your distance from the seamline and ensure you’re following all preparation steps.
Can I understitch a facing that’s cut on the bias?
You can understitch bias-cut facings, but handle them carefully to avoid stretching. Use a shorter stitch length (2.0mm), reduce presser foot pressure slightly, and don’t pull the fabric through the machine. Let the feed dogs move the fabric naturally. Bias facings benefit especially from understitching because they’re prone to stretching and rolling.
Is understitching necessary on facings that will be topstitched?
Understitching is not necessary on facings that will be topstitched because topstitching serves the same function of securing the facing and preventing it from rolling out. Choose one technique or the other, not both. Topstitching is visible and decorative, while understitching is hidden and functional.
How do I understitch a V-neckline at the point?
To understitch a V-neckline, stitch down one side of the V, stop with the needle down at the point, lift the presser foot, pivot the fabric, lower the foot, and continue stitching up the other side. Clip very close to the point (within 1/16 inch of the stitching) before understitching to allow the point to turn sharply without puckering.
Can I use a walking foot for understitching?
You can use a walking foot for understitching, especially on slippery fabrics or multiple layers that tend to shift. The walking foot helps feed all layers evenly through the machine. However, a standard presser foot works fine for most understitching applications, so a walking foot is helpful but not necessary.
What stitch length is best for understitching?
Use a standard stitch length of 2.5mm for most understitching. Reduce to 2.0mm for tight curves or very lightweight fabrics where you need more control. Longer stitches (3.0mm) work for straight edges on medium to heavyweight fabrics but may not hold curves as securely.