Quick Answer
Presser feet are specialized attachments for sewing machines designed to handle specific fabrics, techniques, and sewing tasks. Each foot has a unique shape, groove, or guide that helps feed fabric correctly, create precise stitches, or apply specific finishes like zippers, buttonholes, or hems. Most sewing machines come with 3-7 basic feet, but dozens of specialty feet exist to expand your machine’s capabilities for quilting, garment construction, home décor, and decorative stitching.
Key Takeaways
- Presser feet hold fabric against feed dogs while guiding it through the machine for even, controlled stitching
- Standard machines include 3-7 basic feet (all-purpose, zipper, buttonhole, blind hem, and sometimes walking or overcast feet)
- Specialty feet solve specific problems like sewing thick seams, inserting invisible zippers, or creating rolled hems
- Feet are not always universal, check your machine’s shank type (low, high, or snap-on) before buying
- Beginners benefit most from zipper, walking, and rolled hem feet as first additions beyond the basic set
- Changing feet takes 5-30 seconds depending on whether your machine uses snap-on or screw-on attachments
- You can technically sew without a presser foot but fabric won’t feed evenly and stitch quality suffers dramatically
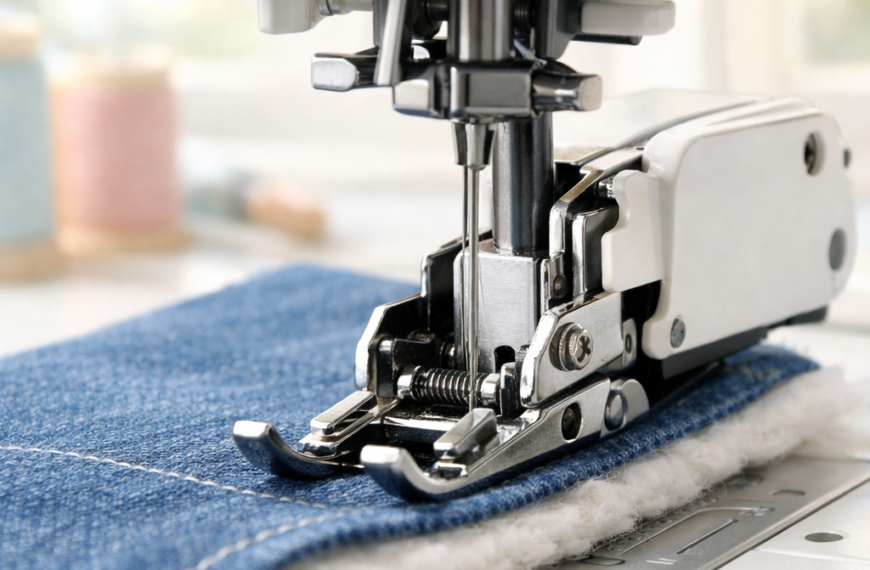
- Walking feet prevent fabric shifting on thick or slippery materials by feeding top and bottom layers at the same rate
What Is a Presser Foot on a Sewing Machine?
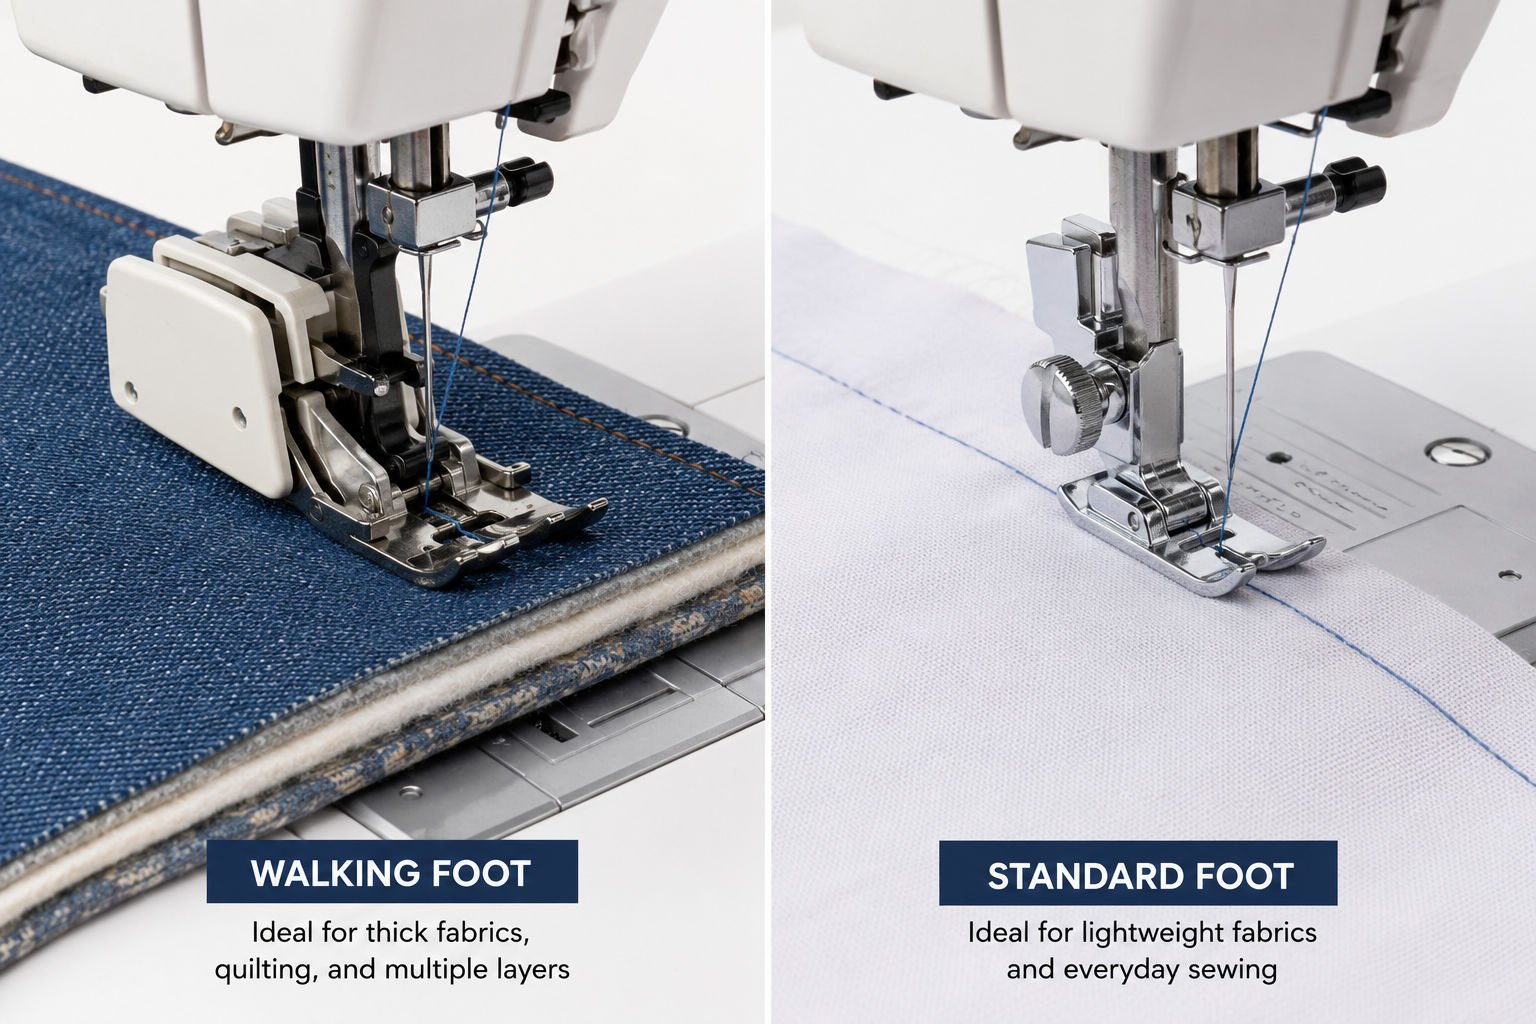
A presser foot is the metal or plastic attachment that clamps fabric against the feed dogs (those little teeth under the needle plate) while you sew. The foot applies downward pressure so fabric moves smoothly through the machine without bunching, shifting, or skipping stitches. Every presser foot has a hole or groove for the needle to pass through and a shank that connects to the machine’s presser bar.
The “all-purpose” or “zigzag” foot that comes pre-installed on most machines works for about 70% of basic sewing tasks. It has a wide opening to accommodate straight and zigzag stitches on light to medium-weight fabrics. But when you encounter thick seams, stretchy knits, slippery silks, or specialized techniques like piping or gathering, that standard foot struggles.
Why different feet exist: Fabric behaves differently depending on weight, weave, and stretch. A foot designed for denim won’t work well on chiffon because the pressure, groove depth, and feed mechanism need to match the material. Specialty feet also include guides, channels, or grooves that position trims, elastic, or cording exactly where you need them.
How Many Presser Feet Come With a Sewing Machine?
Most entry-level and mid-range sewing machines include 3 to 7 presser feet in the accessory box. Budget machines (under $150) typically include 3-4 basic feet, while machines in the $200-$500 range often bundle 5-7 feet. High-end computerized machines may include 8-12 feet, especially models marketed for quilting or embroidery.
Common feet included with new machines:
- All-purpose/zigzag foot (usually pre-installed)
- Zipper foot (narrow foot for sewing close to zipper teeth)
- Buttonhole foot (with measurement guides or sensors)
- Blind hem foot (with a guide blade for invisible hems)
- Button sewing foot (holds buttons flat for machine attachment)
- Overcast/overedge foot (finishes raw fabric edges)
- Satin stitch foot (clear or grooved underside for decorative stitches)
Choose a machine with more included feet if you plan to dive into garment sewing immediately and want to avoid buying accessories separately. If you’re starting with simple projects like pillows or tote bags, 3-4 basic feet will cover your needs for months.
Do I Really Need Different Presser Feet for Sewing?
You can complete many beginner and intermediate projects using only the all-purpose foot, but specialized feet dramatically improve stitch quality, speed, and ease for specific tasks. Trying to install an invisible zipper with a standard foot, for example, results in visible stitching and puckered fabric. An invisible zipper foot positions the needle right next to the coil, creating a professional finish in one pass.
When you absolutely need specialty feet:
- Thick fabrics or multiple layers, A walking foot prevents the top layer from shifting ahead of the bottom layer, essential for quilting and denim
- Invisible zippers, The standard zipper foot can’t unroll the coil; an invisible zipper foot has grooves that hold the coil open
- Narrow hems on lightweight fabric, A rolled hem foot folds and stitches the edge in one step, saving 10+ minutes per garment
- Buttonholes on thick fabric, A buttonhole foot with a back plate stabilizes the fabric and ensures even stitch density
When the all-purpose foot works fine:
- Straight seams on quilting cotton, linen, or medium-weight wovens
- Topstitching on stable fabrics
- Simple zigzag finishing on fabrics that don’t fray heavily
- Basting or gathering with long straight stitches
Bottom line: Start with your included feet and buy specialty feet only when you encounter a technique that frustrates you or produces poor results. Most sewists build their collection over 1-2 years based on the projects they actually make.
What Is a Walking Foot Used For?
A walking foot (also called an even-feed foot) has its own set of feed dogs on top of the fabric that work in sync with the machine’s bottom feed dogs. This dual-feed system moves the top and bottom fabric layers at exactly the same rate, preventing the top layer from creeping forward or bunching.
Best uses for a walking foot:
- Quilting, Keeps quilt top, batting, and backing aligned without pins shifting
- Matching plaids or stripes, Ensures pattern lines stay perfectly aligned at seams
- Slippery fabrics (satin, silk, vinyl, faux leather), Prevents the top layer from sliding
- Thick fabrics (denim, canvas, upholstery weight), Feeds heavy materials evenly without stalling
- Knits and stretchy fabrics, Reduces stretching and wavy seams
When you don’t need a walking foot: Thin, stable fabrics like quilting cotton or linen feed evenly with a standard foot. Save the walking foot for projects where fabric thickness, slipperiness, or layer count causes feeding problems.
Installation note: Walking feet are bulkier than snap-on feet and often attach via a fork that fits around the needle clamp screw. Check your machine’s manual, some computerized machines have a built-in dual-feed system that eliminates the need for a separate walking foot attachment.
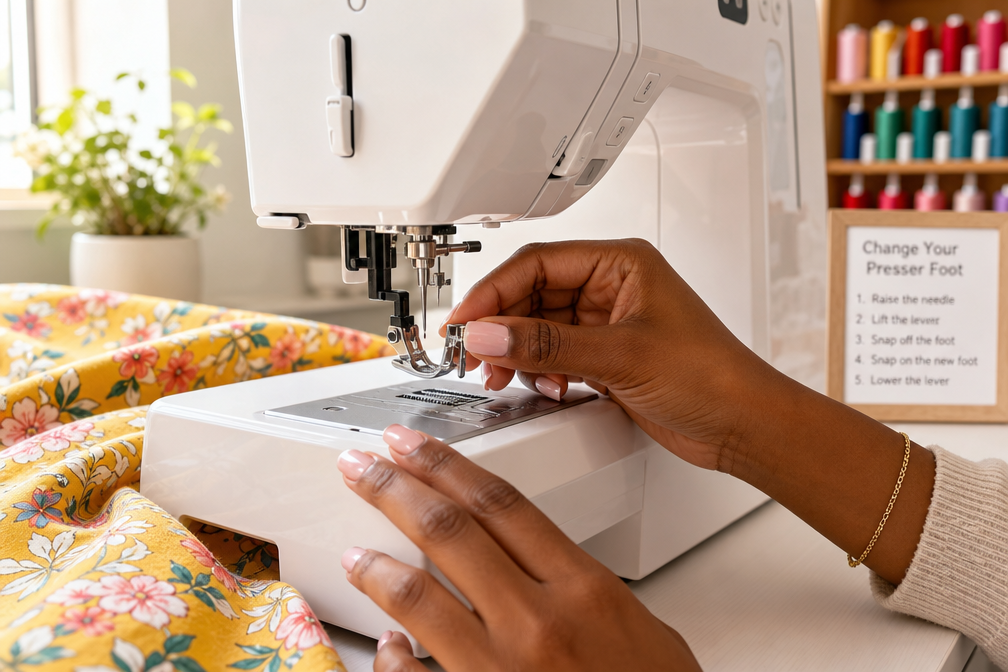
How to Change Presser Feet on a Sewing Machine
Modern sewing machines use either snap-on or screw-on presser feet. Snap-on systems (also called clip-on) let you swap feet in 5 seconds by pressing a release lever. Screw-on feet require a small screwdriver and take 20-30 seconds to change.
For snap-on presser feet:
- Raise the presser foot lever to its highest position
- Raise the needle to its highest point (turn the handwheel toward you)
- Press the black release button on the back of the presser foot shank
- The foot drops off, catch it or let it fall onto a soft surface
- Position the new foot directly under the shank groove
- Lower the presser foot lever, the foot clicks into place
For screw-on presser feet:
- Raise the presser foot and needle to their highest positions
- Use a small screwdriver to loosen (not remove) the thumb screw on the shank
- Slide the old foot out from the shank
- Slide the new foot’s post into the shank groove
- Tighten the thumb screw until snug (don’t overtighten)
Common mistake: Forgetting to raise the needle before changing feet. If the needle is down, it can catch on the foot opening and bend or break when you try to remove the foot.
Compatibility check: Snap-on feet from one brand usually don’t fit another brand’s machines. Always verify your machine’s shank type (low shank, high shank, or slant shank) before buying feet. Low shank is the most common and measures about 1/2 inch from the bottom of the shank to the needle plate.
Zipper Foot vs Regular Presser Foot
A zipper foot is narrow (about 1/4 inch wide) and can attach on either the left or right side of the needle, allowing you to stitch very close to zipper teeth, piping, or cording. A regular presser foot is wider (about 3/4 inch) with the needle centered, designed for general seaming where you don’t need to sew right next to a raised edge.
When to use a zipper foot:
- Installing centered, lapped, or exposed zippers in garments or bags
- Sewing piping or cording into seams (the narrow foot rides along the cord)
- Attaching welting to cushions or upholstery
- Any seam where a bulky edge prevents the regular foot from sitting flat
When the regular foot works better:
- Topstitching far from a zipper (1/4 inch or more away)
- Any seam without a raised edge or trim
- Zigzag stitching (zipper feet often have a smaller needle opening that doesn’t accommodate wide zigzags)
Zipper foot limitation: Most basic zipper feet don’t work for invisible zippers because they can’t unroll the zipper coil. You need a dedicated invisible zipper foot with two grooves that hold the coil open while you stitch.
What Is an Invisible Zipper Foot For?
An invisible zipper foot has two parallel grooves on the underside that hold the zipper coil upright and unrolled while you stitch. This positions the needle directly next to the coil teeth, hiding the stitching line behind the zipper when closed. A standard zipper foot can’t achieve this because it lacks the grooves to manipulate the coil.
How it works:
- The zipper is sewn face-down on the right side of the fabric before the seam is closed
- The foot’s groove unrolls the coil so it stands perpendicular to the tape
- You stitch right next to the coil teeth (closer than possible with a regular zipper foot)
- When the zipper is closed, the coil sits behind the fabric and only the zipper pull is visible
Best for: Dresses, skirts, and garments where you want the zipper to disappear into the seam. Invisible zippers create a cleaner, more professional look than centered or lapped zippers but require a bit more precision during installation.
Common mistake: Using a regular zipper foot and stitching too far from the coil. The result is visible stitching lines and a zipper that doesn’t sit flat in the seam. If you sew garments regularly, an invisible zipper foot (usually $8-15) is worth buying.
Are Presser Feet Universal or Machine Specific?
Presser feet are machine-specific based on shank type, not universal across all brands. The three main shank types are low shank, high shank, and slant shank. Low shank is the most common and fits most home sewing machines from Brother, Singer, Janome, Babylock, and others. High shank fits older Singer models and some industrial machines. Slant shank fits vintage Singer Slant-O-Matic machines from the 1960s.
How to identify your shank type:
- Low shank: Measures 1/2 inch from the bottom of the shank to the needle plate (most common)
- High shank: Measures 1 inch or more from shank to needle plate
- Slant shank: The shank angles backward instead of straight down (vintage Singers only)
Snap-on vs. screw-on compatibility: Even within the same shank type, snap-on feet from one brand may not click into another brand’s snap-on adapter. Generic snap-on feet often work across brands, but always check reviews or product descriptions for compatibility.
When feet are truly universal: Screw-on feet with a standard shank post fit any machine with the same shank height. Walking feet and other specialty attachments that clamp around the needle bar are usually brand-specific because the clamping mechanism varies.
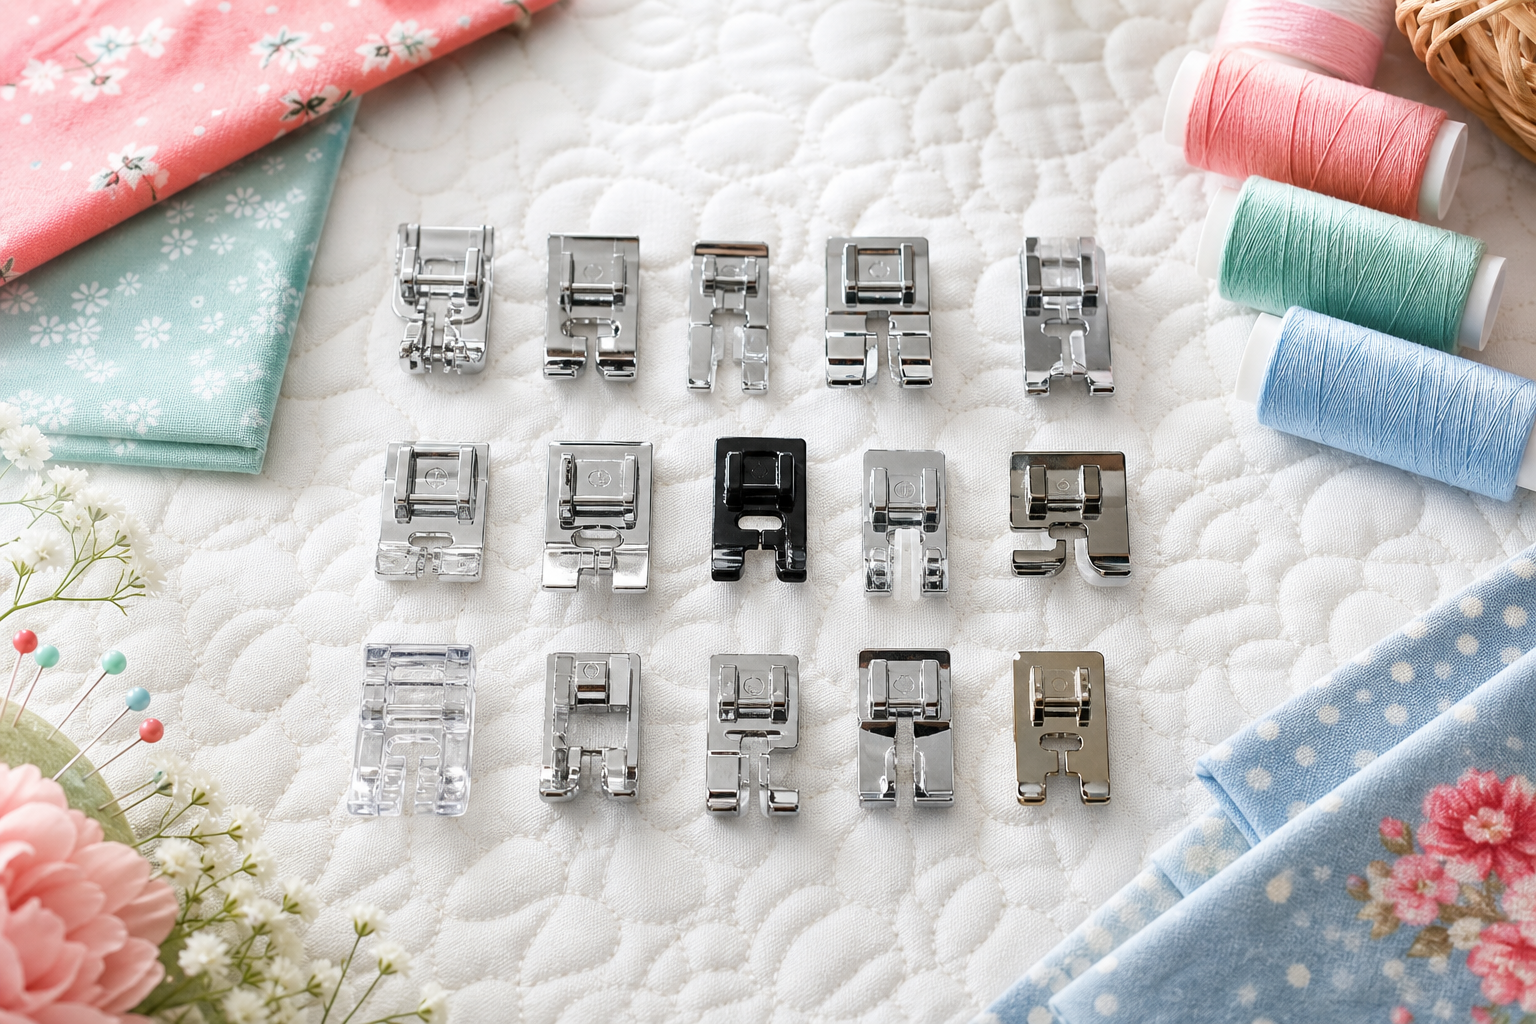
Pro tip: Buy a generic low-shank presser foot set (15-32 pieces for $20-40) if your machine uses snap-on feet. These sets include rolled hem, gathering, cording, and other specialty feet that work on most low-shank machines.
What Presser Foot to Use for Thick Fabric
For thick fabrics like denim, canvas, upholstery weight, or multiple layers (bag straps, quilt bindings), use a walking foot or a Teflon foot. A walking foot feeds thick layers evenly without the top layer shifting. A Teflon foot (also called a non-stick foot) has a slick coating that glides over sticky or textured surfaces like vinyl, faux leather, or laminated cotton.
Why the standard foot struggles on thick fabric:
- The bottom feed dogs move the lower layer faster than the top layer, causing misalignment
- Thick seams create a height difference that tilts the foot, resulting in uneven stitches
- Heavy fabric resists the foot’s pressure, causing skipped stitches or thread tension issues
Additional tips for thick fabric:
- Use a denim/jeans needle (size 90/14 or 100/16) to penetrate multiple layers
- Lengthen your stitch (3.0-3.5mm) so the needle doesn’t perforate the fabric excessively
- Reduce presser foot pressure if your machine has an adjustment dial
- Use a hump jumper (a small plastic wedge) to level the foot when crossing thick seams
When to use a Teflon foot instead of a walking foot: Teflon feet work best on fabrics that stick to metal, like vinyl, oilcloth, or faux leather. They don’t have the dual-feed mechanism of a walking foot, so they won’t prevent layer shifting on very thick or slippery fabrics, they just glide more smoothly.

Universal Compatibility: This walking foot attachment is designed to fit Brother, Singer, Janome, and all low shank sewing machine models. Whether you own a Brother walking foot sewing machine or a Singer walking foot sewing machine, this accessory ensures seamless integration and enhanced stitching performance
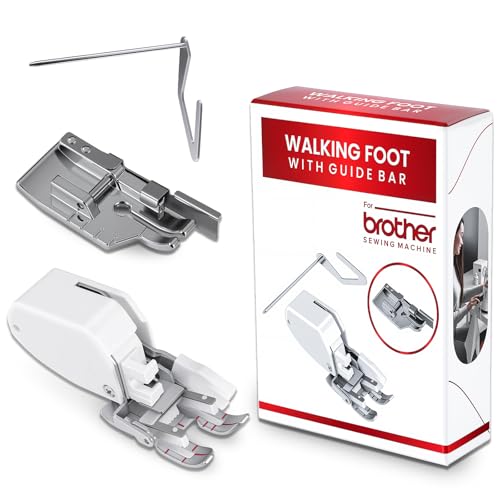
【UNIVERSAL LOW SHANK FIT】 Engineered to seamlessly fit Brother, Singer, Janome, Kenmore, and all low-shank sewing machines. Upgrade your domestic machine into a high-performance stitching powerhouse instantly without any extra adapters

SMOOTH FABRIC FEEDING: The SINGER Even Feed Walking Presser Foot ensures even fabric feeding for professional results, especially on thick or layered fabrics. Perfect for sewing challenging materials like velvet, denim, and quilts without shifting.
Rolled Hem Foot vs Narrow Hem Foot Difference
A rolled hem foot and a narrow hem foot both create small, finished hems, but they differ in hem width and fabric compatibility. A rolled hem foot produces a 2-4mm hem (about 1/8 inch) by rolling the fabric edge twice before stitching. A narrow hem foot creates a slightly wider hem (4-6mm or about 1/4 inch) with a single fold.
Rolled hem foot:
- Best for lightweight fabrics (chiffon, georgette, silk, cotton lawn)
- Creates a tiny, delicate hem often used on scarves, ruffles, or napkins
- Requires trimming the seam allowance to about 1/4 inch before starting
- The foot has a spiral or scroll shape that curls the fabric as it feeds
Narrow hem foot:
- Works on light to medium-weight fabrics (quilting cotton, linen, rayon)
- Creates a slightly wider, more visible hem
- Easier for beginners because the fold is less finicky
- The foot has a straight channel that folds the fabric once or twice
Common mistake: Trying to use a rolled hem foot on medium or heavyweight fabric. The fabric won’t curl properly through the scroll, resulting in jammed fabric and skipped stitches. For anything heavier than quilting cotton, use a narrow hem foot or hem by hand.
When to skip both: If you’re hemming jeans, canvas, or upholstery fabric, use the standard foot and fold/press the hem manually. Rolled and narrow hem feet only work on fabrics that can be manipulated into tight folds.
Best Presser Feet for Beginners
Beginners benefit most from presser feet that solve common frustrations and expand project possibilities without requiring advanced skills. The three most useful feet to buy first (beyond the basic set) are a walking foot, a 1/4-inch quilting foot, and a rolled hem foot.
Walking foot ($25-50)
Prevents fabric shifting on quilts, bag straps, and thick seams. Eliminates the need for excessive pinning and reduces frustration when layers don’t align.
1/4-inch quilting foot ($8-15)
Has a guide that keeps your seam allowance exactly 1/4 inch from the fabric edge, essential for quilting and patchwork. Even if you don’t quilt, this foot improves seam accuracy on any project.
Rolled hem foot ($6-12)
Turns a 20-minute hand-hemming task into a 2-minute machine task. Perfect for napkins, scarves, curtains, and garment hems on lightweight fabric.
Honorable mentions:
- Invisible zipper foot ($8-15), If you sew garments, this foot makes zipper installation dramatically easier
- Gathering foot ($10-18), Gathers fabric automatically while stitching, saving time on ruffles and skirts
- Bias tape binder foot ($12-20), Attaches bias tape in one step, useful for quilt binding and garment finishing
Skip these until you need them: Pintuck feet, cording feet, fringe feet, and other decorative feet. They’re fun but not essential for building foundational sewing skills.

Open toe for decorative stitching: The open toe design allows space for dense decorative stitches to glide easily under the foot, for more consistent stitching

Enhanced Compatibility: This walking foot attachment is compatible with Brother sewing machines, as well as part Singer and Janome models, making it a versatile addition to your crafting tool kit

【Clear View for Detailed Stitching】See exactly where your needle goes. The open toe design gives you a full view for intricate decorative stitches and free-motion quilting, making detailed work easier and more accurate
Most Useful Presser Feet to Buy First
If you’re expanding beyond your machine’s included feet, prioritize feet that solve problems you’re already encountering. The most universally useful presser feet across all sewing disciplines are the walking foot, 1/4-inch quilting foot, and invisible zipper foot.
Walking foot, Solves layer shifting on quilts, bags, and thick fabrics. If you’ve ever sewn a quilt sandwich and had the backing fabric bunch up, a walking foot eliminates that issue entirely.
1/4-inch quilting foot, Keeps seam allowances consistent, which is critical for quilting but also improves any project where precision matters (bags, garments, home décor).
Invisible zipper foot, Makes zipper installation faster and cleaner. If you sew garments or bags with zippers, this foot pays for itself in time saved and frustration avoided.
For quilters, add these next:
- Free-motion quilting foot (darning foot)
- Bias tape binder foot
- Edge-joining foot (for precise seam matching)
For garment sewers, add these next:
- Rolled hem foot
- Buttonhole foot with back plate (if your included foot struggles on thick fabric)
- Overlock/overcast foot (if you don’t own a serger)
For bag makers, add these next:
- Teflon foot (for vinyl, cork, or laminated fabrics)
- Piping foot
- Double-fold bias tape foot
Budget tip: Buy a generic presser foot set (15-32 feet for $20-40) if your machine uses low-shank snap-on feet. These sets include most specialty feet at a fraction of the cost of buying individually.

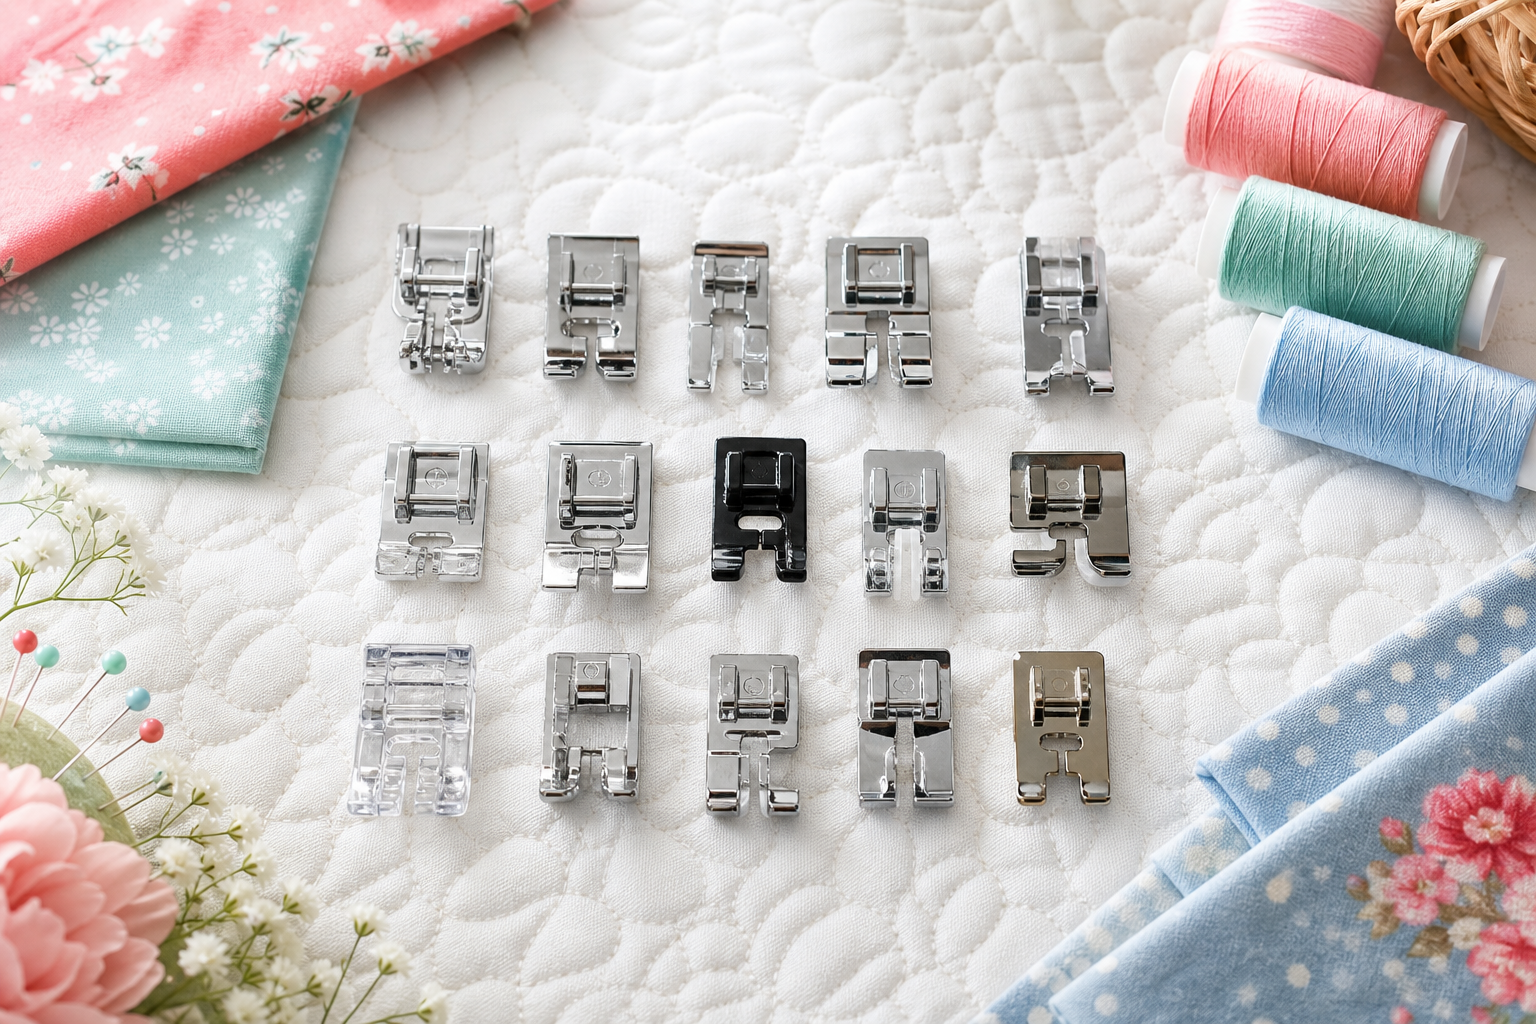
❤ MODEL COMPLETE :15 piece sewing machine presser feet kit with each part instructions in English.

Part #214874013 For 7mm zigzag machines
Can You Sew Without a Presser Foot?
Technically yes, but stitch quality and fabric control suffer dramatically. The presser foot applies downward pressure that keeps fabric against the feed dogs, which move the fabric through the machine at a consistent rate. Without a presser foot, fabric doesn’t feed evenly, stitches become irregular, and the fabric can bunch or jam under the needle.
When sewing without a presser foot might work:
- Free-motion quilting or embroidery, You lower the feed dogs and manually move the fabric, so the presser foot is replaced with a darning foot or free-motion foot that doesn’t apply pressure
- Emergency repairs, If your presser foot breaks mid-project and you need to finish a seam, you can carefully hand-guide the fabric while holding it taut
Why it’s a bad idea for regular sewing:
- Fabric won’t feed at a consistent rate, causing uneven stitch length
- The needle can pull fabric down into the bobbin area, jamming the machine
- You have no control over seam allowance accuracy
- Thread tension becomes unpredictable because the fabric isn’t held firmly
What to do if your presser foot breaks: Order a replacement snap-on adapter or screw-on shank from your machine’s manufacturer or a generic supplier. Most replacements cost $5-15 and arrive within a few days. In the meantime, avoid sewing or use a darning foot with the feed dogs lowered for very careful, slow stitching.
Buttonhole Foot Not Working Properly
Buttonhole feet fail most often due to incorrect foot attachment, wrong stitch settings, or fabric thickness exceeding the foot’s capacity. Buttonholes require precise stitch density and consistent fabric feeding, so any misalignment or setting error produces gappy, uneven, or jammed buttonholes.
Common causes and fixes:
Foot not fully snapped in, The buttonhole foot must click firmly into the snap-on adapter. If it’s loose, the sensor (on automatic buttonhole feet) can’t communicate with the machine. Remove and reattach the foot, ensuring you hear a click.
Button not placed in the foot’s measuring slot, Automatic buttonhole feet have a back plate where you place the button to set the buttonhole length. If the button isn’t seated correctly, the machine makes the wrong size buttonhole.
Fabric too thick or too thin, Buttonhole feet work best on light to medium-weight fabric. On thick fabric (denim, canvas), the foot can’t compress the layers enough for even stitches. Use a buttonhole stabilizer (tear-away or wash-away) under the fabric and slow your sewing speed.
Wrong stitch selected, Make sure you’ve selected the buttonhole stitch (usually a dedicated button on the machine or a stitch number in the manual). Some machines have multiple buttonhole styles (standard, keyhole, rounded), choose the one that matches your foot.
Feed dogs not engaged, Buttonholes require the feed dogs to be up. If you’ve been doing free-motion quilting and forgot to raise the feed dogs, the fabric won’t move through the foot.
Needle too small, Use a size 80/12 or 90/14 universal needle for buttonholes. A size 70/10 needle can break or skip stitches under the dense stitching of a buttonhole.
Pro tip: Practice buttonholes on scrap fabric with the same weight and interfacing as your project. Buttonholes are difficult to unpick, so testing first saves time and fabric.
FAQ
What is the most versatile presser foot?
The all-purpose or zigzag foot is the most versatile because it handles straight stitching, zigzag, and most decorative stitches on light to medium-weight fabrics. For specialty tasks, a walking foot is the most versatile add-on because it works on thick, slippery, and layered fabrics across quilting, garment sewing, and bag making.
How do I know which presser foot to use?
Match the foot to your fabric type and technique. Use a walking foot for thick or slippery fabrics, a zipper foot for zippers and piping, a rolled hem foot for narrow hems on lightweight fabric, and a buttonhole foot for buttonholes. Check your machine’s manual for a chart that pairs feet with common tasks.
Can I use Brother presser feet on a Singer machine?
Only if both machines use the same shank type (usually low shank) and the same attachment system (snap-on or screw-on). Snap-on feet are often brand-specific, but generic low-shank snap-on feet work on most Brother, Singer, Janome, and Babylock machines. Always verify compatibility before buying.
Why does my presser foot keep falling off?
The snap-on adapter may be loose or damaged. Remove the adapter (press the release button and slide it off the shank), inspect it for cracks or bent clips, and replace it if damaged. Generic snap-on adapters cost $3-8. If the adapter is fine, make sure you’re pressing the foot firmly up into the adapter until it clicks.
What presser foot do I use for stretchy fabric?
A walking foot or a stretch/jersey needle (ballpoint) with the standard foot works for most knits. For very stretchy fabrics like spandex or swimsuit material, use a walking foot to prevent wavy seams. Some machines also include a stretch stitch (lightning bolt icon) that works with the standard foot to add elasticity to the seam.
How much do presser feet cost?
Individual presser feet range from $6 to $50 depending on complexity. Basic feet (zipper, rolled hem, buttonhole) cost $6-15. Walking feet cost $25-50 because they have moving parts and a more complex attachment mechanism. Generic presser foot sets (15-32 feet) cost $20-40 and offer the best value for beginners.
Do expensive presser feet work better than cheap ones?
Brand-name feet from your machine’s manufacturer often have tighter tolerances and better materials, but generic feet work fine for most tasks. Walking feet and other complex feet benefit from higher quality because moving parts need precision. For simple feet like zipper or rolled hem, generic versions perform nearly identically to brand-name versions.
Can I use presser feet from an old sewing machine on a new one?
Yes, if the shank type matches. Vintage machines often use low-shank or high-shank feet that fit modern machines with the same shank height. Slant-shank feet from 1960s Singer machines won’t fit modern machines. Check the shank-to-needle-plate distance to confirm compatibility.
What is a free-motion quilting foot?
A free-motion foot (also called a darning foot) has a spring-loaded or open-toe design that allows you to move fabric freely in any direction while the feed dogs are lowered. It’s used for free-motion quilting, embroidery, and decorative stitching where you control fabric movement instead of the machine’s feed dogs.
Why do some presser feet have a clear plastic toe?
Clear or open-toe presser feet let you see the stitching line and fabric markings while you sew. They’re useful for appliqué, decorative stitching, and any technique where precise needle placement matters. The clear material is usually acrylic or polycarbonate and works the same as metal feet.
How do I clean presser feet?
Remove lint and thread buildup with a small brush (a clean toothbrush works well) or compressed air. For sticky residue from stabilizer or adhesive, wipe the foot with rubbing alcohol on a cotton swab. Avoid soaking feet in water because some have internal springs or bearings that can rust.
What is a Teflon presser foot used for?
A Teflon (non-stick) foot has a slick coating that glides over sticky or textured fabrics like vinyl, faux leather, oilcloth, laminated cotton, and suede. It prevents the foot from dragging or leaving marks on the fabric surface. Use it for bag making, raincoat sewing, or any project with coated fabrics.
Conclusion
Understanding what all those presser feet are for transforms your sewing machine from a basic straight-stitch tool into a versatile workshop. Each foot solves a specific problem, whether it’s preventing fabric shift on thick quilts, creating invisible zipper installations, or finishing delicate hems in seconds. Start with the feet included with your machine and add specialty feet only when you encounter techniques that frustrate you or produce poor results with the standard foot.
The three most valuable additions for any sewist are a walking foot (for even feeding on thick or slippery fabrics), a 1/4-inch quilting foot (for accurate seam allowances), and an invisible zipper foot (for professional garment finishing). These three feet cover the most common pain points across quilting, garment sewing, and bag making.
Next steps:
- Inventory the presser feet that came with your machine and read the manual section explaining each one
- Practice changing feet until you can swap them confidently in under 30 seconds
- Identify the techniques you struggle with most (thick seams, zippers, hems) and research which foot solves that problem
- Buy one specialty foot and practice on scrap fabric before using it on a project
- Join online sewing communities to see which feet other sewists recommend for your specific projects
The right presser foot makes difficult techniques easy and transforms frustrating tasks into satisfying, professional results. Build your collection gradually based on the projects you love, and you’ll wonder how you ever sewed without them.