


Quick Answer
Setting up a sewing space in a small home requires just 25-36 square feet of floor space, a stable work surface at 28-30 inches high, adequate task lighting (at least 500 lumens), and vertical storage solutions to maximize limited square footage. You can create a functional sewing area in a corner, closet, or with a fold-away station that disappears when not in use, making it perfect for apartments and compact homes.
Key Takeaways
- Minimum space needed: A functional sewing area requires only 25-36 square feet (roughly 5×5 to 6×6 feet) for a basic setup
- Fold-away vs. permanent: Fold-away stations work best for multi-use rooms and renters, while permanent setups suit dedicated corners or closets
- Budget range: Basic sewing space setup costs $150-$400, including a compact table, lighting, and storage solutions
- Vertical storage is essential: Wall-mounted shelves, pegboards, and over-door organizers maximize storage without consuming floor space
- Lighting matters: Position your machine near natural light when possible, and add a task lamp with at least 500 lumens for evening sewing
- Closet conversions work: A standard 24-inch-deep closet can accommodate a sewing machine, cutting surface, and vertical storage
- Common mistakes: Inadequate lighting, no designated cutting surface, and failing to plan for fabric storage lead to frustration
- Renter-friendly options: Command strips, tension rods, freestanding furniture, and portable carts require no drilling or permanent modifications
What Is the Minimum Space Needed for a Sewing Area?
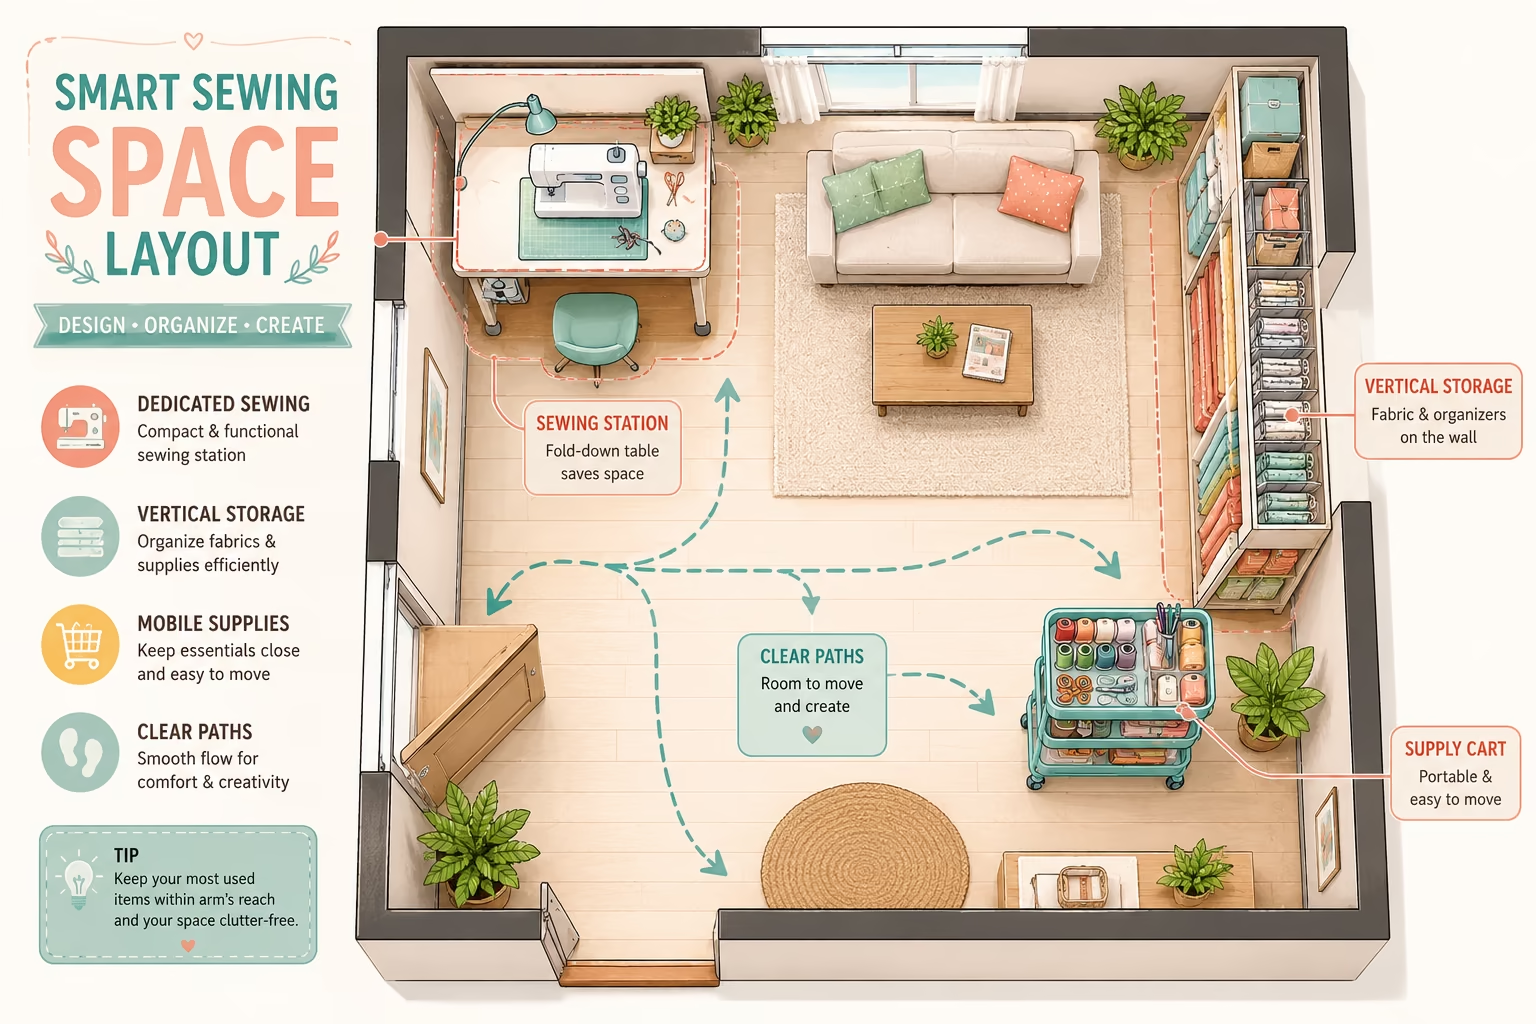
A functional sewing area requires approximately 25-36 square feet of floor space, which translates to a 5×5 to 6×6 foot area. This accommodates a sewing machine table (24-36 inches wide), a chair, and minimal movement space around your work surface.
The actual footprint depends on three factors:
Your sewing machine size: Compact machines need only 12-18 inches of table width, while larger models with extension tables require 24-30 inches.
Cutting surface needs: If you plan to cut fabric in the same space, add another 24×36 inches for a folding cutting mat or board. Many sewers use their dining table or bed for cutting to save space.
Storage volume: Vertical storage (shelves, pegboards) adds zero floor space, while rolling carts add 12-18 square feet but can be moved when not in use.
Choose a 5×5 foot setup if: You sew occasionally, use a compact machine, and can cut fabric elsewhere in your home.
Choose a 6×6 foot or larger setup if: You sew frequently, work on larger projects like quilts or garments, or need dedicated cutting space.
A corner of a bedroom, living room, or even a wide hallway can work. The key is ensuring your chair can pull out comfortably and you have elbow room while guiding fabric through the machine.
How to Organize Sewing Supplies in a Small Apartment
Organizing sewing supplies in a small apartment requires vertical storage, clear containers, and a “one in, one out” mindset to prevent clutter accumulation. Wall-mounted solutions and multi-purpose furniture keep supplies accessible without consuming precious floor space.
Vertical storage solutions:
- Pegboards: Mount a pegboard above your sewing table to hang scissors, rulers, rotary cutters, and thread spools. Use small baskets for notions.
- Floating shelves: Install 2-3 shelves above your work area for fabric bins, pattern storage, and reference books.
- Over-door organizers: Hang clear pocket organizers on closet doors for thread, bobbins, needles, and small tools.
- Magnetic strips: Attach magnetic strips to walls or the side of your table to hold metal scissors, pins, and seam rippers.
Container strategies:
Use clear, stackable bins labeled by category (interfacing, zippers, elastic, buttons). Store fabric vertically in bins or magazine holders so you can see each piece at a glance. Keep current project supplies in a portable caddy that moves with you.
Common mistake: Buying too many storage containers before assessing what you actually own. Audit your supplies first, purge duplicates and unused items, then purchase storage that fits your real needs.
Space-saving tip: Store patterns digitally when possible, or file paper patterns in large ziplock bags with a photo of the finished garment taped to the outside. This reduces bulk significantly compared to keeping original envelopes.
Best Sewing Table for Small Spaces
The best sewing table for small spaces is one that matches your available square footage and usage frequency: fold-down wall-mounted tables (18-24 inches deep) for occasional sewers, compact sewing desks (30-40 inches wide) for regular use, or portable sewing cabinets with built-in storage for those who need mobility.
Top options by space constraint:
| Table Type | Width | Best For | Price Range |
|---|---|---|---|
| Wall-mounted fold-down | 24-36″ | Multi-use rooms, renters | $80-$200 |
| Compact sewing desk | 30-40″ | Dedicated corners | $100-$300 |
| Portable sewing cabinet | 20-24″ | Moving between rooms | $150-$400 |
| Adjustable-height laptop desk | 24-30″ | Temporary setups | $60-$150 |
Key features to prioritize:
- Stable surface: Your table must not wobble. Sewing machine vibration amplifies any instability, leading to skipped stitches and frustration.
- Correct height: Standard sewing table height is 28-30 inches (slightly lower than a dining table). Your elbows should rest comfortably at 90 degrees while sewing.
- Machine drop-in option: Some tables have a recessed area so your machine sits flush with the table surface, creating a larger flat work area. This isn’t essential but helps with large projects.
- Storage integration: Look for tables with drawers, shelves, or side pockets to keep thread, scissors, and notions within arm’s reach.
Choose a fold-down table if: You need the space for other activities daily and can set up/break down in 2-3 minutes.
Choose a permanent compact desk if: You have a dedicated corner and sew at least weekly. The convenience of leaving your machine set up saves significant time.
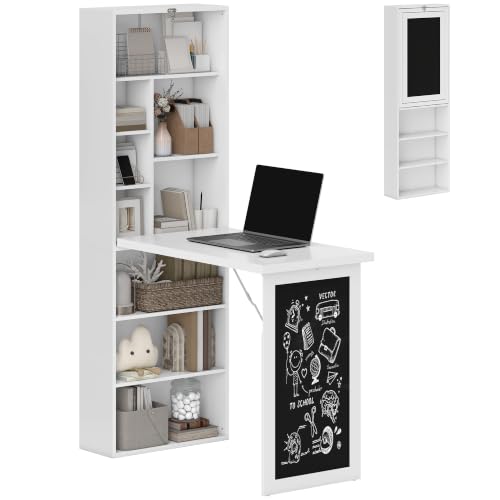
Space-Saving Sanctuary: Great for home office and small apartments, this fold out desk frees up your space when closed—only 7.7" deep. Switch effortlessly between a full workspace and a neat display cabinet, helping you reclaim your living area
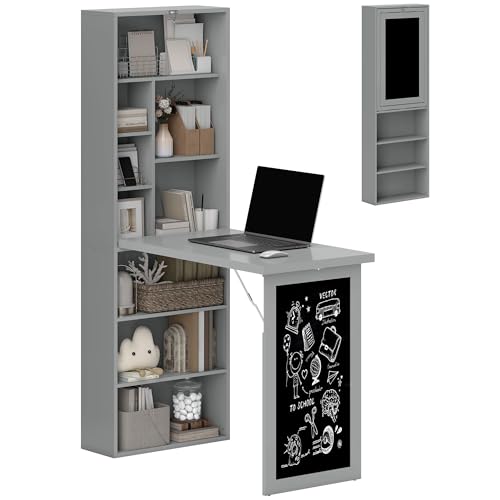
Space-Saving Sanctuary: Great for home office and small apartments, this fold out desk frees up your space when closed—only 7.7" deep. Switch effortlessly between a full workspace and a neat display cabinet, helping you reclaim your living area

【Wall Mounted Shelf】 Add Extra Space to Any Room. Whether it's in your office, bedroom, or living room as a compact workstation, in your kitchen as an extra countertop for cooking and dining, in your laundry room, on your balcony, or even in your camper or RV, this shelf is designed to adapt to your needs.
Fold-Away Sewing Station vs Permanent Setup
Fold-away sewing stations suit renters, multi-use rooms, and occasional sewers who need flexibility, while permanent setups work best for dedicated spaces and frequent sewers who value convenience over floor space. The choice hinges on how often you sew and whether you can dedicate a corner exclusively to sewing.
Fold-away station advantages:
- Reclaims floor space when not in use (critical in studio apartments)
- Renter-friendly with no permanent modifications needed
- Forces you to keep supplies organized and portable
- Costs less upfront ($80-$200 for a basic wall-mounted table)
Fold-away station drawbacks:
- Setup and breakdown adds 5-10 minutes to each sewing session
- Limited storage for supplies (requires separate solutions)
- May not accommodate larger machines or extension tables
- Can feel less “inviting” to start projects spontaneously
Permanent setup advantages:
- Machine stays threaded and ready to use instantly
- Integrated storage keeps everything at your fingertips
- More stable for heavy machines or high-speed sewing
- Creates a dedicated creative zone that encourages regular sewing
Permanent setup drawbacks:
- Consumes floor space continuously (25-36 square feet minimum)
- Requires commitment to a specific room layout
- Can accumulate clutter if not maintained
- Higher initial investment ($150-$400 for table and storage)
Decision rule: If you sew less than once per week or share your space with others who need the room for different activities, choose fold-away. If you sew multiple times weekly and have a corner you can dedicate permanently, the convenience of a permanent setup pays off quickly.
Many sewers start with a fold-away station and upgrade to permanent once they confirm sewing is a regular hobby. There’s no wrong choice, just different trade-offs.

STORAGE SPACE: Create fashion pieces in a breeze with a designated spot for yarn, pins, scissors, and materials in 2 rows of pegs, 2 attached storage trays, 1 large interior shelf, and a large tabletop space

[Smart Storage & Organization]: Keep all your sewing supplies within reach! This folding sewing table features a spacious tabletop for your sewing machine and projects, 3 built-in side storage bins for threads, scissors, and tools, plus a large open shelf—perfect for organizing storage boxes, fabric, or a mini iron. Dimensions (expanded): 45.5''L x 16''W x 31''H.

Convenient size for trimming, foundation piecing, or cutting around templates
How Much Does It Cost to Set Up a Basic Sewing Space at Home?
Setting up a basic sewing space at home costs between $150 and $400 for furniture and storage, not including the sewing machine itself. This budget covers a stable work surface, task lighting, and essential storage solutions for a functional small-space setup.
Budget breakdown (basic setup):
- Work surface: $60-$200 (fold-down table, compact desk, or sturdy TV tray)
- Task lighting: $20-$50 (LED desk lamp with adjustable arm, 500+ lumens)
- Storage solutions: $40-$100 (pegboard, floating shelves, clear bins, thread rack)
- Seating: $30-$80 (adjustable office chair or kitchen chair with cushion)
- Cutting mat: $15-$30 (24×36 inch self-healing mat for rotary cutting)
Total: $165-$460 depending on whether you choose budget or mid-range options.
Cost-saving strategies:
Repurpose furniture you already own. A sturdy kitchen table, desk, or even a folding banquet table can serve as your sewing surface if it’s the right height and doesn’t wobble. Add a non-slip mat under your machine for stability.
Shop secondhand for tables and chairs. Check Facebook Marketplace, Craigslist, or thrift stores for solid wood desks and office chairs at 50-70% off retail prices.
Start minimal and add storage as needed. You don’t need every organizational tool on day one. Begin with a pegboard and a few bins, then expand based on your actual usage patterns.
Common mistake: Overspending on specialized sewing furniture before confirming your space needs. A $300 sewing cabinet might seem perfect, but a $100 desk and $50 in storage could serve you better while leaving budget for fabric and notions.
If you’re just starting out, check our guide on beginner sewing to understand what equipment truly matters versus nice-to-have extras.
Can I Set Up a Sewing Area in a Closet?
Yes, a standard closet (24 inches deep by 48-72 inches wide) can accommodate a functional sewing area with a wall-mounted shelf for your machine, vertical storage for supplies, and even a small cutting surface. Closet sewing spaces work especially well for apartments and homes where every square foot counts.
Closet conversion steps:
Remove the closet door or replace it with a curtain to improve access and light. Bifold doors can stay if they open fully.
Install a sturdy shelf at 28-30 inches height for your sewing machine. Use heavy-duty brackets rated for at least 50 pounds to handle machine weight and vibration.
Add task lighting since closets typically lack overhead lights. Mount a battery-powered LED puck light or plug in a clip-on lamp.
Maximize vertical storage with additional shelves above the machine for fabric bins, a pegboard on one side wall for tools, and hooks for measuring tapes and scissors.
Create a fold-down cutting surface by mounting a hinged board (24×36 inches) to the wall that flips up when not in use, or use a cutting mat on your bed/dining table.
Add a small stool or chair that slides under the shelf when not in use. A backless stool saves space in tight closets.
Ventilation consideration: Closets can get warm during extended sewing sessions. Keep the door/curtain open and consider a small USB fan for air circulation.
Choose closet setup if: You have an unused coat closet, linen closet, or bedroom closet you can dedicate to sewing. It’s ideal for renters because modifications are minimal and reversible.
Avoid closet setup if: Your only available closet is in a dark, poorly ventilated area, or if you work on large projects like quilts that need more spreading room.
Sewing Room Lighting Requirements for Small Spaces
Sewing room lighting requires at least 500 lumens of task lighting directly over your machine and needle area, plus ambient lighting to reduce eye strain. Natural daylight (5000-6500K color temperature) is ideal, so position your sewing space near a window when possible and supplement with LED task lamps for evening work.
Lighting layers for small sewing spaces:
Task lighting (essential): A focused LED lamp with an adjustable arm positioned 12-18 inches from your needle provides shadow-free illumination where you need it most. Look for lamps rated 500-1000 lumens with a daylight color temperature (5000-6500K) that shows fabric colors accurately.
Ambient lighting (important): Overhead room lighting or a floor lamp prevents harsh contrast between your bright work area and dark surroundings, reducing eye fatigue during long sewing sessions.
Natural light (bonus): Position your sewing table perpendicular to a window so natural light comes from the side, not behind you (which creates shadows) or in front (which causes glare on your machine’s screen).
Common lighting mistakes:
- Using only overhead lighting, which creates shadows from your hands and machine
- Choosing warm-toned bulbs (2700-3000K) that distort fabric colors, making it hard to match thread
- Positioning your machine facing a bright window, causing screen glare and eye strain
- Neglecting to add lighting inside closet sewing spaces
Budget solution: A $20-$30 LED desk lamp with a clamp base and flexible arm provides excellent task lighting without consuming table space. Position it on the left side if you’re right-handed (right side if left-handed) to minimize shadows.
Proper lighting isn’t optional. Poor visibility leads to eye strain, headaches, and sewing mistakes that require time-consuming seam ripping. If you’re experiencing sewing machine skipping stitches, check your lighting first, you might be inadvertently pulling fabric because you can’t see the needle clearly.
How to Store Fabric When You Don’t Have Much Room
Store fabric vertically in clear bins, magazine holders, or on comic book boards to maximize visibility and minimize space consumption. Vertical storage lets you flip through fabrics like files, preventing the “fabric avalanche” that happens with horizontal stacking and making it easy to see your entire stash at a glance.
Space-efficient fabric storage methods:
Comic book boards method: Wrap fabric around 7×10 inch comic book boards (available at hobby stores), secure with a pin, and store upright in a bin or drawer. This works beautifully for fat quarters and half-yard cuts.
Magazine holders: Stand fabric pieces rolled or folded in magazine holders on a shelf. Label the spine by fabric type (quilting cotton, knit, linen) or color family.
Under-bed storage: Use shallow, wheeled bins that slide under your bed for bulk fabric storage. Keep current project fabrics accessible and archive the rest.
Vacuum storage bags: Compress rarely-used fabrics (seasonal, future projects) in vacuum-seal bags to reduce volume by 50-70%. Store these in closets or under furniture.
Hanging storage: Clip fabric pieces to pant hangers and hang in a closet. This works well for larger cuts (1+ yards) and keeps fabrics wrinkle-free.
Fabric storage by quantity:
- Small stash (under 20 pieces): One clear bin with vertical dividers or a single magazine holder
- Medium stash (20-50 pieces): 2-3 bins organized by fabric type or color, plus under-bed storage for backups
- Large stash (50+ pieces): Combination of vertical bins, under-bed storage, and vacuum bags for archive fabrics
Common mistake: Storing fabric in opaque containers where you forget what you own, leading to duplicate purchases. Clear bins or labeled containers solve this problem.
Scrap management: Keep a separate small bin for scraps larger than 5×5 inches, organized by color. Discard anything smaller unless you specifically quilt with tiny pieces. Scraps multiply quickly and consume disproportionate storage space.
Mistakes People Make When Setting Up a Small Sewing Space
The most common mistakes when setting up a small sewing space include inadequate lighting, no designated cutting surface, insufficient storage planning, and choosing furniture that wobbles or sits at the wrong height. These issues create frustration and make sewing feel harder than it should be.
Top setup mistakes and fixes:
Mistake 1: Skipping task lighting Relying only on overhead room lighting creates shadows and eye strain. Add a dedicated task lamp with 500+ lumens positioned near your needle.
Mistake 2: No cutting surface plan Assuming you’ll “figure it out later” leads to awkward floor cutting or hunching over a coffee table. Designate a cutting area (dining table, bed with cutting mat, or fold-down board) before you start your first project.
Mistake 3: Buying storage before auditing supplies Purchasing bins and organizers before knowing what you own results in wrong sizes and wasted money. Sort your supplies first, then buy storage that fits your actual inventory.
Mistake 4: Unstable work surface Using a wobbly card table or lightweight desk amplifies machine vibration, causing skipped stitches and frustration. Test stability by pressing down firmly on all corners, if it rocks, it won’t work for sewing.
Mistake 5: Wrong table height Standard dining tables (30 inches) are too high for comfortable sewing. Your elbows should rest at 90 degrees with hands on the machine. If your table is too high, raise your chair or add a footrest.
Mistake 6: Ignoring electrical outlet access Positioning your sewing table far from outlets means running extension cords across walkways (tripping hazard) or constantly unplugging other devices. Plan your layout around outlet locations.
Mistake 7: No plan for fabric storage Fabric piles grow quickly. Without a storage system from day one, fabric takes over your space and makes it hard to find what you need. Start with at least one dedicated fabric bin.
Mistake 8: Forgetting about seating comfort Using a dining chair without back support leads to back pain during long sewing sessions. Invest in an adjustable office chair or add a lumbar cushion to your existing chair.
If you’re setting up your first space, review our sewing tips to avoid common beginner pitfalls beyond just space setup.
Is a Dedicated Sewing Room Necessary for Beginners?
No, a dedicated sewing room is not necessary for beginners. A small corner, closet, or fold-away station provides everything needed to learn sewing basics and complete projects successfully. Many experienced sewers work in compact spaces and produce professional-quality results.
What beginners actually need:
- A stable surface for a sewing machine (24-36 inches wide)
- Adequate lighting (task lamp + ambient light)
- Basic storage for thread, scissors, pins, and notions (one small bin or drawer)
- Access to a cutting surface (can be a dining table or bed with a mat)
- Comfortable seating at the correct height
What beginners don’t need:
- A separate room with a door
- Built-in cabinets or custom furniture
- Extensive fabric storage (start with 5-10 pieces)
- Industrial-grade cutting tables
- Specialized sewing chairs (a regular office chair works fine)
Advantages of starting small:
Starting in a compact space forces good organizational habits. You learn to keep only supplies you actually use, put tools away after each session, and work efficiently within constraints. These habits serve you well even if you later expand to a larger space.
Small spaces also keep initial costs low, letting you invest in quality fabric and sewing machine maintenance rather than furniture.
When to consider a dedicated room:
Upgrade to a dedicated sewing room when you sew multiple times per week, work on large projects (quilts, home decor, garment sewing), or find that setup/breakdown time discourages you from sewing. Until then, a compact space serves you perfectly well.
Many sewers never need a dedicated room. The quality of your work depends on your skills and machine, not your square footage.
Portable Sewing Machine Cabinet Options
Portable sewing machine cabinets range from rolling carts with fold-down work surfaces ($100-$250) to compact cabinets with lift mechanisms ($200-$400) that let you move your sewing station between rooms or store it away when not in use. These work especially well for renters and those who share space with family members.
Types of portable cabinets:
Rolling carts with drop-leaf: These feature a central cabinet for your machine, side leaves that fold up to create a larger work surface, and wheels for mobility. When closed, they’re about 20×24 inches, small enough to roll into a closet.
Lift-top cabinets: Your machine sits on a platform that lifts to working height and lowers into the cabinet when done. The closed cabinet doubles as a side table or TV stand. These typically don’t have wheels but are light enough to move occasionally.
Portable sewing tables: Lightweight tables (under 30 pounds) with folding legs that set up in seconds. These lack storage but cost less ($60-$120) and fit in narrow closets when folded.
Features to prioritize:
- Locking wheels: Essential for stability during sewing. Unlock to move, lock before you start stitching.
- Weight capacity: Ensure the cabinet supports your machine’s weight plus fabric. Most handle 30-40 pounds comfortably.
- Storage drawers: At least one drawer for thread, bobbins, and scissors keeps essentials with your machine.
- Fold-down surface area: When extended, you need at least 36-40 inches of width for comfortable sewing.
Choose portable cabinets if: You sew in different rooms (living room during the day, bedroom at night), need to store your setup completely out of sight between sessions, or move frequently and want furniture that travels easily.
Skip portable cabinets if: You have a dedicated corner and rarely need to move your machine. A standard desk with storage costs less and offers more stability.
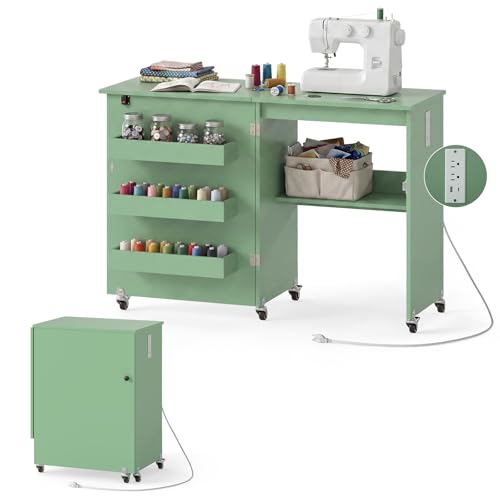
[Smart Storage & Organization]: Keep all your sewing supplies within reach! This folding sewing table features a spacious tabletop for your sewing machine and projects, 3 built-in side storage bins for threads, scissors, and tools, plus a large open shelf—perfect for organizing storage boxes, fabric, or a mini iron. Dimensions (expanded): 45.5''L x 16''W x 31''H.

Maximize your sewing space with a large tabletop, dual storage trays, 18 spool pegs, and an open compartment—keep all threads, tools, and supplies organized and at hand.

【Large Storage Capacity】 This table has 3 hidden storage bins, a built in storage shelf blow the tabletop and a side cabinet, which can be classified storage of various tools. Items in the bins can be quickly found, which keeps your home clean and tidy. Featuring large table top, this sewing table provides plenty of space for sewing even the sewing machine is placed.
How to Reduce Sewing Room Clutter in Tight Spaces
Reducing sewing room clutter in tight spaces requires implementing a “one project at a time” rule, using vertical storage exclusively, and conducting monthly supply audits to remove unused items. Clutter accumulates quickly in small spaces, making it essential to maintain strict organizational systems.
Clutter prevention strategies:
One project rule: Keep only your current project’s supplies on your work surface. Store everything else in bins or drawers. This single habit prevents the “creative chaos” that makes small spaces unusable.
Vertical storage only: Every horizontal surface (table, floor, chair) should be clear except when actively sewing. Use walls, pegboards, and shelves for storage instead.
Monthly audit: Once per month, review your supplies and remove items you haven’t used in 6+ months. Donate excess fabric, outdated patterns, and duplicate tools.
Designated homes: Every item needs a specific storage location. Thread goes in the thread rack, scissors hang on the pegboard, fabric stays in bins. When everything has a home, cleanup takes 2-3 minutes instead of 20.
Project bins: Use a portable bin or basket for each project’s supplies (fabric, pattern, notions). When you’re not working on that project, the entire bin goes on a shelf. This prevents project supplies from mixing and creating confusion.
Scrap discipline: Establish a minimum scrap size (5×5 inches is common) and discard anything smaller immediately. Tiny scraps consume storage space without providing real value for most sewers.
Common clutter triggers:
- Leaving multiple projects out simultaneously
- Buying fabric without a specific project in mind
- Keeping every scrap “just in case”
- Storing supplies in opaque containers where you forget what you own
- Failing to put tools away after each sewing session
If you’re struggling with sewing machine jamming or other issues, a cluttered workspace often contributes to the problem by making it hard to properly maintain your machine and keep the work area clean.
Sewing Space Setup for Renters Who Can’t Drill Holes
Renters who can’t drill holes can create functional sewing spaces using Command strips for lightweight storage, tension rods for hanging supplies, freestanding furniture, and portable pegboards that lean against walls. These solutions require zero permanent modifications and leave no damage when you move.
Renter-friendly storage solutions:
Command strips and hooks: Heavy-duty Command strips (rated for 5-16 pounds) hold floating shelves, small pegboards, and tool organizers. Follow weight limits carefully and use multiple strips for heavier items.
Tension rods: Install tension rods inside closets or between walls to hang fabric, patterns, or tool organizers. These require no hardware and leave no marks.
Freestanding pegboards: Purchase or build a pegboard that leans against the wall or sits on your table. Some designs use a weighted base for stability without wall mounting.
Over-door organizers: Hang clear pocket organizers over closet doors for thread, scissors, and notions. These work on any standard door without tools.
Freestanding shelving units: Metal or wood shelving units provide vertical storage without wall mounting. Choose units with a small footprint (12-18 inches deep) to maximize floor space.
Rolling carts: Multi-tier rolling carts store supplies and move easily. Park them next to your sewing table during use, roll them into a closet when done.
Furniture with built-in storage: Choose a sewing table or desk with drawers and shelves so you don’t need to add wall storage.
Magnetic solutions: Stick magnetic strips to the side of metal furniture or filing cabinets (not walls) to hold scissors and metal tools.
Setup tips for renters:
Test Command strips on an inconspicuous area first to ensure they don’t damage your specific wall finish. Some textured walls don’t work well with adhesive strips.
Take photos of your setup so you can recreate it quickly in your next home. Document what worked and what didn’t.
Keep all original hardware and wall anchors from your furniture. You’ll need these when you move and want to sell or donate items.
Choose lightweight storage solutions. Heavy shelving requires drilling; lightweight alternatives work just as well for sewing supplies.
Common renter mistake: Assuming you can’t have organized storage without drilling. The solutions above create just as much storage capacity as permanent installations, with the bonus of taking everything with you when you move.
Frequently Asked Questions
How much space do I really need for a sewing machine? You need a minimum of 24 inches of table width and 18 inches of depth for the machine itself, plus 12-18 inches of clearance on each side for fabric movement. A 5×5 foot area accommodates machine, chair, and basic movement comfortably.
Can I sew on a regular desk or table? Yes, any stable desk or table works as long as it’s 28-30 inches high and doesn’t wobble. Add a non-slip mat under your machine for extra stability. Avoid glass-top tables, which can crack under machine vibration.
What’s the best lighting for a small sewing space? An LED task lamp with 500-1000 lumens and daylight color temperature (5000-6500K) positioned 12-18 inches from your needle provides the best visibility. Supplement with ambient room lighting to reduce eye strain.
How do I store fabric in a studio apartment? Store fabric vertically in clear bins, use under-bed storage for bulk fabric, or hang larger pieces on pant hangers in a closet. Vertical storage maximizes visibility while minimizing floor space consumption.
Is a fold-down table sturdy enough for sewing? Yes, if properly installed with heavy-duty brackets rated for 50+ pounds. Test stability by pressing down firmly before placing your machine. Wall-mounted fold-down tables work well for machines under 25 pounds.
What’s the most important thing for a small sewing space? Adequate task lighting and a stable work surface are the two non-negotiable elements. You can improvise storage and cutting surfaces, but poor lighting and an unstable table make sewing frustrating and lead to mistakes.
How do I keep my sewing space organized long-term? Implement a “one project at a time” rule, assign every item a specific storage location, and conduct monthly audits to remove unused supplies. Put tools away immediately after each sewing session to prevent clutter accumulation.
Can I set up a sewing space without spending a lot of money? Yes. Repurpose existing furniture for your work surface, use a $20 LED desk lamp for lighting, and start with one clear bin for supplies. A functional basic setup costs $100-$150 if you shop strategically and use what you already own.
Do I need a special chair for sewing? No, but your chair should allow your elbows to rest at 90 degrees while sewing and provide back support for comfort during longer sessions. An adjustable office chair works perfectly, or add a cushion to a kitchen chair.
How do I deal with sewing machine noise in an apartment? Place a rubber mat or folded towel under your machine to dampen vibration. Sew during reasonable hours (typically 9 AM to 8 PM) and let neighbors know you’re starting a new hobby. Most modern machines are quieter than vacuum cleaners.
What storage do I need before buying fabric? Start with one clear bin (approximately 12x16x8 inches) for your first 10-15 fabric pieces. Add storage as your collection grows rather than buying multiple bins upfront. This prevents overbuying fabric to “fill” empty storage.
Can I use a closet as a permanent sewing space? Yes, a standard 24-inch-deep closet accommodates a wall-mounted shelf for your machine, vertical storage, and task lighting. Remove or replace the door for better access and light. This works especially well for renters and small apartments.
Conclusion
Setting up a sewing space in a small home is entirely achievable with thoughtful planning and smart storage solutions. You don’t need a dedicated room or expensive furniture, just 25-36 square feet of space, a stable work surface, proper lighting, and vertical storage to keep supplies organized and accessible.
Start by assessing your available space and sewing frequency. Choose a fold-away station if you need flexibility or a permanent corner setup if you sew regularly. Prioritize the essentials: a sturdy table at the right height, a task lamp with at least 500 lumens, and basic storage for your most-used supplies. Everything else can be added gradually as your needs become clear.
Remember that many experienced sewers create beautiful projects in compact spaces. The quality of your work depends on your skills and proper machine maintenance, not your square footage.
Your next steps:
- Measure your available space and identify the best location (corner, closet, or multi-use area)
- Choose your work surface based on your space constraints and budget
- Add task lighting positioned near your needle area
- Implement vertical storage solutions (pegboard, shelves, or bins)
- Set up your machine and complete one small project to test your layout
- Adjust storage and lighting based on what works and what doesn’t
Start small, stay organized, and enjoy the creative freedom that comes with having your own dedicated sewing space, no matter how compact it might be.


