


Quick Answer
Replacing a sewing machine foot pedal is a straightforward process that most sewers can complete in under 10 minutes without opening the machine. You’ll unplug the old pedal from the machine’s socket, verify compatibility with your replacement (brand-specific or universal), plug in the new pedal, and test it before resuming your projects. The hardest part is usually finding the right replacement pedal that matches your machine’s electrical requirements and connector type.
Key Takeaways
- Foot pedal replacement requires no machine disassembly, you only need to unplug the old pedal and plug in the new one at the machine’s base or side panel
- Brand-specific pedals offer better speed control but universal pedals work across multiple machines with adapter plugs included
- Replacement pedals cost $15-$80 depending on whether you choose universal ($15-$35) or brand-specific models ($30-$80)
- Socket compatibility is critical, measure your machine’s plug type (2-pin, 3-pin, or proprietary) before purchasing
- Singer, Brother, and Janome pedals are not interchangeable without adapters due to different voltage requirements and connector designs
- Speed calibration issues with new pedals can often be fixed by adjusting the machine’s speed limiter or checking voltage compatibility
- Repairing old pedals is possible for simple issues like frayed cords but not cost-effective for internal rheostat failures
- Beginners can replace pedals confidently, it’s one of the easiest sewing machine parts to swap
What Does a Sewing Machine Foot Pedal Do?
A sewing machine foot pedal controls the motor speed and starts or stops the machine through variable pressure applied by your foot. When you press down lightly, the machine runs slowly; pressing harder increases speed up to the machine’s maximum capability. The pedal contains a rheostat (variable resistor) or electronic speed controller that regulates electrical current flowing to the motor.
Modern computerized machines use electronic pedals with circuit boards, while mechanical machines typically use simpler rheostat-based pedals. Both types perform the same function but differ in how they modulate power. The pedal connects to your machine via a cord and plug, usually located at the base or right side panel of the machine body.
Why the pedal matters for your sewing:
- Gives you hands-free speed control so both hands can guide fabric
- Allows precise speed adjustments for detailed work like curves or corners
- Provides instant stop capability by lifting your foot
- Reduces hand fatigue compared to manual speed controls
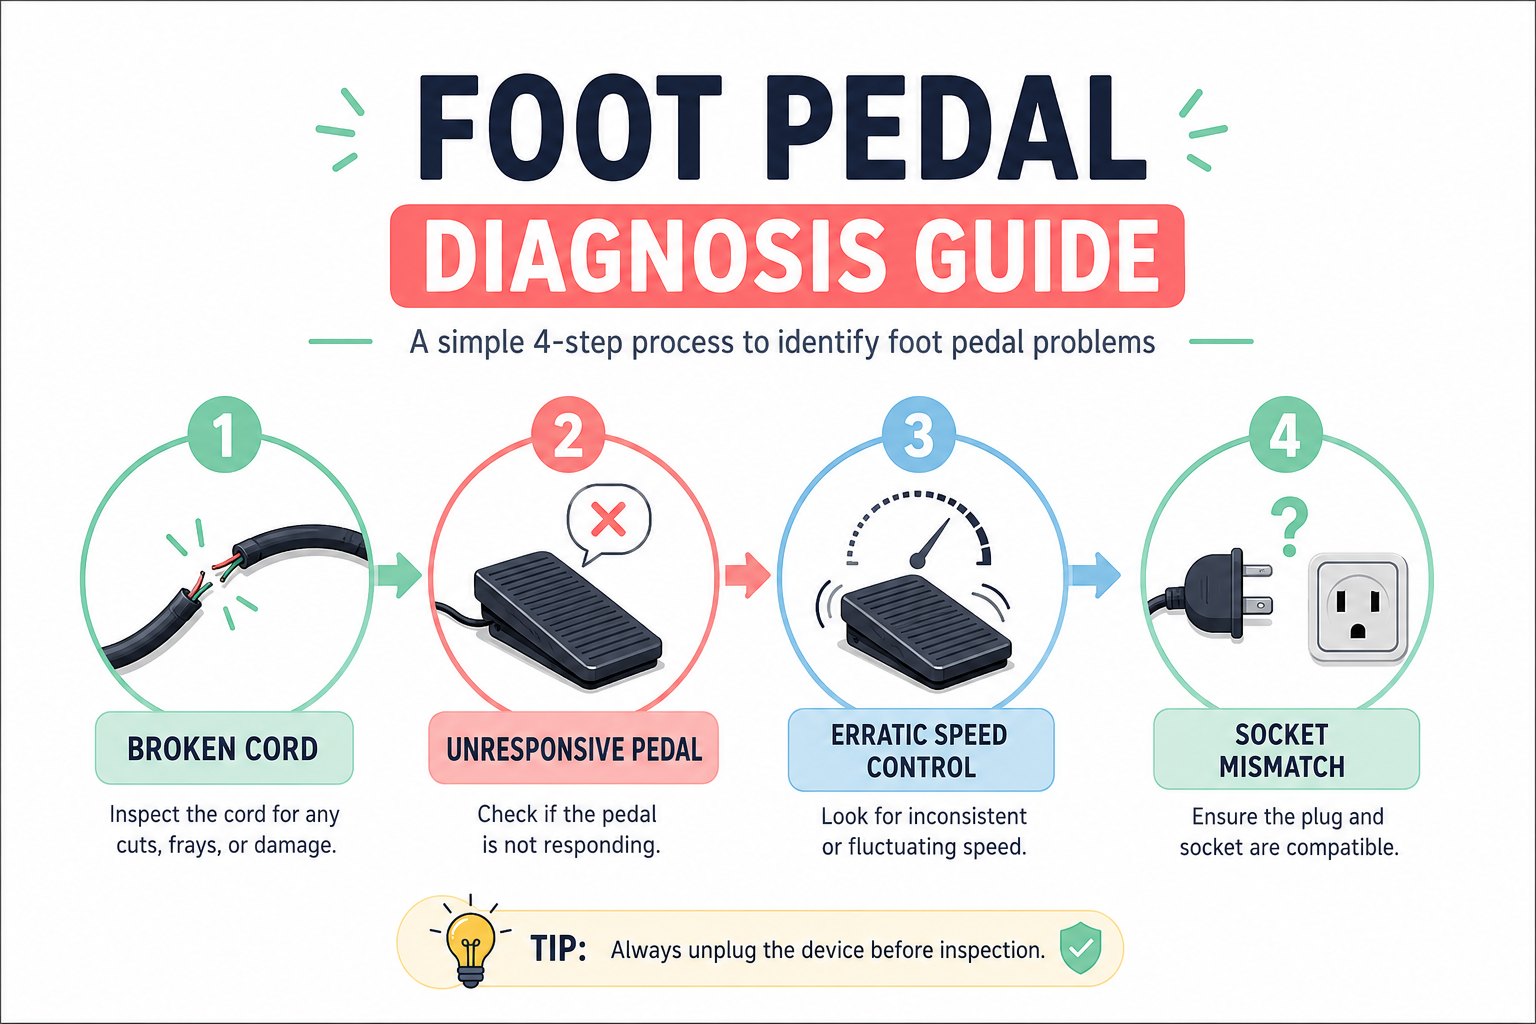
How Do I Know If My Sewing Machine Foot Pedal Is Broken?
Your foot pedal is likely broken if the machine won’t start when you press the pedal, runs at only one speed regardless of pressure, or operates erratically with sudden speed changes. Other clear signs include visible damage to the cord (fraying, cuts, exposed wires), a burning smell when pressing the pedal, or the machine running continuously even when you lift your foot.
Common symptoms of pedal failure:
- No response: Machine stays silent when pedal is pressed fully
- Stuck at full speed: Machine runs maximum speed with light pressure
- Intermittent operation: Machine starts and stops randomly while pedal is pressed
- Physical damage: Cracked pedal casing, loose plug connection, or damaged cord insulation
- Overheating: Pedal becomes hot to touch after brief use
Quick diagnostic test: Unplug the pedal and inspect the cord along its entire length. Flex the cord gently near the pedal and plug ends while watching for breaks in the outer insulation. If the cord looks intact, the problem is likely internal (rheostat failure or circuit board damage). For more complex issues, consult our guide on sewing machine troubleshooting.
When to replace vs. repair: Replace the pedal if you see internal component damage, the rheostat is worn out, or repair costs exceed $40. Repair is only worthwhile for simple cord damage near the plug that you can fix with electrical tape and heat-shrink tubing.
Can I Use Any Foot Pedal on My Sewing Machine or Does It Need to Be Specific?
You cannot use just any foot pedal on your sewing machine because pedals vary by voltage, amperage, connector type, and control mechanism. Most sewing machines require either a brand-specific pedal designed for that manufacturer’s models or a universal pedal with the correct adapter for your machine’s socket and electrical specifications.
Three types of pedal compatibility:
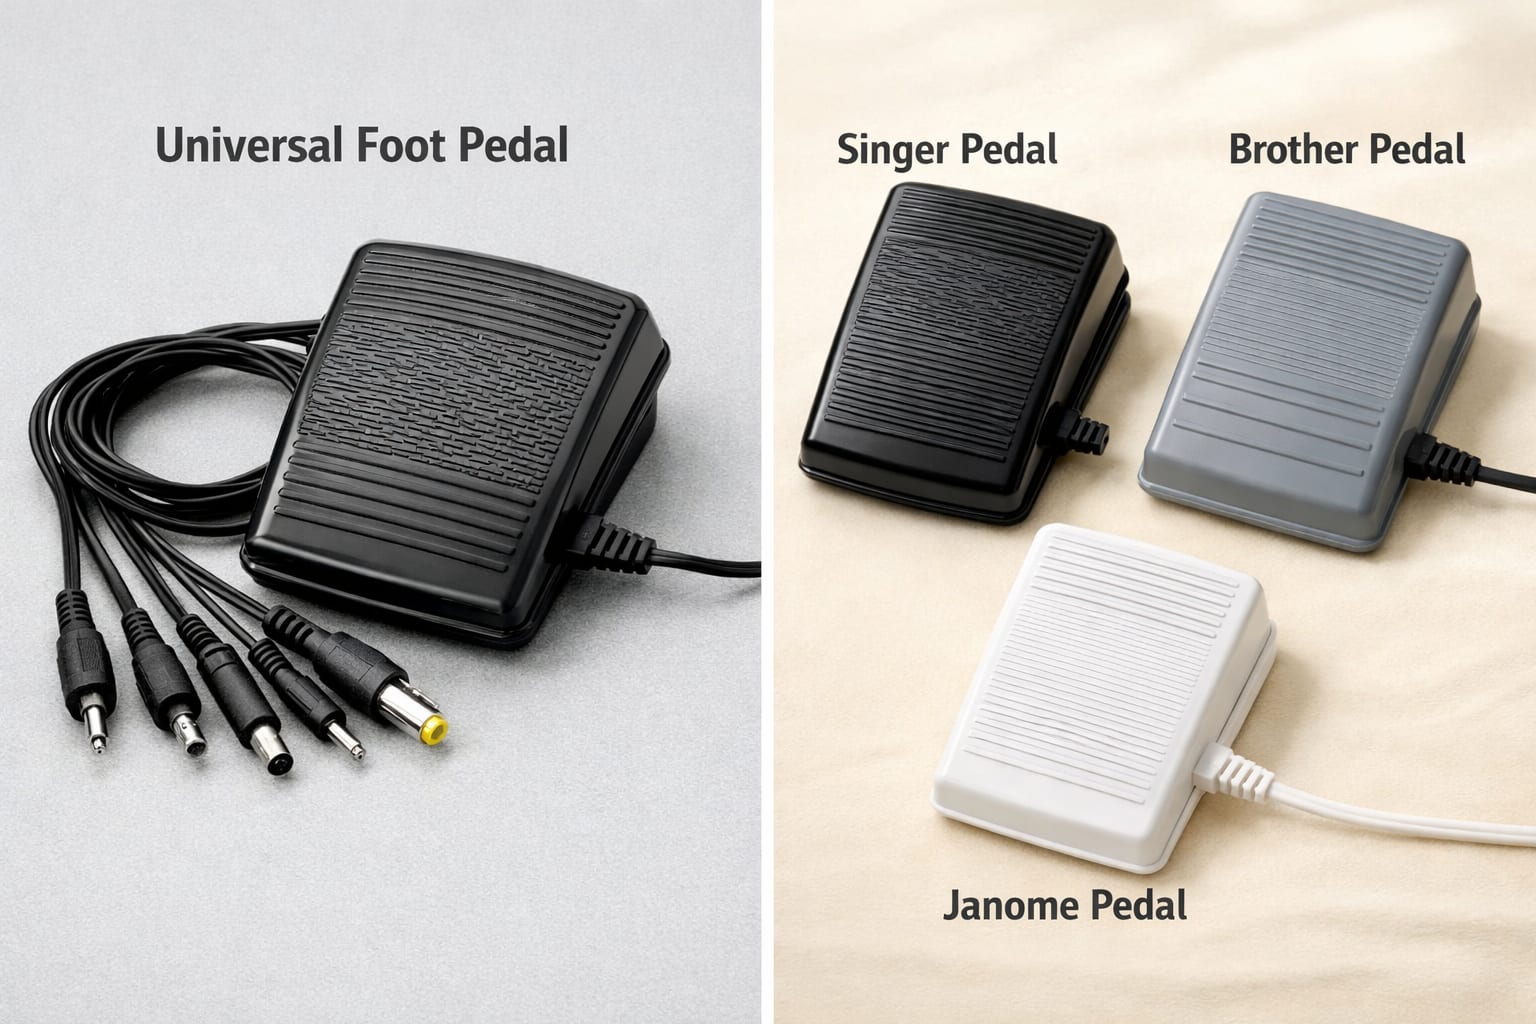
- Brand-specific pedals: Designed exclusively for one manufacturer (Singer, Brother, Janome, Bernina, etc.) with proprietary connectors and voltage ratings
- Universal pedals: Come with multiple adapter plugs to fit various brands, typically rated for 110-120V machines in North America
- Model-specific pedals: Required for certain high-end or computerized machines with unique electronic communication protocols
Critical compatibility factors:
- Voltage rating: Must match your machine (usually 110-120V in North America, 220-240V elsewhere)
- Amperage: Pedal must handle your machine’s motor current draw (typically 0.5-1.5 amps for home machines)
- Connector type: 2-pin, 3-pin, or proprietary plug shape must fit your machine’s socket
- Control type: Mechanical machines need rheostat pedals; computerized machines may need electronic pedals with specific resistance curves
Common mistake: Buying a universal pedal without checking if your machine uses a proprietary connector. Always verify your machine’s plug type before purchasing. If you’re unsure about compatibility, check your machine’s manual or contact the manufacturer.
Where to Buy Replacement Foot Pedals for Singer Sewing Machines
Replacement foot pedals for Singer sewing machines are available from Singer’s official website, Amazon, sewing machine dealers, and specialty parts retailers like Sewing Parts Online. Singer-branded pedals cost $30-$60 depending on the model, while universal pedals compatible with Singer machines range from $15-$35.
Best sources for Singer pedals:
Official Singer store (singer.com)
- Guaranteed compatibility with model-specific part numbers
- Higher prices but includes warranty
- Best for newer computerized Singer models
Amazon
- Wide selection of OEM and aftermarket pedals
- Customer reviews help verify compatibility
- Prices typically 20-30% lower than official sources
- Ships quickly with Prime
Sewing machine dealers
- Can verify compatibility in person
- May offer installation assistance
- Prices comparable to official sources
eBay and used markets
- Good for vintage Singer pedals (pre-1990 models)
- Significantly cheaper but no warranty
- Verify seller reputation and return policy
What to specify when ordering: Your Singer model number (found on the machine’s base or back panel), the current pedal’s part number (if visible), and whether your machine is mechanical or computerized. For vintage Singer machines, you may need to search for vintage sewing machine repair specialists who stock older pedal models.

[Compatible Models] Foot pedal power cord replacement for singer 359102-001, 1116, 1120, 1234, 1412, 1507, 1525, 1725, 1732, 1748, 2250, 2259, 2263, 2277, 2639, 2662, 2732, 2932, 3207, 3210, 3221, 3223, 3229, 3321, 3337, 3342, 3820, 4111, 4205, 4206, 4210, 4212, 4220, 4228, 4411, 4423, 4432, 4452, 5511, 5523, 5532, 5554, 6510, 6518, 6550, 7312, 7350, 8280, 14T948DC, 14T967DC, 14T968DC, 44s, 50t8, 85SCH, E10, e99670, Esteem II 2273, Fashion Mate 3333, FC 1902, HD0400S, HD725, Heavy Duty 6380, KD 1902, m1150, m1500, m2100, m3220, m3300, m3305, m3400, m3500, mx231, mx60, Promise 1512/1409/1408/, Serger s0230, Start 1304, Start 1306, Talent 3323

[compatible models] foot pedal and power cord replacement for singer sewing machine #979314-031, 354, 778, 1802, 4016, 5525, 6105, 8834, 9612, 2517C, 2950C, 3270C, 362095, 362095-001, 4325C, 4525C, 4528C, 4530C, 4538C, 4620C, 4830C, 5050C, 57820C, 57825C, 5817C, 5825C, 5830C, 6212C, 6215C, 621B, CG-500C, CG-550C, CG-590C, CM-17C, CP-17C, Fashion Mate 252, Fashion Mate 362, HD110C, N/12029, Stylist 533, Stylist 534,. only suitable for the above models of Singer sewing machines

【Compatible Models】 Replacement sewing machine pedal and power cord for singer, Singer #359102-001, 1120, 1234, 1507, 1725, 2250, 2259, 2662, 2263, 2277, 2732, 2932, 3221, 3223, 3232, 3321, 3337, 3342, 4411, 4423, 4432, 4452, 44s, 50t8, 8280, e99670, m3220, KD 1902, FC 1902, m1500, mx60, Simple 3116, Start 1304, Talent 3323, Fashion Mate 3333, Promise 1512 / 1409 / 1408, Heavy Duty 6380, Esteem II 2273. For more models, please send an e-mail to tell me your sewing machine brand and model.
How Much Does a New Sewing Machine Foot Pedal Cost?
A new sewing machine foot pedal costs between $15 and $80 depending on whether you choose a universal model or a brand-specific replacement. Universal pedals with multiple adapters typically range from $15-$35, while manufacturer-specific pedals (Singer, Brother, Janome, Bernina) cost $30-$80. High-end computerized machine pedals can reach $100-$150 for models with advanced electronic controls.
Price breakdown by pedal type:
| Pedal Type | Price Range | Best For |
|---|---|---|
| Basic universal | $15-$25 | Older mechanical machines, budget repairs |
| Premium universal | $25-$35 | Multiple machines, includes more adapters |
| Brand-specific (Singer, Brother, Janome) | $30-$60 | Single machine, optimal performance |
| High-end brand-specific | $60-$80 | Newer computerized models |
| Specialty/industrial | $80-$150 | Industrial machines, professional use |
Factors affecting cost:
- Electronic vs. mechanical: Electronic pedals with circuit boards cost more than simple rheostat models
- Brand premium: Official manufacturer pedals cost 30-50% more than third-party alternatives
- Included accessories: Some pedals come with extension cords or multiple adapters
- Warranty coverage: Pedals with 1-2 year warranties typically cost $5-10 more
Money-saving tip: If you own multiple machines from different brands, a quality universal pedal ($30-35) with adapters may be more economical than buying separate brand-specific pedals. However, for your primary machine, a brand-specific pedal usually offers better speed control and longevity.
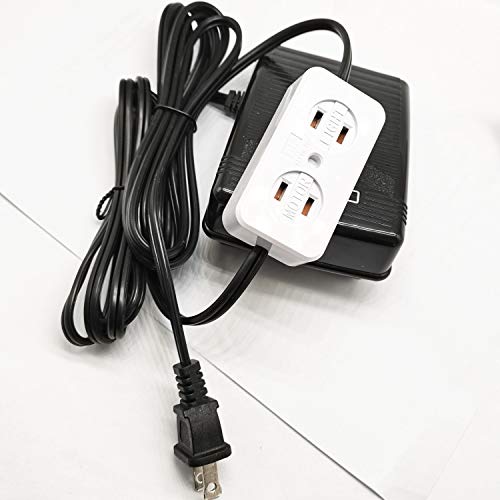
Universal Home Sewing Machines Foot Control Pedal With Light And Motor Block Fits Many Home Sewing Machines

1PCS Foot Control Pedal With Light And Motor Block For Universal Home Sewing Machines. Electronic IC-based foot control.The alternative part number is: 001002409.PLEASE MAKE SURE YOUR MOTOR HAS ITS OWN POWER CORD WITH PLUG. 110V with American style plug!

Carbon Pile Foot Control Pedal with Light and Motor Block. Single Speed.
Step-by-Step Instructions to Replace a Sewing Machine Foot Pedal
Replacing a sewing machine foot pedal takes 5-10 minutes and requires no tools. You’ll unplug the old pedal, verify the new pedal’s compatibility, connect it to your machine, and test the speed control before resuming sewing.
What you’ll need:
- New replacement foot pedal (compatible with your machine)
- Your machine’s manual (optional, for socket location reference)
- Well-lit workspace
Detailed replacement steps:
Step 1: Power down and unplug Turn off your sewing machine and unplug it from the wall outlet. This prevents accidental motor activation while you’re handling the pedal connection. Wait 30 seconds for any residual charge to dissipate.
Step 2: Locate the pedal socket Find where the current pedal plugs into your machine. Most machines have the socket on the right side of the base, the back panel, or underneath the machine body. The socket is usually labeled “foot control” or marked with a pedal icon.
Step 3: Remove the old pedal Grasp the plug (not the cord) and pull straight out from the socket. If it’s tight, gently wiggle while pulling. Never yank the cord itself, as this can damage the socket’s internal pins.
Step 4: Inspect the socket Look inside the socket for bent pins, debris, or corrosion. If you see damage, you may need professional repair before installing the new pedal. Clean any dust with compressed air if needed.
Step 5: Prepare the new pedal If using a universal pedal, attach the correct adapter plug for your machine brand. The adapter should click or screw into place securely. Verify the adapter’s pin configuration matches your machine’s socket.
Step 6: Connect the new pedal Align the plug with the socket and push firmly until it seats completely. You should feel or hear a slight click when properly connected. The plug should sit flush against the machine body with no gap.
Step 7: Plug in and test Plug your machine back into the wall outlet and turn it on. Place the new pedal on the floor and press it gently. The machine should start slowly. Press harder to verify speed increases smoothly. Test the full range from slowest to fastest speed.
Step 8: Check for issues Listen for unusual motor sounds, watch for erratic speed behavior, and verify the machine stops completely when you lift your foot. If the speed seems too fast or too slow, check your machine’s speed limiter setting (if equipped).
Common installation mistake: Forcing an incompatible plug into the socket. If the plug doesn’t slide in easily, stop and verify you have the correct adapter. Forcing it can bend socket pins and damage your machine.
For additional maintenance tips after installation, see our guide on sewing machine care.
Do I Need to Open My Sewing Machine to Replace the Foot Pedal?
No, you do not need to open your sewing machine to replace the foot pedal. The pedal connects externally via a plug and socket on the machine’s exterior, making replacement a simple plug-and-play process that requires no disassembly or access to internal components.
The foot pedal is designed as a user-replaceable accessory, similar to changing a power cord. All connection points are accessible from outside the machine body. Opening the machine is only necessary if the internal socket itself is damaged, which is rare and typically requires professional repair.
When you might need to open the machine:
- The socket has broken internal pins or loose solder joints
- The wiring between the socket and motor is damaged
- The machine’s internal speed controller has failed (separate from the pedal)
For these internal issues, consult a sewing machine technician rather than attempting DIY repairs, as improper work can void warranties or create electrical hazards.
Universal Foot Pedal vs Brand-Specific: Which Is Better?
Brand-specific foot pedals are better for optimal performance on a single machine, offering precise speed control and guaranteed compatibility, while universal pedals are better for sewers who own multiple machines from different manufacturers or need a budget-friendly replacement. Brand-specific pedals cost $30-$80 but provide smoother speed curves and longer lifespan, whereas universal pedals cost $15-$35 and include adapters for 5-10 different brands.
Brand-specific pedal advantages:
- Exact voltage and resistance matching for your machine’s motor
- Smoother speed control with better low-speed performance
- Longer lifespan due to components rated for your specific machine
- Warranty coverage from the manufacturer
- No adapter needed, direct plug-in connection
Brand-specific pedal disadvantages:
- Higher cost (typically 2-3x universal pedals)
- Only works with one brand or model family
- May be harder to find for discontinued models
Universal pedal advantages:
- Works with multiple brands (Singer, Brother, Janome, Kenmore, etc.)
- Lower cost, good for budget repairs or backup pedals
- Widely available from many retailers
- Includes multiple adapters in one package
Universal pedal disadvantages:
- Less precise speed control, may feel “jumpy” at low speeds
- Adapter connection adds a potential failure point
- Generic components may not match your machine’s optimal specifications
- Shorter lifespan in heavy-use scenarios
Choose brand-specific if: You sew frequently on one primary machine, need the best low-speed control for detailed work, or own a high-end computerized model with specific electronic requirements.
Choose universal if: You own multiple machines from different brands, need a backup pedal, are on a tight budget, or have an older mechanical machine with simple speed control needs.
Real-world performance difference: On a mechanical Singer machine, most sewers won’t notice significant differences between quality universal and brand-specific pedals. However, on computerized Brother or Janome machines with precise stitch control, brand-specific pedals often provide noticeably smoother speed transitions, especially at slow speeds for detailed work.

[Compatible Models] Foot pedal power cord replacement for brother #j00360051, 1034D, 1634D, 273C, 3034D, 5234prw, 5261CW, 834DP, 888-E42, 888-X55, 888-X64, 920D, 925D, 929D, BM2800, BM3850, DZ1234, GX37, JX2517, KD1902, LR43670, LS1217, LS1520, LS1717, LS2000, LS2020, LS2125, LS2220, LS2250prw, LS2300prw, LS2350, LS2400, LS30, LS590, LX2375, LX2500, LX2763, LX3014, LX3125, LX3817, PS1000, SB170, SM1400, SM1704, SM2700, SM3701, ST371HD, ST531HD, VX1010, VX1120, VX1140, VX1200, VX1435, VX1500, VX710, VX780, VX808, VX809, VX810, VX857, VX950,

1PCS Electric Pedal Foot Speed Control with Power Cable for Motor Pedal Control .
My New Foot Pedal Doesn’t Fit the Socket, What Do I Do?
If your new foot pedal doesn’t fit the socket, first verify you’re using the correct adapter (for universal pedals) or confirm you ordered the right model-specific pedal for your machine. Check your machine’s model number against the pedal’s compatibility list, and inspect the plug’s pin configuration to ensure it matches your socket’s layout.
Troubleshooting steps for fit issues:
For universal pedals:
- Try all included adapters, the correct one should slide in smoothly without force
- Check the adapter orientation, some are keyed and only fit one way
- Verify the adapter is fully seated in the pedal before attempting to plug into the machine
For brand-specific pedals:
- Confirm your machine model number matches the pedal’s compatibility range
- Check if your machine is an older or international model with different socket standards
- Look for any plastic socket covers or dust caps that need removal
Common socket/plug configurations:
- 2-pin round: Common on older Singer and Kenmore machines
- 3-pin triangular: Used by many Brother and Janome models
- Proprietary rectangular: Found on Bernina, Pfaff, and some high-end brands
- RJ-style connector: Used on some newer computerized machines
Solutions when nothing fits:
- Order a socket adapter: Available for $8-15, these convert one socket type to another
- Contact the manufacturer: They can identify your exact socket type and recommend compatible pedals
- Visit a dealer: Bring your machine in to test-fit pedals before purchasing
- Check for international versions: Some machines sold in different countries use different socket standards
Warning: Never file down or modify plug pins to force a fit. This creates electrical hazards and can damage your machine’s internal circuitry. If no standard pedal fits, your machine may require a proprietary pedal available only from the manufacturer or specialized repair shops.
Can I Fix My Old Foot Pedal Instead of Replacing It?
You can fix your old foot pedal if the problem is a damaged cord, loose plug connection, or dirty internal contacts, but you should replace it if the rheostat or electronic circuit board has failed. Simple repairs like splicing a frayed cord or tightening loose screws cost under $5 in materials, while internal component failures make replacement more economical since new pedals start at just $15.
Repairable pedal problems:
Frayed or cut cord
- Fix: Cut out damaged section, splice wires with solder and heat-shrink tubing
- Cost: $3-5 for supplies
- Difficulty: Easy if you have basic soldering skills
- Time: 15-20 minutes
Loose plug connection
- Fix: Open pedal casing, re-solder wires to plug terminals
- Cost: $0-2 (solder only)
- Difficulty: Moderate
- Time: 10-15 minutes
Dirty contacts or rheostat
- Fix: Open casing, clean contacts with electrical contact cleaner
- Cost: $5-8 for contact cleaner
- Difficulty: Easy
- Time: 10 minutes
Not worth repairing:
Burned-out rheostat
- Replacement rheostats cost $15-25 plus labor
- New complete pedal costs $15-35
- Verdict: Replace the entire pedal
Failed circuit board (electronic pedals)
- Circuit board replacement requires specialized parts and skills
- Repair cost: $40-60 at a shop
- Verdict: Replace the entire pedal
Cracked or broken casing
- Structural damage affects safety and durability
- Difficult to repair securely
- Verdict: Replace the entire pedal
DIY repair safety warning: Always unplug the pedal before opening it. Work in a well-ventilated area if soldering. Never bypass safety components or use electrical tape as a permanent fix for exposed wires. If you’re uncomfortable working with electrical components, replacement is safer than repair.
For sewers who enjoy DIY maintenance, check our diy sewing machine repair resources for more guidance.
Sewing Machine Runs Too Fast with New Pedal, How to Fix
If your sewing machine runs too fast with a new pedal, the pedal’s resistance curve likely doesn’t match your machine’s motor controller, or your machine’s speed limiter needs adjustment. First, check if your machine has a speed control slider or dial (separate from the pedal) and reduce it to 50-70% to compensate for the pedal’s sensitivity.
Quick fixes to try first:
Adjust the machine’s speed limiter Most computerized machines and many mechanical models have a speed control slider, dial, or button that sets maximum speed independent of the pedal. Reduce this setting to slow down the machine’s top speed.
Check voltage compatibility Verify the new pedal’s voltage rating matches your machine. A pedal rated for 220V used on a 110V machine (or vice versa) can cause speed control issues.
Test pedal sensitivity Press the pedal very lightly, if the machine immediately jumps to high speed with minimal pressure, the pedal’s resistance curve is too aggressive for your machine.
Solutions for persistent speed problems:
For universal pedals:
- Try a different adapter if multiple are included, some adapters have built-in resistors that affect speed curves
- Return the pedal and try a different brand, universal pedals vary significantly in quality and sensitivity
- Consider upgrading to a brand-specific pedal for better speed matching
For brand-specific pedals:
- Verify you ordered the correct model number for your specific machine
- Check if your machine requires a “high-speed” vs. “standard” pedal variant
- Contact the manufacturer, some machines need firmware updates to work properly with newer pedal models
For mechanical machines:
- The motor’s speed controller (inside the machine) may need adjustment by a technician
- Some vintage machines have adjustable motor brushes that affect speed response
Advanced solution, add a resistor: For sewers comfortable with electronics, adding a small resistor (10-50 ohms, 5W rating) in series with the pedal can reduce sensitivity. This requires cutting and splicing the pedal cord, so only attempt if you have electrical experience.
When to return the pedal: If you’ve tried all adjustments and the machine still runs too fast with light pedal pressure, the pedal is incompatible with your machine. Return it and try a different model or brand. Document the issue with video for easier returns.
Is Replacing a Foot Pedal Hard for Beginners?
Replacing a foot pedal is not hard for beginners and ranks as one of the easiest sewing machine maintenance tasks you can perform. The process involves only unplugging the old pedal and plugging in the new one, no tools, no disassembly, and no technical knowledge required beyond matching the correct plug to the socket.
Why it’s beginner-friendly:
- No tools needed, purely plug-and-play
- No machine disassembly, all work happens externally
- Immediate feedback, you know instantly if it works when you test it
- Low risk, virtually impossible to damage your machine during replacement
- Quick process, takes 5-10 minutes even for first-timers
The only challenge: Ensuring compatibility before purchase. Beginners should verify their machine’s model number and socket type before ordering a replacement pedal. Take a photo of your current pedal’s plug and your machine’s model plate to reference when shopping.
Confidence builders for nervous beginners:
- Watch a 3-minute YouTube video showing the process for your machine brand
- Ask at a sewing machine shop to see a demonstration
- Buy from retailers with easy return policies in case of compatibility issues
- Start with a universal pedal that includes multiple adapters for flexibility
Comparison to other repairs: Replacing a foot pedal is significantly easier than needle replacement, adjusting thread tension, or timing the machine. If you can plug in a lamp, you can replace a foot pedal.
Common Mistakes When Installing a New Sewing Machine Foot Pedal
The most common mistakes when installing a new sewing machine foot pedal are forcing an incompatible plug into the socket, failing to verify voltage compatibility before purchase, and not testing the full speed range after installation. These errors can damage your machine’s socket, create electrical hazards, or result in poor speed control that frustrates your sewing.
Top installation mistakes and how to avoid them:
Mistake 1: Forcing the wrong plug
- Why it happens: Assuming all plugs are universal or that slight resistance means it just needs more force
- Consequence: Bent socket pins, damaged plug, or broken socket housing requiring professional repair
- Prevention: If the plug doesn’t slide in smoothly, stop and verify compatibility
Mistake 2: Skipping the adapter (universal pedals)
- Why it happens: Not realizing the universal pedal needs an adapter attached first
- Consequence: Trying to plug the bare pedal cord into the machine, which won’t fit
- Prevention: Read the universal pedal’s instructions and identify the correct adapter before attempting connection
Mistake 3: Ignoring voltage ratings
- Why it happens: Focusing only on plug fit without checking electrical specifications
- Consequence: Pedal overheats, machine runs too fast/slow, or premature pedal failure
- Prevention: Match the pedal’s voltage rating (110V, 120V, 220V, etc.) to your machine’s requirements
Mistake 4: Not testing the full speed range
- Why it happens: Pressing the pedal once, seeing the machine run, and assuming everything is fine
- Consequence: Discovering speed control problems mid-project when you need precise slow stitching
- Prevention: Test from slowest to fastest speed immediately after installation, before starting any project
Mistake 5: Yanking the cord instead of the plug
- Why it happens: Rushing or not being able to reach the plug easily
- Consequence: Damaged cord, loose internal connections, or pulled wires inside the plug
- Prevention: Always grasp the plug body when connecting or disconnecting
Mistake 6: Buying based on price alone
- Why it happens: Choosing the cheapest universal pedal without checking reviews or compatibility
- Consequence: Poor speed control, short lifespan, or incompatibility requiring a second purchase
- Prevention: Read reviews from users with your machine brand and invest in quality ($25-35 range for universal pedals)
Mistake 7: Not checking the socket first
- Why it happens: Assuming the socket is fine because the old pedal was the problem
- Consequence: New pedal doesn’t work due to damaged socket pins or internal wiring issues
- Prevention: Inspect the socket for damage before installing the new pedal
Pro tip: Keep your old pedal even after replacement (if it’s only partially broken). The plug can serve as a reference for socket type when ordering future replacements, and the cord might be salvageable for repairs.
Will a Brother Foot Pedal Work on a Janome Machine?
A Brother foot pedal will not work on a Janome machine without an adapter because the two brands use different plug configurations and voltage specifications. Brother typically uses 3-pin connectors with specific resistance curves for their motors, while Janome uses different proprietary connectors and electrical requirements, making direct cross-brand use impossible.
Why brand pedals aren’t interchangeable:
Different connector types
- Brother: Often uses 3-pin triangular or rectangular connectors
- Janome: Uses proprietary 2-pin or 3-pin connectors with different pin spacing
- Physical incompatibility prevents plugging one into the other
Different electrical specifications
- Voltage requirements vary between brands
- Resistance curves are calibrated for each brand’s motor controllers
- Amperage ratings differ based on motor power
Different control protocols
- Computerized machines may use digital communication between pedal and machine
- Brand-specific protocols aren’t compatible across manufacturers
Cross-brand compatibility chart:
| Your Machine | Compatible Pedals | Not Compatible |
|---|---|---|
| Brother | Brother, some universal | Singer, Janome, Bernina |
| Janome | Janome, some universal | Brother, Singer, Bernina |
| Singer | Singer, some universal | Brother, Janome, Bernina |
| Bernina | Bernina only | All other brands |
The universal pedal solution: Quality universal pedals include adapters for multiple brands and can work across Brother, Janome, Singer, and other common brands. However, they provide adequate rather than optimal performance compared to brand-specific pedals.
When cross-brand use might work:
- Very old mechanical machines (pre-1980) sometimes used more standardized connectors
- Some industrial machines use universal pedal standards
- With custom-made adapter cables (available from specialty electronics suppliers)
Bottom line: For best results, stick with pedals designed for your machine’s brand. If you own machines from multiple brands, invest in a quality universal pedal rather than trying to make brand-specific pedals work across different machines. For more information on brand comparisons, see our Juki vs Janome comparison.
Frequently Asked Questions
How long do sewing machine foot pedals last? Sewing machine foot pedals typically last 5-15 years depending on usage frequency and quality. Heavy daily use wears out rheostats and electronic components faster, while occasional sewers may get 20+ years from a quality pedal. Cord damage is usually the first failure point.
Can I use a foot pedal from an old sewing machine on a new one? You can use an old foot pedal on a new machine only if the connector type, voltage rating, and control mechanism match. Most modern computerized machines require specific electronic pedals that won’t work with vintage mechanical pedals, even if the plug fits.
Do all Singer sewing machines use the same foot pedal? No, Singer sewing machines do not all use the same foot pedal. Singer has used multiple pedal designs over decades, with different models requiring specific pedals based on motor type, voltage, and connector design. Always verify compatibility using your specific Singer model number.
What happens if I use the wrong voltage foot pedal? Using the wrong voltage foot pedal can cause the machine to run too fast or too slow, overheat the pedal, damage the motor controller, or create fire hazards. Always match the pedal’s voltage rating to your machine’s specifications and your country’s electrical standard.
Can I extend the cord on my foot pedal? Yes, you can extend a foot pedal cord using a standard electrical extension cord or by splicing in additional wire with proper soldering and insulation. Keep total cord length under 15 feet to avoid voltage drop that affects speed control. Use 18-gauge or thicker wire for extensions.
Why does my foot pedal get hot during use? Foot pedals get warm during normal use as the rheostat or electronic components dissipate energy as heat. Excessive heat (too hot to touch) indicates a problem: incompatible voltage, internal component failure, or prolonged use at partial speed where resistance generates maximum heat.
Do I need to calibrate a new foot pedal? Most foot pedals do not require calibration, they work immediately upon connection. Some high-end computerized machines have pedal sensitivity settings in their menu systems that you can adjust for personal preference, but this is optional rather than required.
Can I sew without a foot pedal? Yes, many modern sewing machines have a start/stop button that lets you sew without a foot pedal, though you lose variable speed control. Some machines also have knee lifters or hand controls as alternatives. Check your machine’s manual for available options.
Where can I find a foot pedal for a vintage sewing machine? Find vintage sewing machine foot pedals through eBay, Etsy, specialized vintage sewing machine parts dealers, sewing machine repair shops, and online forums where collectors sell parts. Search using your machine’s model number and year for best results.
Will a universal foot pedal void my sewing machine warranty? Using a universal foot pedal typically does not void your warranty unless the manufacturer can prove the pedal caused specific damage. However, using an incompatible or incorrect voltage pedal that damages your machine may not be covered. Check your warranty terms or use manufacturer-approved pedals during the warranty period.
How do I dispose of an old foot pedal? Dispose of old foot pedals through electronic waste recycling programs, not regular trash. Many municipalities have e-waste collection days, or you can take them to electronics recycling centers. Some sewing machine shops accept old pedals for parts recycling.
Can I repair a foot pedal cord that’s been cut by a chair wheel? Yes, you can repair a cut foot pedal cord by cutting out the damaged section and splicing the wires with solder and heat-shrink tubing or wire nuts. Ensure proper insulation and strain relief at the repair point. If the cut is near the pedal or plug, replacement may be more reliable than repair.
Conclusion
Replacing a sewing machine foot pedal is one of the most straightforward maintenance tasks any sewer can perform, requiring no tools and taking less than 10 minutes from start to finish. The key to success lies in choosing the right replacement pedal for your specific machine, whether that’s a brand-specific model for optimal performance or a quality universal pedal for versatility across multiple machines.
Your action plan:
- Diagnose your current pedal using the symptoms outlined above to confirm it needs replacement rather than simple repair
- Identify your machine’s specifications, note the model number, socket type, and voltage requirements
- Choose your replacement, decide between brand-specific ($30-$80) for best performance or universal ($15-$35) for budget-friendly versatility
- Purchase from a reputable source with good return policies in case of compatibility issues
- Follow the installation steps carefully, testing the full speed range before starting your next project
- Adjust as needed using your machine’s speed limiter if the new pedal feels too sensitive
Remember that foot pedal replacement is a normal part of sewing machine ownership, not a sign of machine failure. With proper selection and installation, your new pedal should provide years of reliable service, giving you precise speed control for all your sewing projects.
If you encounter persistent issues after replacement, the problem may lie elsewhere in your machine’s electrical system. In those cases, consult our guides on sewing machine repair or consider professional service to diagnose deeper electrical problems.
Don’t let a faulty foot pedal keep you from your sewing projects. With the information in this guide, you’re now equipped to confidently select and install a replacement pedal that will have you back to sewing in no time.


