


Quick Answer
Sewing slippery fabrics like silk, satin, and chiffon requires specific techniques to prevent shifting, puckering, and frustration. Use a sharp microtex needle (size 60/8 or 70/10), reduce presser foot pressure, switch to a walking foot or even-feed foot, and stabilize fabric with tissue paper or spray starch before cutting and stitching. Lower your thread tension slightly and sew at a slower, steady pace to maintain control.
Key Takeaways
- Sharp microtex or universal needles (size 60/8 to 70/10) work best for satin, silk, and chiffon without snagging delicate fibers
- Walking feet prevent fabric layers from shifting by feeding top and bottom layers evenly through the machine
- Tissue paper or water-soluble stabilizer placed under slippery fabric eliminates puckering and keeps seams flat
- Fine silk pins or fabric clips avoid permanent holes that regular pins leave in satin and silk
- Polyester satin is more forgiving than real silk for beginners because it’s less delicate and costs less
- Reduce thread tension by 1-2 settings to prevent puckering on lightweight, slippery materials
- French seams and narrow hems provide clean, professional finishes that prevent fraying on slippery fabrics
- Slippery fabrics are challenging for beginners but manageable with the right tools and practice on scraps first
What Makes Fabric Slippery When Sewing
Slippery fabrics have smooth, tightly woven fibers with minimal surface friction, causing layers to slide against each other during cutting and sewing. Silk, satin, charmeuse, chiffon, and polyester lining materials all share this characteristic because their weave structure creates a glossy, low-friction surface that resists staying in place.
The fiber content and weave pattern determine how slippery a fabric behaves:
- Satin weave creates a smooth, shiny surface where threads float over multiple crosswise threads, reducing friction
- Silk fibers are naturally smooth and round, making them glide easily against other surfaces
- Synthetic materials like polyester and acetate mimic silk’s slippery qualities at lower cost
- Lightweight construction means less weight to anchor fabric in place during sewing
When you place two layers of slippery fabric together, gravity and machine vibration cause the top layer to shift faster than the bottom layer. This creates uneven seams, puckering, and misaligned pattern pieces. Understanding this behavior helps you choose the right techniques to control the fabric throughout your project.
Best Needle Type for Satin and Silk Fabrics
Sharp microtex needles (size 60/8 to 70/10) and fine universal needles work best for satin and silk because their ultra-sharp points pierce delicate fibers cleanly without snagging or creating runs. The smaller the needle size number, the finer the needle shaft, which minimizes visible holes in your finished garment.
Recommended needle types by fabric weight:
| Fabric Type | Needle Type | Size Range | Why It Works |
|---|---|---|---|
| Lightweight silk, chiffon | Microtex/Sharp | 60/8 – 70/10 | Ultra-fine point prevents snags |
| Medium silk, charmeuse | Microtex/Sharp or Universal | 70/10 – 80/12 | Balances strength and fineness |
| Satin (polyester) | Universal or Microtex | 70/10 – 80/12 | Handles synthetic fibers smoothly |
| Heavy silk dupioni | Universal | 80/12 – 90/14 | Stronger shaft for thicker fabric |
Replace your needle after every 6-8 hours of sewing or at the start of each slippery fabric project. Dull needles snag delicate fibers and cause skipped stitches, which are especially visible on smooth, reflective surfaces. For more guidance on needle maintenance, check out our article on how often you should change your needle.
Common mistake: Using a ballpoint or stretch needle on slippery woven fabrics. Ballpoint needles are designed for knits and will create larger holes in woven silk and satin, potentially causing runs or visible punctures.

Ultra-Sharp, Fine Point for Pinpoint Accuracy: The Organ Microtex Sewing Machine Needles features an exceptionally sharp and thin point, designed to pierce fabric threads with surgical precision instead of pushing them aside. This results in nearly invisible needle holes, perfectly straight seams, and flawless detail work on even the most delicate materials

STRONG & SHARP PRECISION NEEDLE: The SCHMETZ Microtex sewing machine needle features an ultra-thin, sharp point for flawless stitching and perfectly straight stitches, delivering powerful precision in fashion sewing and quilting
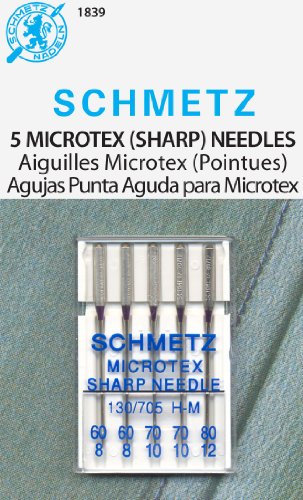
MIcrotex (Sharp) (130/705 H-M) Sewing Machine Needles
How to Keep Slippery Fabric From Shifting While Cutting
Pin fabric to a cutting mat or large piece of cardboard, then place pattern weights on top of pattern pieces instead of pinning through the fabric. This method prevents pin holes and keeps all layers stable during cutting without the fabric sliding across your work surface.
Step-by-step cutting technique:
- Prepare your surface – Use a large cutting mat with a slightly textured surface, or tape a cotton sheet to your table to add friction
- Layer carefully – Smooth fabric flat, eliminating all wrinkles and air bubbles between layers
- Anchor with weights – Place pattern weights (or clean cans, washers, or small bags of rice) every 6-8 inches around pattern edges
- Cut with sharp rotary cutter or scissors – Use long, smooth strokes rather than short choppy cuts to maintain clean edges
- Cut one layer at a time when possible – This eliminates shifting between layers entirely
For extra stability, spray the wrong side of your fabric lightly with temporary spray adhesive or spray starch before laying out pattern pieces. The stiffness washes out after sewing but provides crucial control during cutting and handling.
Alternative method: Sandwich slippery fabric between two layers of tissue paper before cutting. Pin through all layers (the tissue protects the fabric from pin marks), cut through everything together, then tear away the tissue paper before sewing.
Tissue Paper Method vs Spray Starch for Slippery Fabric
Tissue paper placed under slippery fabric during sewing prevents puckering and keeps seams flat, while spray starch temporarily stiffens fabric fibers to reduce slipperiness during cutting and stitching. Both methods work well, but tissue paper is better for very delicate fabrics that might water-spot from starch, and starch is more convenient for larger projects.
Tissue paper method:
- Place lightweight tissue paper or medical exam paper under fabric as you sew
- Stitch through both fabric and paper together
- Tear away paper carefully after stitching (perforations from stitching make removal easy)
- Best for: Chiffon, organza, and fabrics prone to puckering
- Drawback: Adds an extra step and requires careful paper removal
Spray starch method:
- Spray light to medium starch on the wrong side of fabric before cutting
- Let dry completely (iron if needed to set)
- Fabric becomes temporarily crisp and easier to handle
- Starch washes out after project completion
- Best for: Silk, satin, and fabrics that need body during construction
- Drawback: Can leave water spots on some silks; test on scraps first
Decision rule: Choose tissue paper if your fabric is sheer, extremely delicate, or prone to water spotting. Choose spray starch if you’re working with larger pattern pieces, need fabric to hold its shape during fitting, or want to reduce handling time. Many sewers use both methods together for maximum control on challenging projects.
Water-soluble stabilizer is a third option that combines benefits of both methods. It provides support like tissue paper but dissolves completely in water, leaving no residue to pick out of seams.

Lineco is a leading manufacturer of archival storage materials for preservation of photos, documents, and artwork. Trusted by museums and archives, ideal for your family...
Walking Foot vs Regular Presser Foot for Slippery Materials

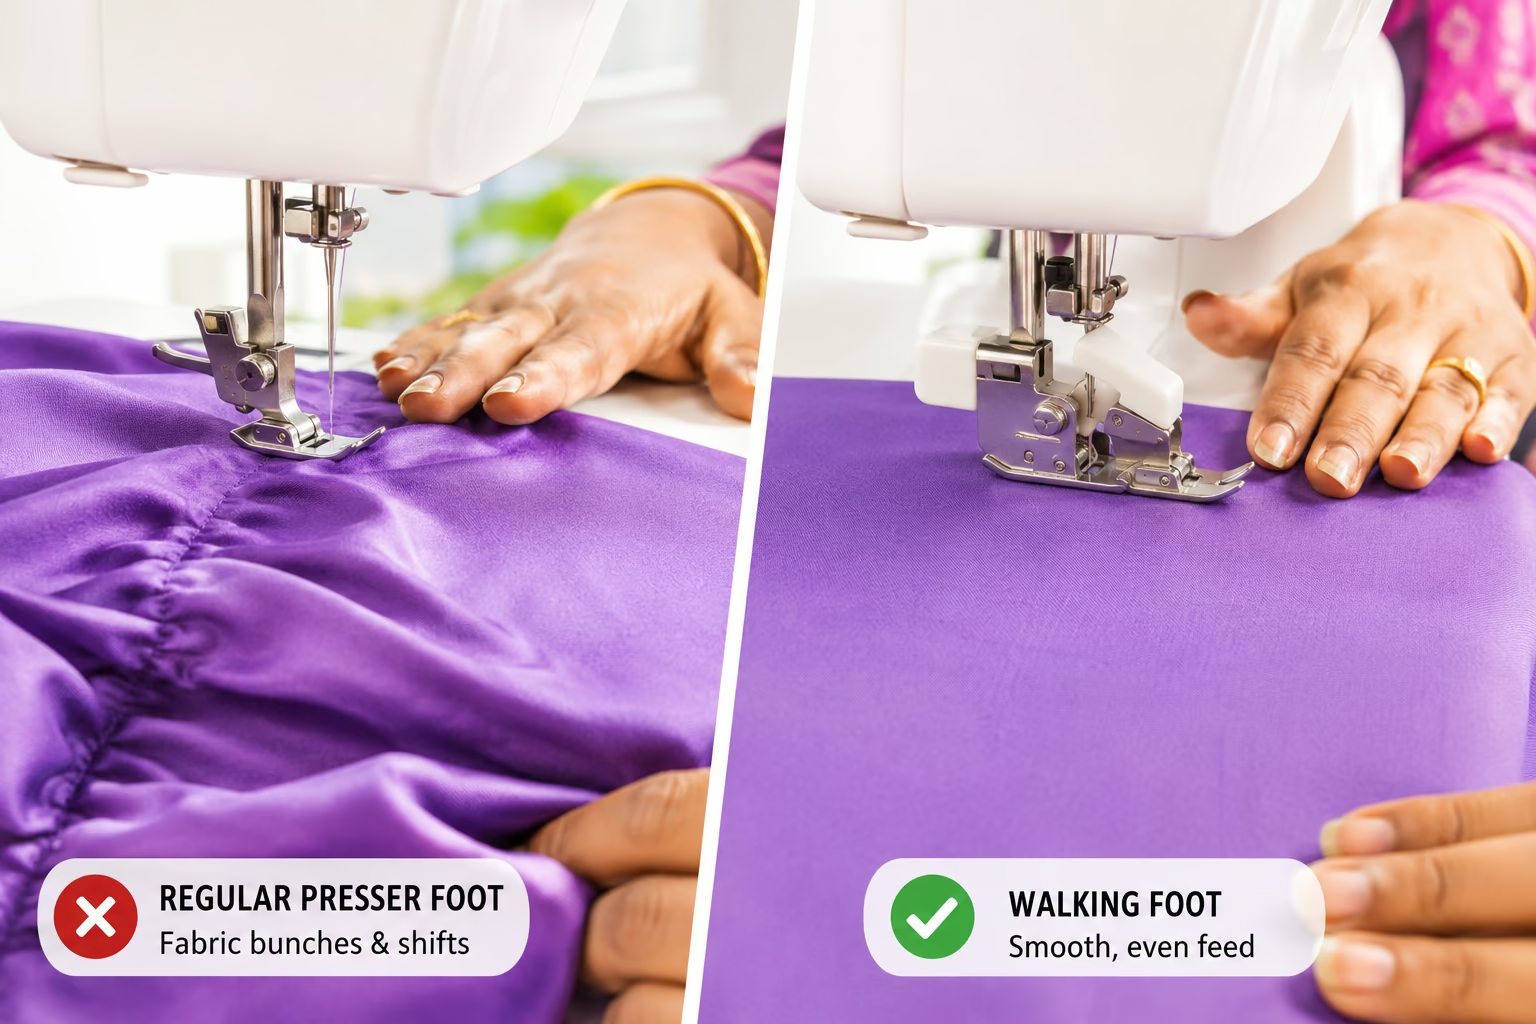
A walking foot (also called an even-feed foot) feeds the top and bottom fabric layers through your machine at the same rate, preventing the top layer from sliding ahead and creating puckered or uneven seams. Regular presser feet only feed fabric from the bottom via feed dogs, which allows slippery top layers to shift during stitching.
How a walking foot solves slippery fabric problems:
- Even feeding – Built-in feed dogs on top of the foot grip the upper fabric layer
- Synchronized movement – Top and bottom layers move through the machine together
- Reduced puckering – Even tension on both layers prevents fabric from bunching
- Better seam alignment – Pattern matching and stripe alignment stay accurate
Most modern sewing machines accept snap-on or screw-on walking feet as accessories. If your machine doesn’t have a walking foot option, an even-feed foot or dual-feed system (built into some machines) provides similar benefits.
When to use a regular presser foot instead:
- Very lightweight fabrics (chiffon, organza) where a walking foot’s weight might drag
- Delicate hand-basting or easing that requires manual fabric control
- Decorative stitching where you need to see the needle area clearly
For more information about specialized presser feet and their uses, see our guide on what all those presser feet are for.
Pro tip: Reduce your presser foot pressure when using a walking foot on slippery fabrics. Most machines have a pressure adjustment dial or lever that lets you lighten the foot’s grip, which prevents fabric from stretching as it feeds through.

【Clear View for Detailed Stitching】See exactly where your needle goes. The open toe design gives you a full view for intricate decorative stitches and free-motion quilting, making detailed work easier and more accurate

Enhanced Compatibility: This walking foot attachment is compatible with Brother sewing machines, as well as part Singer and Janome models, making it a versatile addition to your crafting tool kit

O(∩_∩)O Enhances Functionality:This walking foot attachment set is compatible with Brother sewing machines, as well as part Singer 、Janome models, making it a versatile addition to your crafting tool kit.
What Tension Settings Work Best for Sewing Silk
Lower your upper thread tension by 1-2 settings below your machine’s normal tension for silk and other slippery fabrics. Standard tension (usually 4-5 on most machines) pulls too tightly on delicate, lightweight materials, causing puckering, thread breakage, and visible tension lines along seams.
Tension adjustment process:
- Test on fabric scraps – Use the same fabric, thread, and needle you’ll use for your project
- Start with normal tension – Sew a test seam and examine both sides
- Reduce upper tension gradually – Lower by one number, test again, and repeat if needed
- Check stitch balance – Ideal stitches lock between fabric layers with no loops visible on either side
- Document your settings – Write down the tension number that works for future reference
Signs your tension is too tight on silk:
- Fabric puckers along the seam line
- Thread breaks frequently during sewing
- Seam feels stiff or rope-like rather than soft and flexible
- Fabric gathers or tunnels around stitches
Signs your tension is too loose:
- Loops of bobbin thread visible on the fabric top
- Seam pulls apart easily when tugged
- Stitches look uneven or irregular
For a deeper understanding of tension mechanics, read our article on sewing machine tension explained with test strips.
Edge case: If you’ve lowered tension significantly and still see puckering, the problem might be your stitch length rather than tension. Increase stitch length to 2.5-3mm for lightweight slippery fabrics to reduce the number of perforations per inch.
Why Does My Slippery Fabric Pucker at the Seams
Slippery fabric puckers when the upper and lower fabric layers feed through your machine at different speeds, when thread tension is too tight, or when your stitch length is too short for the fabric weight. The combination of low fabric friction and machine feeding mechanics causes the top layer to push ahead, creating excess fabric that bunches into puckers.
Primary causes and solutions:
- Uneven feeding – Switch to a walking foot or reduce presser foot pressure
- Tight tension – Lower upper thread tension by 1-2 settings
- Short stitch length – Increase to 2.5-3mm for lightweight fabrics
- Dull needle – Replace with a fresh sharp microtex needle
- Fast sewing speed – Slow down to maintain better control
- Lack of stabilization – Add tissue paper under fabric or use spray starch
Testing method: Sew a 6-inch test seam on fabric scraps using your current settings. If puckering appears, change ONE variable at a time and test again until you identify the cause. This systematic approach prevents making multiple changes that might conflict with each other.
If puckering persists after addressing these factors, check your fabric feeding system for lint buildup or mechanical issues that might affect feed dog performance.
Prevention tip: Hold fabric taut (but don’t pull) in front of and behind the presser foot as you sew. This gentle tension helps both layers feed evenly without stretching the fabric.
Can You Use Regular Pins on Satin or Will It Leave Marks
Regular pins can leave permanent holes in satin, silk, and other tightly woven slippery fabrics, especially if pins are thick, dull, or left in place for extended periods. Fine silk pins (size 0.5mm or thinner) minimize this risk, but fabric clips, pattern weights, and basting are safer alternatives that leave no marks at all.
Pin alternatives for slippery fabrics:
- Fine silk pins – Ultra-thin diameter (0.5mm) creates minimal holes that usually close after removal
- Fabric clips – Small plastic clips grip fabric edges without penetrating fibers (perfect for seam allowances)
- Pattern weights – Hold pattern pieces during cutting without any punctures
- Hand basting – Temporary long stitches secure layers, then pull out easily after machine sewing
- Washable fabric glue stick – Dabs of glue hold seams temporarily, wash out completely
If you must use pins on satin or silk:
- Pin only within seam allowances (areas that will be hidden inside the garment)
- Use the finest silk pins available (look for “extra fine” or “silk pins” on the package)
- Pin perpendicular to the seam line so you can sew over them or remove them easily
- Remove pins as soon as possible – don’t leave them in fabric for days or weeks
- Never pin through the right side of fabric in areas that will be visible
Common mistake: Using thick quilting pins or ballpoint pins on slippery woven fabrics. These create large holes that may not close, especially in synthetic satins where fibers have less elasticity than natural silk.
For more techniques on handling delicate materials, explore our collection of fabric techniques.
Alternatives to Pins for Holding Slippery Fabric Together
Fabric clips, washable glue sticks, and hand basting provide secure hold for slippery fabrics without creating pin holes or distorting delicate materials. These methods work especially well for fabrics like silk charmeuse, satin, and chiffon where even fine pins can leave permanent marks.
Comparison of pinless methods:
Fabric clips:
- Small plastic clips (similar to mini clothespins) grip fabric edges
- Work best on seam allowances and hems
- Easy to reposition and remove
- Can’t use in the middle of large fabric pieces
- Cost: $8-15 for a pack of 50
Washable glue stick:
- Apply small dabs along seam lines to temporarily bond layers
- Washes out completely in first laundering
- Provides smooth, flat hold without bulk
- Requires drying time before sewing
- Best for straight seams and hems
Hand basting:
- Long running stitches (1/4 inch or longer) sewn by hand
- Most secure method for complex curves and gathers
- Time-consuming but gives maximum control
- Thread pulls out easily after machine stitching
- Use contrasting thread color for easy visibility
Wonder tape (double-sided basting tape):
- Narrow strips of temporary adhesive tape
- Holds seam allowances flat for topstitching
- Needle-safe (won’t gum up your needle)
- More expensive than other methods
- Perfect for hems and zipper installation
Decision rule: Use fabric clips for quick projects with straight seams, hand basting for fitted garments that need precision, and glue stick for hems and topstitching where you need a perfectly flat surface.
Is Polyester Satin Easier to Sew Than Real Silk
Polyester satin is significantly easier to sew than real silk because it’s more durable, less prone to water spotting, more forgiving of tension errors, and costs less for practice. While both fabrics are slippery, polyester satin tolerates beginner mistakes better and doesn’t require the same level of precision as natural silk.
Polyester satin advantages:
- More forgiving – Tolerates slightly incorrect tension and stitch length without permanent damage
- No water spots – Can use spray starch and steam pressing without risk
- Stronger fibers – Less likely to snag or develop runs from needle imperfections
- Lower cost – Mistakes don’t waste expensive material
- Easier to press – Handles higher heat settings than silk
- More stable – Slightly less slippery than silk charmeuse
Real silk advantages:
- Superior drape – Flows more naturally and feels luxurious
- Breathable – More comfortable for garments worn against skin
- Natural luster – Deeper, more complex sheen than synthetic alternatives
- Better for heirlooms – Long-lasting when properly cared for
- Temperature regulating – Keeps you cooler in summer, warmer in winter
For beginners learning how to sew slippery fabric without tears: Start with polyester satin to build confidence and master techniques before investing in expensive silk. Practice on polyester until you can sew straight seams without puckering, then graduate to silk for special projects.
Edge case: Some high-quality polyester satins (often labeled “bridal satin” or “duchess satin”) can be just as challenging as silk because they’re extremely slippery. Read fabric descriptions carefully and feel the fabric in person when possible.
Common Mistakes When Sewing With Chiffon and How to Avoid Them
The most common chiffon mistakes are using the wrong needle size, sewing too fast, skipping stabilization, and attempting to press seams with too much heat. Chiffon is the most challenging slippery fabric because it’s both transparent and extremely lightweight, making every error visible and difficult to correct.
Mistake #1: Using a dull or wrong-sized needle
- Problem: Snags, runs, and skipped stitches appear immediately
- Solution: Use a fresh size 60/8 or 70/10 microtex needle for every chiffon project
Mistake #2: Sewing at normal speed
- Problem: Fabric feeds unevenly and puckers form
- Solution: Reduce machine speed to 50% or slower for maximum control
Mistake #3: Skipping stabilization
- Problem: Seams pucker and ripple, edges roll during sewing
- Solution: Always use tissue paper under chiffon or sandwich it between two layers of water-soluble stabilizer
Mistake #4: Using regular seam finishes
- Problem: Raw edges fray immediately and look messy
- Solution: Use French seams, rolled hems, or narrow zigzag finishes designed for sheer fabrics
Mistake #5: Pressing with too much heat or pressure
- Problem: Chiffon melts, becomes shiny, or develops permanent creases
- Solution: Use lowest heat setting (silk setting), press from wrong side, and use a pressing cloth
Mistake #6: Cutting multiple layers at once
- Problem: Layers shift dramatically, resulting in uneven pieces
- Solution: Cut one layer at a time, or use pattern weights and spray adhesive to secure layers
Prevention checklist for chiffon success:
- ✓ New microtex needle (size 60/8 or 70/10)
- ✓ Tissue paper or stabilizer ready
- ✓ Thread tension reduced by 1-2 settings
- ✓ Stitch length increased to 2.5-3mm
- ✓ Machine speed set to slow
- ✓ Test seam sewn on scraps first
If you’re experiencing thread bunching or other tension issues with lightweight fabrics, our guide on why thread bunches under fabric can help troubleshoot.
Do I Need a Special Sewing Machine for Slippery Fabrics
You don’t need a special sewing machine to sew slippery fabrics successfully, but your machine should have adjustable presser foot pressure, variable speed control, and the ability to accept a walking foot attachment. Most modern machines (even basic models) include these features, making them capable of handling silk, satin, and chiffon with proper technique.
Essential machine features for slippery fabrics:
- Adjustable presser foot pressure – Lets you lighten the foot’s grip on delicate materials
- Variable speed control – Allows slow, controlled stitching for better accuracy
- Walking foot compatibility – Accepts snap-on or screw-on walking foot accessories
- Adjustable tension – Provides fine control over upper thread tension
- Smooth feed dogs – Clean, well-maintained feed dogs prevent snagging
Nice-to-have features:
- Needle down position – Keeps needle in fabric when you stop, preventing shifting
- Automatic thread cutter – Reduces handling that might shift delicate fabric
- Extension table – Provides larger work surface to support fabric weight
- Dual feed system – Built-in even-feed mechanism (eliminates need for walking foot)
Machines that struggle with slippery fabrics:
- Very old machines with limited tension adjustment
- Heavy-duty machines designed only for thick materials (limited low-tension range)
- Machines with damaged or rough feed dogs that snag delicate fibers
- Models without presser foot pressure adjustment
Decision rule: If your current machine can sew a test seam on cotton without skipped stitches or tension problems, it can handle slippery fabrics with the right accessories and techniques. Invest in a walking foot, quality needles, and stabilizers before considering a new machine.
For guidance on choosing machines with versatile capabilities, see our comparison of sewing machines for different skill levels.
How to Finish Seams on Slippery Fabric Without Fraying
French seams, rolled hems, and narrow zigzag finishes provide clean, fray-resistant edges on slippery fabrics while maintaining the delicate drape that makes these materials special. French seams are the gold standard for sheer and lightweight fabrics because they completely enclose raw edges inside a narrow, professional-looking seam.
French seam technique (best for straight seams):
- Place fabric wrong sides together (opposite of normal)
- Sew a 1/4-inch seam along the edge
- Trim seam allowance to 1/8 inch
- Press seam open, then fold fabric right sides together along the seam line
- Sew a second seam 1/4 inch from the folded edge, enclosing the raw edges
- Press to one side – the finished seam shows no raw edges on either side
Rolled hem (best for curved edges and hems):
- Use a rolled hem foot attachment on your machine
- Fabric edge rolls into a tiny tube as it feeds through the foot
- Creates a 1/8-inch or narrower finished hem
- Perfect for chiffon scarves and lightweight garment hems
- Requires practice to feed fabric smoothly
Narrow zigzag finish (fastest method):
- Set machine to narrow zigzag (1-1.5mm width, 2mm length)
- Sew along raw edge, encasing it with zigzag stitches
- Trim excess fabric close to stitching
- Works well for seam allowances that won’t be visible
Serger/overlock option:
- If you have a serger, use a narrow 3-thread overlock
- Adjust differential feed to prevent stretching
- Creates professional finish in one pass
- Requires additional equipment investment
For more information on seam finishing techniques, visit our guide on seam finishing methods.
Common mistake: Using pinking shears on slippery fabrics. The zigzag cut doesn’t prevent fraying on smooth, tightly woven materials like satin and silk – it only works on fabrics with more texture.
Is Slippery Fabric Suitable for Beginner Sewers
Slippery fabrics are challenging for beginners but not impossible if you start with polyester satin, use stabilization methods, invest in the right tools, and practice on scraps before cutting into your main fabric. Complete at least 3-5 projects on cotton or cotton-blend fabrics before attempting silk or chiffon to build fundamental sewing skills first.
Skills beginners should master before tackling slippery fabrics:
- Sewing straight seams with consistent seam allowances
- Understanding and adjusting thread tension
- Changing needles and recognizing when they’re dull
- Operating machine at variable speeds with control
- Pressing seams properly without stretching fabric
Beginner-friendly slippery fabric progression:
- Start here: Polyester satin (medium weight) for simple projects like pillowcases or lined tote bags
- Next level: Silk charmeuse for a simple camisole or scarf with straight seams
- Advanced: Chiffon for a lined skirt or overlay garment
- Expert: Bias-cut silk garments or chiffon with complex curves
Project recommendations for first slippery fabric attempt:
- Simple A-line skirt with elastic waist (minimal fitting, straight seams)
- Pillowcase with French seams (practice technique on small project)
- Lined tote bag with satin exterior (lining provides stability)
- Rectangular scarf with rolled hems (small, low-stakes project)
When to wait: Avoid slippery fabrics for your first fitted garment, first zipper installation, or first project with set-in sleeves. These techniques are challenging enough on stable fabrics and become exponentially harder on slippery materials.
Encouragement for beginners: Many sewers avoid slippery fabrics for years out of fear, but with proper preparation and realistic expectations, you can successfully complete beautiful projects. The key is accepting that your first attempt might not be perfect and viewing it as valuable practice rather than a failure.
For foundational sewing guidance, explore our sewing for beginners resources.
FAQ
What thread works best for slippery fabrics?
Fine polyester or silk thread in 50-60 weight works best for slippery fabrics because it’s strong, smooth, and creates minimal bulk in seams. Match thread fiber content to your fabric when possible (silk thread for silk fabric, polyester for polyester satin) for best results.
Can I use a regular straight stitch on satin?
Yes, a regular straight stitch works well on satin and most slippery fabrics. Use a stitch length of 2.5-3mm for best results, and reduce tension slightly to prevent puckering. Straight stitches create less bulk than zigzag stitches in seams.
How do I prevent my sewing machine from eating thin fabric?
Place tissue paper under thin slippery fabric before sewing, start stitching 1/2 inch from the fabric edge rather than right at the edge, and hold thread tails behind the presser foot for the first few stitches. These techniques prevent fabric from being pulled down into the feed dogs.
Should I wash slippery fabric before sewing?
Pre-wash polyester satin if you plan to wash the finished garment, but dry-clean-only silks should not be washed before sewing. Pre-washing removes sizing and allows fabric to shrink before you cut pattern pieces, preventing size changes after your garment is complete.
Why does my needle keep breaking when sewing silk?
Needle breakage on silk usually indicates you’re using a needle that’s too large, too dull, or the wrong type. Switch to a fresh size 70/10 microtex needle, slow your sewing speed, and ensure fabric isn’t pulling or shifting as you sew.
Can I use fabric glue instead of pins on all slippery fabrics?
Washable fabric glue sticks work well on most slippery fabrics, but test on scraps first to ensure the glue washes out completely and doesn’t leave residue. Avoid permanent fabric glues or hot glue, which will damage delicate materials.
How do I keep satin from slipping while hemming?
Use fabric clips or hand basting to secure the hem in place, press the fold with low heat to create a crease, and consider using a walking foot or tissue paper under the fabric while stitching. A rolled hem foot also helps feed fabric evenly for narrow hems.
What presser foot pressure should I use for chiffon?
Reduce presser foot pressure to the lightest setting your machine allows for chiffon. Light pressure prevents the foot from crushing delicate fabric and allows it to feed more smoothly without stretching or distorting.
Is it better to hand sew or machine sew slippery fabrics?
Machine sewing produces stronger, more consistent seams on slippery fabrics, but hand basting before machine sewing gives you the best control. Reserve hand sewing for delicate areas like hems on sheer fabrics or attaching closures.
Can I use a rotary cutter on silk?
Yes, a sharp rotary cutter works excellently on silk and produces cleaner edges than scissors. Use a cutting mat underneath, secure fabric with pattern weights, and cut with smooth, continuous strokes rather than short choppy movements.
How do I fix puckered seams after sewing?
Light steam pressing from the wrong side can sometimes relax minor puckering, but severely puckered seams usually need to be removed and re-sewn with corrected tension, stitch length, or stabilization. Prevention is easier than correction with slippery fabrics.
What’s the best way to mark slippery fabric?
Use tailor’s tacks (thread marking), chalk that brushes off easily, or washable fabric markers tested on scraps first. Avoid tracing wheels or permanent markers that might show through sheer fabrics or leave permanent marks on smooth surfaces.
Conclusion
Learning how to sew slippery fabric without tears transforms challenging materials like silk, satin, and chiffon from frustrating obstacles into beautiful, rewarding projects. The key is combining the right tools (sharp microtex needles, walking feet, and fine pins or clips) with proven techniques (reduced tension, tissue paper stabilization, and slower sewing speeds) to control fabric behavior throughout cutting, stitching, and finishing.
Start your slippery fabric journey with forgiving polyester satin on simple projects, master French seams and rolled hems for professional finishes, and always test your settings on scraps before cutting into expensive materials. Remember that even experienced sewers approach slippery fabrics with patience and preparation – these techniques aren’t shortcuts around difficulty but rather the standard professional approach to working with delicate materials.
Your next steps:
- Gather essential tools: microtex needles (size 70/10), walking foot, tissue paper, and fabric clips
- Choose a beginner-friendly project like a simple skirt or pillowcase in polyester satin
- Sew test seams on fabric scraps, adjusting tension and stitch length until seams are smooth
- Cut carefully using pattern weights and a sharp rotary cutter or scissors
- Sew slowly with stabilization, checking your work frequently
- Finish seams with French seams or narrow zigzag for a polished result
With these techniques in your sewing toolkit, you’ll approach slippery fabrics with confidence rather than dread, opening up a world of elegant garments and projects that showcase your growing skills.


