


Quick Answer
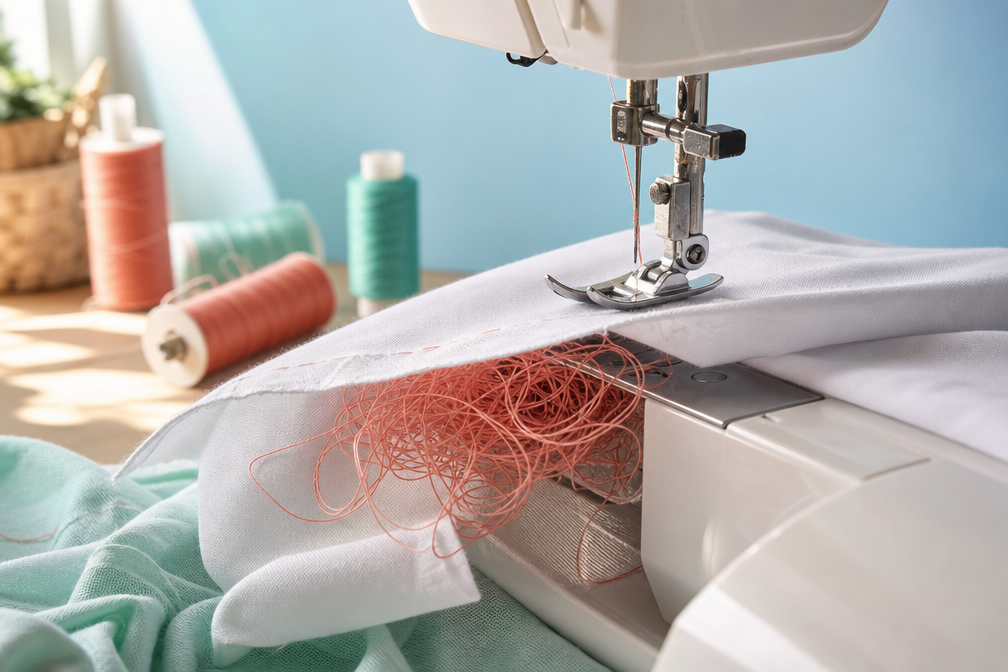
Thread bunching under fabric, commonly called “birdnesting,” happens when the upper thread isn’t properly caught by the bobbin thread, causing loops and tangles to form on the underside of your project. The most common culprits are incorrect threading, improper bobbin tension, or using a damaged needle. Most cases can be fixed in under five minutes by rethreading your machine correctly and checking your bobbin installation.
Key Takeaways
- Birdnesting is almost always an upper thread problem, not a bobbin issue, despite appearing on the bottom of the fabric
- Rethreading with the presser foot up is the single most effective fix because it allows thread to seat properly in the tension discs
- Bobbin tension rarely needs adjustment on home machines and should only be changed as a last resort
- A bent, dull, or wrong-size needle causes up to 30% of thread bunching cases
- Thread quality matters, old, cheap, or mismatched thread types create inconsistent tension
- The fix costs nothing if you troubleshoot yourself; professional tension adjustments run $40-75 if needed
- Beginners experience birdnesting more often because threading mistakes are easy to make when learning
- Preventive maintenance like cleaning the bobbin area and changing needles every 8-10 hours of sewing stops most problems
What Is Birdnesting in Sewing Machines?
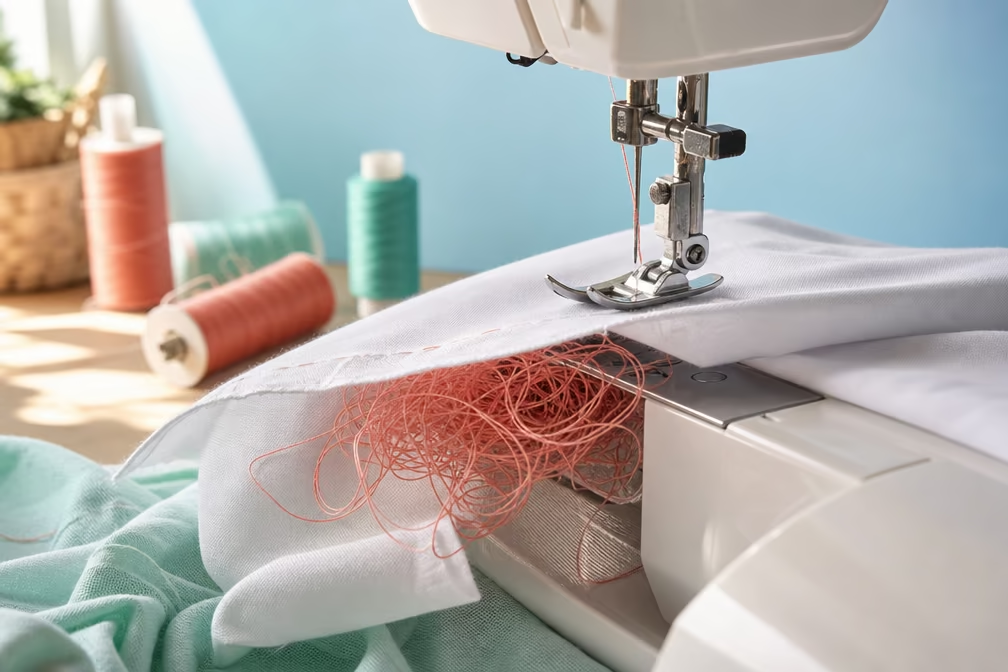
Birdnesting refers to the tangled mess of thread loops that form underneath your fabric while sewing, resembling a bird’s nest. This frustrating problem creates loose, loopy stitches on the bottom side of your project while the top may look normal or slightly puckered.
The term describes both the appearance and the chaos, thread wraps around itself in knots, jams in the bobbin area, and can even lock up your machine completely. Unlike regular tension problems that create uneven but functional stitches, birdnesting produces unusable seams that must be removed and resewn.
Key characteristics of birdnesting:
- Loops of thread visible on the fabric underside
- Thread tangles in the bobbin case or throat plate area
- Top stitches may pull through to the bottom
- Machine may make grinding sounds or refuse to sew
- Thread breaks frequently during sewing
Birdnesting differs from simple loose stitches because it involves actual thread tangles rather than just incorrect tension balance. A loose stitch shows bobbin thread on top or upper thread on bottom, but the threads remain separate. Birdnesting creates a matted, knotted mess that physically jams the machine.
What Causes Thread Bunching Under Fabric When Sewing?
Thread bunching under fabric stems from the upper thread failing to form proper lockstitches with the bobbin thread. When your needle carries the upper thread down through the fabric, it should create a small loop that the rotating hook catches and wraps around the bobbin thread. If this loop is too large, too loose, or improperly formed, excess thread accumulates underneath instead of locking neatly.
The five most common causes:
- Incorrect upper threading, Thread bypassing tension discs or guides (accounts for 60-70% of cases)
- Threading with presser foot down, Prevents thread from seating between tension discs
- Wrong needle size or type, Bent, dull, or incorrectly sized needles create irregular loops
- Bobbin inserted incorrectly, Thread unwinding in the wrong direction disrupts timing
- Dirty or damaged bobbin case, Lint buildup or scratches catch thread
Less common but possible causes include a bent needle bar, damaged hook timing, or a malfunctioning tension assembly. These mechanical issues usually require professional repair.
Choose DIY troubleshooting if:
- Your machine is less than 10 years old
- The problem started suddenly
- You recently changed thread or fabric type
- The machine works fine sometimes but not others
Take it to a repair shop if:
- You’ve tried all basic fixes with no improvement
- The machine makes unusual grinding or clicking sounds
- Timing seems off (needle hits bobbin case or hook)
- The problem persists across all thread types and fabrics
Is Birdnesting Caused by Upper Thread or Bobbin Thread?
Birdnesting is caused by the upper thread in approximately 90% of cases, even though the tangled mess appears on the bottom of your fabric. This counterintuitive fact confuses many sewers who assume a bottom-side problem must be a bobbin issue.
The upper thread creates birdnesting when it doesn’t maintain proper tension through the needle. If the thread is too loose, the needle carries excessive thread down through the fabric. The bobbin hook catches this oversized loop and pulls it underneath, where it accumulates into tangles because there’s simply too much thread to form a neat lockstitch.
Why the upper thread is usually responsible:
- The upper thread travels through multiple tension points that can fail
- Threading mistakes are easy to make and hard to spot
- The presser foot position during threading affects upper tension dramatically
- Upper thread spools can catch, snag, or unwind unevenly
The bobbin thread causes problems only when it’s wound incorrectly, inserted backward, or when the bobbin case tension has been accidentally adjusted. Bobbin-related issues typically create different symptoms, loose stitches on top, thread breaking, or uneven stitch length rather than dramatic nesting underneath.
Common mistake: Adjusting bobbin tension first when you see thread bunching underneath. Always exhaust upper thread solutions before touching the bobbin tension screw, which is factory-set and rarely needs changing on home machines.
How to Fix Thread Nesting on Bottom of Fabric
Fixing thread nesting requires a systematic approach that addresses the most common causes first. Start with the simplest solutions and work toward more complex adjustments only if needed.
Step-by-step fix process:
- Turn off the machine and remove the fabric, Cut threads and gently pull the fabric free without forcing it
- Remove the needle, Check for bends, burrs, or dullness; replace if in doubt
- Completely unthread the upper thread, Remove thread from every guide and the needle
- Raise the presser foot, This is critical for the next step
- Rethread the entire upper thread path, With presser foot UP, follow your manual’s threading diagram carefully
- Check each thread guide, Ensure thread sits fully in every notch and guide
- Thread the needle front-to-back, Confirm correct direction for your machine
- Lower the presser foot, This engages the tension discs
- Remove and reinsert the bobbin, Confirm it unwinds in the correct direction (usually counterclockwise)
- Pull up the bobbin thread, Hold upper thread, turn handwheel, catch bobbin thread loop
- Test on scrap fabric, Use the same fabric type as your project
After rethreading, check these details:
- Thread should pull smoothly but with noticeable resistance when presser foot is down
- No resistance when presser foot is up means thread isn’t in tension discs
- Bobbin should drop slightly when you hold the thread end (proper tension)
- Thread spool should unwind freely without catching on the spool pin
If birdnesting continues after correct rethreading, move to needle replacement (use the correct size and type for your fabric), then clean the bobbin area thoroughly with a small brush. Only adjust bobbin tension as a last resort.


Bobbin Case 15 Class Machine #15277

What you get: the package includes 4 pieces sewing machine bobbin case, you can change and replace according to your own interest, or share with others

Tough polypropylene bobbin box organizes those loose bobbins,can be reused many times.
How to Adjust Bobbin Tension to Stop Thread Bunching
Bobbin tension adjustment should be your last resort, not your first step, when addressing thread bunching. Home sewing machines come with factory-set bobbin tension that works for 95% of sewing projects, and unnecessary adjustments often create more problems than they solve.
When bobbin tension actually needs adjustment:
- You’ve confirmed perfect upper threading multiple times
- You’ve replaced the needle with the correct size and type
- The bobbin case is clean and undamaged
- The problem persists across different thread brands and weights
- You’re sewing with specialty threads (metallic, heavy topstitching, or very fine threads)
How to test current bobbin tension:
Hold the bobbin case by the thread with the bobbin inside. The case should drop 2-3 inches and stop, hanging suspended. If it drops freely to the floor, tension is too loose. If it doesn’t drop at all, tension is too tight.
To adjust bobbin tension (proceed carefully):
- Locate the small screw on the side of the bobbin case (not the larger screw that holds the tension spring)
- Turn clockwise (righty-tighty) in tiny increments, 15 minutes on a clock face at most
- Test the drop test after each micro-adjustment
- Turn counterclockwise (lefty-loosey) to loosen if you’ve gone too far
Critical rule: Make adjustments so small you barely see the screw move. A quarter-turn is massive in bobbin tension terms. Mark the screw’s starting position with a permanent marker or take a photo so you can return to factory settings if needed.
Common mistake: Adjusting bobbin tension when the real problem is upper thread tension. If your machine has a numbered tension dial (usually 0-9), try increasing the upper tension by one number first. This is safer and more reversible than touching the bobbin case.
For machines with drop-in bobbins (no removable case), tension is usually non-adjustable by design. These machines rely entirely on upper tension and correct threading to prevent birdnesting.

20 Pieces Bobbin Case Tension Screws.

This listing Brand New High Quality 10PCS #591F bobbin case tension screw. Bobbin case tension screw for the following bobbin cases: JO1313, JO1313Z, 125291, 105032, 173058, 201764, 62740, 9076, 52237

REPLACEMENT PART. An almost identical part to the original part. Ideal for repairs and replacements.
Why Does My Sewing Machine Keep Jamming Underneath?
A sewing machine that keeps jamming underneath is experiencing repeated birdnesting, usually from a persistent threading error or a mechanical issue that hasn’t been addressed. If you’ve fixed the problem once but it returns immediately or within a few seams, you’re dealing with an underlying cause rather than a one-time mistake.
Recurring jam causes:
- Thread spool catching, The spool pin is too long, thread catches on the spool edge, or you need a spool cap
- Incorrect spool orientation, Some machines require thread to unwind from the front of the spool, others from the top
- Presser foot pressure too light, Fabric doesn’t feed evenly, causing thread loops
- Feed dogs lowered or damaged, Fabric doesn’t move consistently under the needle
- Throat plate loose or damaged, Burrs or gaps catch thread as it forms loops
- Wrong bobbin type, Using Class 15 bobbins in a machine designed for Class 66 (or vice versa)
Troubleshooting persistent jams:
Check your thread path while the machine is running (without fabric, needle unthreaded for safety). Watch the spool as it unwinds. It should rotate smoothly without jumping, catching, or creating slack loops. If the thread creates a loop above the spool before reaching the first thread guide, you need a different spool pin setup or a thread stand.
Examine the throat plate (the metal plate around the feed dogs with the needle hole). Remove it and check for:
- Burrs or rough edges around the needle hole
- Scratches in the thread path
- Lint packed underneath
- Proper alignment when reinstalled
When to suspect mechanical timing issues:
If your needle hits the bobbin case, hook, or throat plate, your machine’s timing is off. This is a professional repair job that costs $75-150 but prevents serious damage. Don’t continue sewing if you hear metal-on-metal contact.
Can the Wrong Needle Cause Thread Bunching Under Fabric?
Yes, using the wrong needle causes thread bunching in approximately 25-30% of cases. The needle’s condition, size, and type directly affect how the upper thread loop forms as it passes through the fabric, and any irregularity in that loop leads to nesting underneath.
How needles cause birdnesting:
A bent needle (even slightly) creates an irregular thread loop because the needle doesn’t travel straight down and up. The hook catches the loop at the wrong angle, pulling excess thread underneath. You might not see the bend with your naked eye, needles can bend microscopically from hitting pins or sewing over thick seams.
A dull needle doesn’t pierce fabric cleanly. Instead of making a neat hole, it pushes fabric fibers aside and drags them down with the thread. This creates friction and irregular tension, resulting in inconsistent loop formation.
A wrong-size needle for your fabric weight creates problems in both directions. Too small a needle for heavy fabric can’t make a large enough hole, causing thread to drag and bunch. Too large a needle for lightweight fabric makes oversized holes that don’t grip the thread properly, allowing excess thread to pull through.
Needle size guide:
- Size 60/8 or 70/10: Sheer, lightweight fabrics (chiffon, organza, fine silk)
- Size 80/12: Medium-weight fabrics (quilting cotton, linen, light denim)
- Size 90/14: Heavy fabrics (denim, canvas, upholstery)
- Size 100/16 or 110/18: Very heavy fabrics (multiple denim layers, leather, heavy canvas)
Needle type matters too:
- Universal needles work for woven fabrics
- Ballpoint/Jersey needles are essential for knits (they slip between fibers instead of piercing them)
- Stretch needles have a special scarf to prevent skipped stitches on elastic fabrics
- Denim/Jeans needles have reinforced shafts and sharp points for dense fabrics
Replace your needle:
- Every 8-10 hours of sewing time
- After hitting a pin (even if it seems fine)
- When switching between fabric types (woven to knit, light to heavy)
- If you hear a popping sound as the needle enters fabric
- Immediately if thread keeps breaking or shredding
Quick test: Remove the needle and roll it across a flat surface like a glass table. A bent needle will wobble visibly. Also run your finger gently along the needle shaft, you should feel no burrs or rough spots.

PREMIUM QUALITY MATERIAL: Made of top quality high-strength steel, sharp smooth, sturdy and durable, not easy to bend, and long service life.

SEWING MADE SIMPLE: SCHMETZ Universal Needles work with all home sewing machines and handle everything from delicate silks to heavy denim, making them perfect for any quilting, embroidery, craft, or home décor project

2X STRONGER STEEL — Constructed with reinforced, thick shafts that withstand the resistance of dense, heavy fabrics without bending or breaking, staying sharp longer for consistent, skip-free stitching through any material from start to finish.
Does Thread Quality Affect Birdnesting?
Thread quality significantly affects birdnesting, with cheap or old thread causing problems in 15-20% of cases. High-quality thread maintains consistent diameter, strength, and twist throughout the spool, while bargain thread varies in thickness, sheds lint excessively, and breaks down over time.
How poor thread quality causes nesting:
Inconsistent diameter means your tension discs can’t grip the thread evenly. Thick spots create too much resistance; thin spots slip through with too little tension. This variation produces irregular thread loops that tangle underneath.
Excessive lint from low-quality thread accumulates in your tension discs, bobbin case, and hook area. This buildup creates friction and catches thread, disrupting smooth flow and causing bunching.
Old thread (typically over 3-5 years) becomes brittle and weak. It breaks easily, shreds as it passes through the needle eye, and doesn’t form consistent loops. Thread stored in sunlight, heat, or humidity degrades even faster.
Thread type mismatches cause problems too. Using polyester thread in the bobbin and cotton thread on top (or vice versa) creates tension imbalances because the materials have different stretch and weight characteristics.
Quality indicators to look for:
- Brand reputation (Gutermann, Mettler, Aurifil, Coats & Clark)
- Smooth, even appearance with consistent twist
- Minimal lint when you run it through your fingers
- Proper storage (away from sunlight and moisture)
- Thread weight appropriate for your fabric (50wt for general sewing, 40wt for topstitching, 60wt for fine fabrics)
Common mistake: Buying large cone lots of cheap thread at discount stores. These often sit in warehouses for years and may be manufacturing seconds. The money saved isn’t worth the frustration of constant thread problems.
Test your thread: Pull a length firmly between your hands. Quality thread should stretch slightly but not break. If it snaps easily or feels rough and fuzzy, replace it.
For best results, use the same brand and weight of thread in both the bobbin and upper thread. This ensures matched tension characteristics and eliminates one variable when troubleshooting.
Is Birdnesting Normal for Beginner Sewers?
Birdnesting is extremely common for beginner sewers but isn’t “normal” in the sense that it should be accepted or expected long-term. New sewers experience thread bunching more frequently because they’re still learning proper threading technique, machine setup, and fabric handling, all skills that become automatic with practice.
Why beginners encounter birdnesting more often:
Threading a sewing machine involves 12-15 specific steps that must be done in the correct order with the presser foot in the right position. Beginners often miss a thread guide, skip the take-up lever, or thread with the presser foot down because they don’t yet understand why each step matters.
Fabric handling mistakes also contribute. New sewers may:
- Start sewing without holding thread tails to the back (causing thread to pull into the bobbin area)
- Sew too close to fabric edges without proper support
- Pull or push fabric instead of letting feed dogs do the work
- Forget to lower the presser foot before sewing
Bobbin insertion errors are common when learning. Each machine has a specific bobbin orientation, thread must unwind in the correct direction (usually counterclockwise for drop-in bobbins). Beginners often insert the bobbin backward or forget to pull the thread through the tension spring.
The learning curve:
Most sewers experience frequent birdnesting in their first 10-20 hours of machine time. As threading becomes muscle memory and fabric handling improves, incidents drop dramatically. By 50 hours of practice, birdnesting should be rare and usually indicates a specific problem (wrong needle, old thread, or mechanical issue) rather than user error.
Beginner-friendly prevention tips:
- Thread your machine the same way every time to build muscle memory
- Use a threading checklist from your manual until it’s automatic
- Always raise the presser foot before threading
- Hold thread tails to the back for the first few stitches
- Practice on medium-weight quilting cotton (more forgiving than slippery or stretchy fabrics)
- Change your needle after every project while learning
- Take a photo of correct threading to reference when problems occur
When to ask for help: If you’re following your manual exactly and still experiencing constant birdnesting after 5-10 practice sessions, your machine may need professional servicing. Don’t assume you’re doing something wrong if you’ve systematically checked every variable.
How to Rethread a Sewing Machine to Prevent Nesting
Rethreading your sewing machine correctly prevents 60-70% of birdnesting cases. The key is following the exact sequence with the presser foot in the correct position at each stage, ensuring thread seats properly in every tension point.
Complete rethreading process:
1. Prepare the machine
- Turn off the power or unplug (safety first)
- Raise the needle to its highest position (turn the handwheel toward you)
- Raise the presser foot (this is critical, it opens the tension discs)
2. Remove old thread completely
- Pull thread out of the needle
- Remove thread from all guides working backward to the spool
- Remove the spool
3. Install thread spool correctly
- Place spool on the spool pin
- Check your manual for correct orientation (horizontal vs. vertical, which direction thread unwinds)
- Add a spool cap if needed to prevent thread from catching on the spool edge
- Thread should unwind smoothly without the spool jumping or wobbling
4. Follow the upper thread path (with presser foot still UP)
- Guide thread to the first thread guide (usually at the top of the machine)
- Bring thread down through the tension assembly channel
- Loop thread through the take-up lever (the metal arm that moves up and down, this is the most commonly missed step)
- Bring thread down through remaining guides toward the needle
- Thread the needle from front to back (or side to side, depending on your machine)
- Pull 4-6 inches of thread through the needle
5. Engage tension (now lower the presser foot)
- Lowering the presser foot closes the tension discs around the thread
- Test by gently pulling thread, you should feel resistance
- If there’s no resistance, the thread isn’t between the tension discs; raise the foot and rethread
6. Install and thread the bobbin
- Wind bobbin evenly if needed (don’t overfill, stop when 80% full)
- Insert bobbin in the case or drop-in area
- Confirm thread unwinds in the correct direction (check your manual)
- Pull thread through the tension spring or slot
- Leave 4-6 inches of tail
7. Bring up bobbin thread
- Hold the upper thread tail with your left hand
- Turn the handwheel toward you one complete rotation
- The needle will go down and come back up, catching the bobbin thread
- Pull gently on the upper thread to bring up a loop of bobbin thread
- Pull both threads to the back of the machine, under the presser foot
8. Test before sewing your project
- Place scrap fabric (same type as your project) under the presser foot
- Lower the presser foot
- Hold both thread tails to the back for the first 2-3 stitches
- Sew slowly and check the underside
Critical checkpoints:
✅ Presser foot was UP during threading
✅ Thread passed through the take-up lever
✅ Thread is seated in all guides and notches
✅ Presser foot is DOWN before sewing
✅ Both thread tails are pulled to the back
✅ Bobbin unwinds in the correct direction
Common rethreading mistakes:
- Threading with presser foot down (thread bypasses tension discs)
- Missing the take-up lever (creates massive loops)
- Skipping a thread guide (uneven tension)
- Starting to sew with presser foot up (no tension at all)
- Not holding thread tails back for the first stitches (threads pull into bobbin area)
If you rethread correctly and still get birdnesting, the problem lies elsewhere, move on to checking your needle, cleaning the machine, or testing thread quality.
When to Take Your Sewing Machine to a Repair Shop for Bunching
Take your sewing machine to a professional repair shop when you’ve systematically eliminated all user-fixable causes and the problem persists, or when you observe symptoms that indicate mechanical failure rather than threading or setup errors.
Clear indicators you need professional help:
Timing issues, If your needle hits the bobbin case, hook, or throat plate, the machine’s timing is off. This happens when the precise relationship between needle position and hook rotation becomes misaligned. Timing adjustments require specialized tools and expertise. Cost: $75-150 depending on the machine.
Consistent problems across all variables, If you’ve tried multiple thread brands, different needles, various fabric types, correct threading, and thorough cleaning with no improvement, a mechanical issue is likely. The tension assembly, hook, or feed dog mechanism may be damaged or worn.
Unusual sounds, Grinding, clicking, or metal-on-metal sounds indicate parts are making contact that shouldn’t be. This can damage your machine further if you continue sewing.
Visible damage, Scratches inside the bobbin case, a bent hook, a damaged tension assembly, or a cracked throat plate all require professional repair or replacement parts.
Recent drop or impact, If your machine was dropped, knocked over, or shipped roughly and now has thread bunching problems, internal components may be misaligned.
Age and maintenance history, Machines that haven’t been professionally serviced in 5+ years may need cleaning, lubrication, and adjustment of internal parts you can’t access.
What professional service includes:
- Complete disassembly and cleaning of internal mechanisms
- Timing adjustment if needed
- Tension assembly inspection and calibration
- Hook and feed dog examination
- Lubrication of moving parts
- Replacement of worn components
- Test sewing on multiple fabric types
Cost expectations for 2026:
- Basic cleaning and tune-up: $60-100
- Timing adjustment: $75-150
- Tension assembly repair: $50-125
- Hook replacement: $100-200
- Comprehensive service (cleaning, timing, adjustments): $125-250
Before taking your machine in:
Document the problem with photos or video showing the thread bunching, note when it started, and list everything you’ve already tried. This helps the technician diagnose faster and may save you money.
Ask if the shop offers free estimates. Some issues are simple fixes that take minutes; others require extensive work. Get a quote before authorizing expensive repairs, especially on older or lower-cost machines where repair costs might exceed replacement value.
Choose a repair shop that:
- Specializes in your machine brand (especially for computerized models)
- Provides written estimates
- Offers warranty on repairs (typically 30-90 days)
- Has good reviews for turnaround time (average is 1-3 weeks)
Common Mistakes That Cause Thread to Bunch Under Fabric
Several common mistakes cause thread bunching, and recognizing them helps you troubleshoot faster and prevent future problems. Many of these errors seem minor but have outsized effects on stitch formation.
Threading with presser foot down
This is the number one mistake. When the presser foot is down, the tension discs are closed. Threading in this position means the thread sits on top of the closed discs instead of between them. When you start sewing, there’s no upper tension at all, creating massive loops underneath. Always raise the presser foot before threading.
Missing the take-up lever
The take-up lever (the metal arm that moves up and down on the front of your machine) is easy to miss, especially on machines where it’s recessed or not clearly marked. If thread bypasses this lever, the machine can’t regulate how much thread is released with each stitch, causing bunching. Check your manual’s threading diagram and confirm thread passes through this lever.
Starting to sew without holding thread tails
When you begin a seam, the first few stitches are vulnerable. If you don’t hold both thread tails (upper and bobbin) to the back of the presser foot for the first 2-3 stitches, the threads can pull down into the bobbin area and create an instant bird’s nest. This is especially important when starting at a fabric edge.
Using the wrong bobbin type
Sewing machine bobbins aren’t universal. Class 15 bobbins (the most common) look nearly identical to Class 66 bobbins, but they’re slightly different sizes. Using the wrong type creates wobble in the bobbin case, causing uneven thread delivery. Check your manual and buy the correct bobbin type for your machine.
Overfilling the bobbin
A bobbin wound too full (past the rim) doesn’t rotate smoothly in its case. The excess thread creates drag and uneven tension. Stop winding when the bobbin is 80-90% full, leaving a small gap below the rim.
Sewing too fast on difficult fabrics
Speed matters, especially with slippery, stretchy, or very thick fabrics. Sewing too fast on challenging materials doesn’t give the feed dogs time to grip and move the fabric evenly, causing irregular stitch formation and bunching. Slow down on difficult fabrics.
Pulling or pushing fabric
Your feed dogs should move the fabric at a consistent pace. Pulling fabric through faster than the feed dogs want to move it, or holding it back, disrupts the tension balance and creates loops. Let the machine feed the fabric at its own pace; just guide it gently.
Ignoring the needle
Many sewers use the same needle for multiple projects without checking its condition. A dull or bent needle causes problems gradually, your first project might be fine, but by the third or fourth, you’re getting bunching. Replace needles regularly, not just when they break.
Skipping bobbin area cleaning
Lint accumulates in the bobbin case, under the throat plate, and around the feed dogs. This buildup creates friction and catches thread. Clean this area after every 4-6 hours of sewing, or after working with lint-producing fabrics like fleece or flannel.
Adjusting bobbin tension first
When thread bunches underneath, the instinct is to adjust the bobbin because that’s where the problem appears. But bobbin tension is rarely the cause. Always exhaust upper thread solutions (rethreading, needle replacement, cleaning) before touching the bobbin tension screw.
Using old or cheap thread
Thread degrades over time and cheap thread has quality inconsistencies. Both cause tension problems that lead to bunching. Invest in quality thread and replace spools that are more than 3-5 years old or have been stored in poor conditions.
Not testing on scrap fabric
Starting a project without testing your settings on scrap fabric means you’ll discover problems after you’ve sewn into your good material. Always test with the same fabric type, thread, and needle you’ll use for the project. Sew a few inches, check both sides, and adjust if needed.
FAQ
What is the fastest way to fix thread bunching under fabric?
The fastest fix is to raise the presser foot, completely rethread the upper thread path, then lower the presser foot and test on scrap fabric. This takes 2-3 minutes and solves 60-70% of birdnesting cases immediately because most bunching stems from incorrect threading.
Can I prevent birdnesting by adjusting the tension dial?
Adjusting the upper tension dial can help if your threading is correct but tension is too loose. Increase the tension number by one increment and test. However, if the thread isn’t properly seated in the tension discs (because you threaded with the presser foot down), adjusting the dial won’t help, you must rethread correctly first.
Why does birdnesting happen only on certain fabrics?
Different fabrics require different needle sizes and sometimes tension adjustments. Slippery fabrics like satin don’t grip thread well, stretchy knits need ballpoint needles, and thick fabrics need larger needles. If birdnesting occurs only with specific fabrics, switch to the appropriate needle type and size for that material.
How often should I change my sewing machine needle to prevent bunching?
Change your needle every 8-10 hours of sewing time, after hitting a pin, or when switching between fabric types (woven to knit, lightweight to heavy). Dull or bent needles cause 25-30% of thread bunching cases, and needles are inexpensive insurance against problems.
Does bobbin thread direction matter for preventing birdnesting?
Yes, bobbin thread must unwind in the correct direction for your machine (usually counterclockwise for drop-in bobbins). If inserted backward, the thread doesn’t engage the tension spring properly and can cause bunching. Check your manual for the correct orientation and look for directional arrows in the bobbin area.
Can a dirty sewing machine cause thread to bunch underneath?
Absolutely. Lint buildup in the bobbin case, tension discs, and around the hook creates friction that disrupts smooth thread flow. Clean the bobbin area with a small brush after every 4-6 hours of sewing, and have your machine professionally serviced every 1-2 years for internal cleaning.
Is it normal for thread to bunch when I first start sewing?
Thread bunching at the very start of a seam happens when you don’t hold the thread tails to the back for the first 2-3 stitches. This isn’t a machine problem, it’s a technique issue. Always hold both thread tails behind the presser foot when you begin sewing, then release them after a few stitches.
Will using the same thread brand in the bobbin and top prevent birdnesting?
Using matched thread (same brand, weight, and fiber content) in both the bobbin and top eliminates tension mismatches between different thread characteristics. While not always necessary, it removes one variable and is especially helpful when troubleshooting persistent bunching problems.
Can I fix birdnesting without taking my machine apart?
Most birdnesting fixes don’t require disassembly beyond removing the bobbin and throat plate for cleaning. Rethreading, needle replacement, and basic cleaning solve 90% of cases. Only timing issues, internal damage, or worn parts require professional disassembly and repair.
Why does my machine bird nest with polyester thread but not cotton?
Polyester and cotton threads have different stretch, weight, and friction characteristics. Your tension settings may be calibrated for one type but not the other. When switching thread types, test on scrap fabric and adjust upper tension if needed. Also ensure you’re using the same thread type in both bobbin and top.
How do I know if my bobbin tension needs adjustment or if it’s an upper thread problem?
Test your bobbin tension by holding the bobbin case by the thread, it should drop 2-3 inches and hang suspended. If this test is normal and you’ve rethreaded correctly with a new needle, then bobbin tension might need adjustment. But always exhaust upper thread solutions first because they’re easier to fix and more commonly the cause.
Can sewing too fast cause thread bunching under fabric?
Yes, especially on difficult fabrics. Sewing too fast on slippery, stretchy, or thick materials doesn’t give the feed dogs time to move fabric evenly, creating irregular stitch formation. Slow down your sewing speed when working with challenging fabrics to prevent bunching and improve stitch quality.
Conclusion
Thread bunching under fabric, or birdnesting, is one of the most common and frustrating sewing problems, but it’s also one of the most fixable. The key insight is that despite appearing on the bottom of your fabric, birdnesting is almost always an upper thread issue caused by incorrect threading, a damaged needle, or poor thread quality rather than a bobbin problem.
Your action plan when birdnesting occurs:
- Raise the presser foot and completely rethread the upper thread path, ensuring thread passes through every guide and the take-up lever
- Replace your needle with the correct size and type for your fabric
- Clean the bobbin area and reinsert the bobbin in the correct direction
- Test on scrap fabric before returning to your project
- Only adjust bobbin tension as a last resort after exhausting all other solutions
Prevention is simpler than troubleshooting. Build good habits: always thread with the presser foot up, hold thread tails back when starting seams, change needles regularly, use quality thread, and clean your machine after every few hours of sewing. These practices eliminate most birdnesting before it starts.
For beginners experiencing frequent thread bunching, remember that this problem decreases dramatically with practice as threading becomes automatic and fabric handling improves. Don’t get discouraged, every experienced sewer has dealt with bird’s nests, and the solutions become second nature over time.
If you’ve systematically tried every fix and birdnesting persists, or if your machine makes unusual sounds or shows visible damage, professional service is worth the $75-150 investment to restore proper function and prevent further damage.
The good news? Most thread bunching fixes cost nothing, take under five minutes, and get you back to sewing quickly. Master the rethreading process, keep fresh needles on hand, and you’ll spend more time creating and less time troubleshooting.


