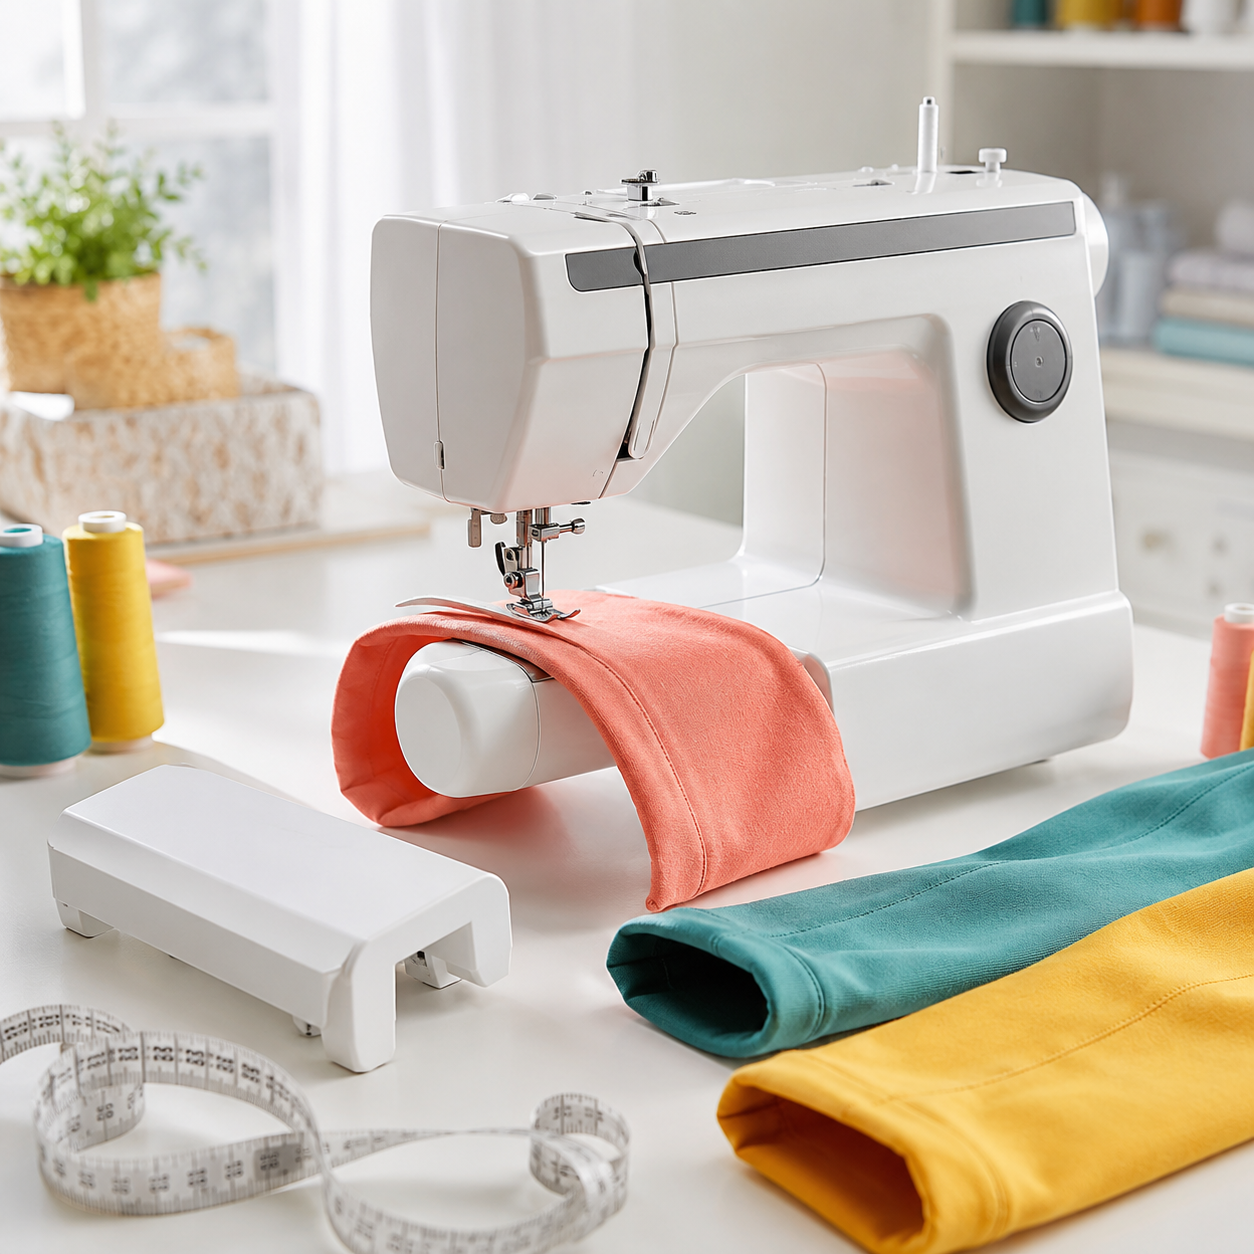
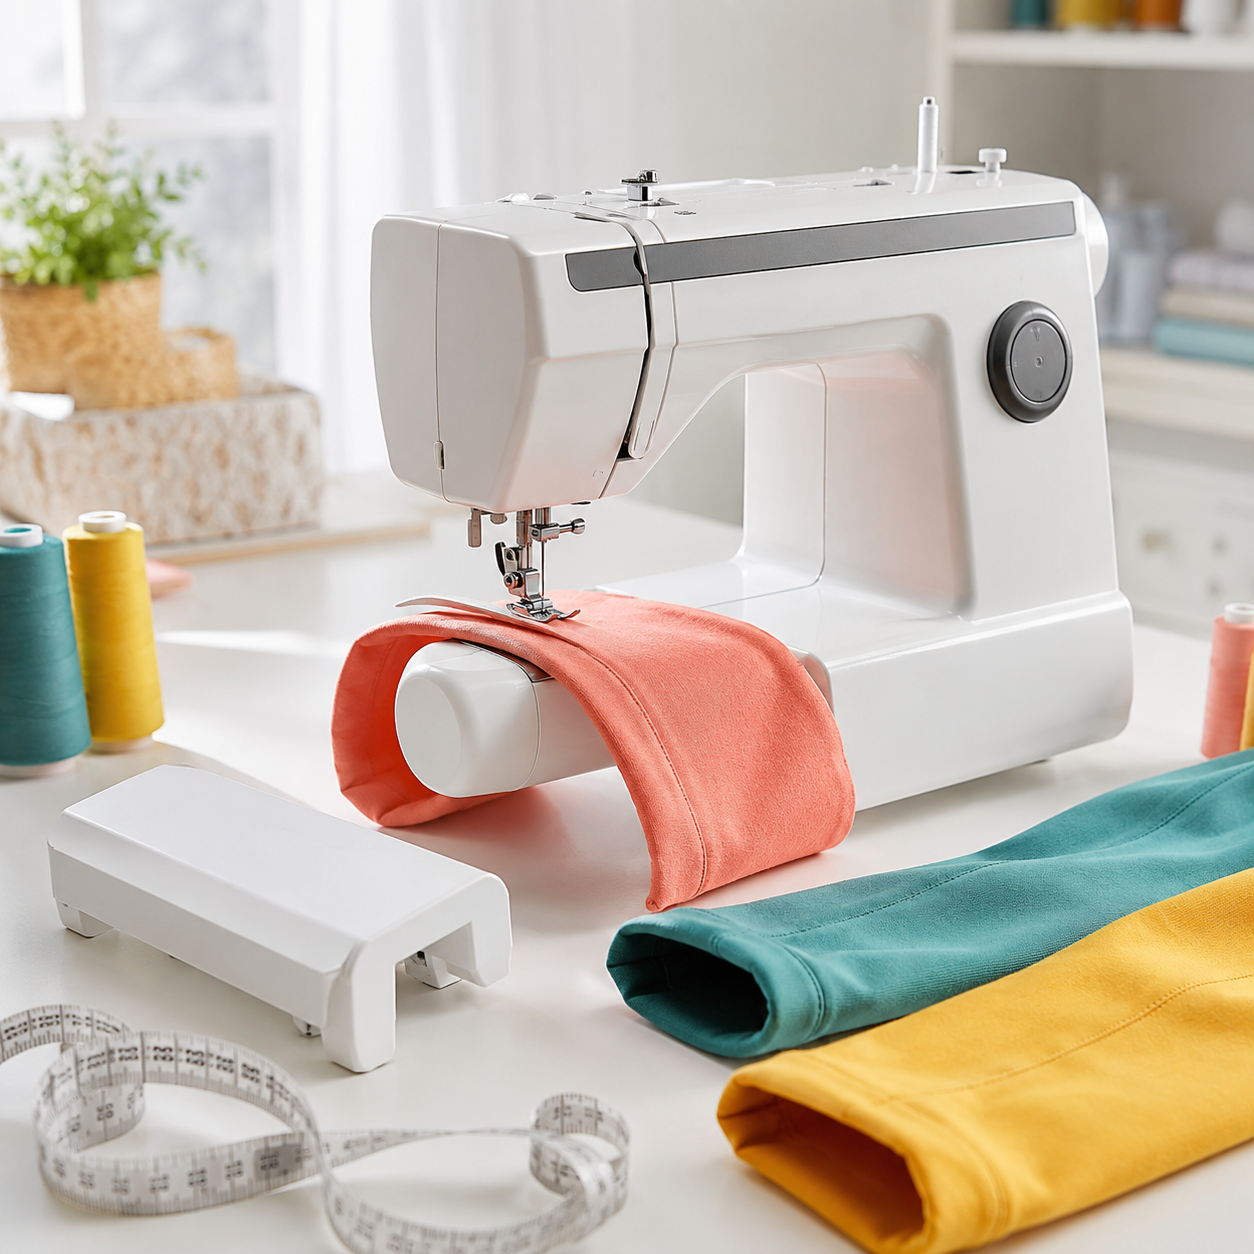
Quick Answer: A free arm on a sewing machine is a narrow, elevated cylindrical platform that becomes accessible when you remove the extension table or flatbed attachment. This design allows you to slide tubular fabric pieces like sleeves, pant legs, cuffs, and collars over the arm for easier circular stitching without having to sew flat seams and then close them.
Key Takeaways
- A free arm is the narrow, raised portion of your sewing machine that’s revealed when you remove the extension table or storage compartment
- It’s specifically designed for sewing cylindrical or tubular items like sleeves, cuffs, pant hems, and children’s clothing
- Most modern sewing machines include a removable free arm feature, though the attachment mechanism varies by brand and model
- Using a free arm eliminates the need to sew flat seams and then close them, saving time and creating cleaner finishes
- The free arm works best for smaller circumference items; large pieces like wide skirts may not fit comfortably
- Beginners can absolutely sew without a free arm, but it becomes increasingly valuable as you tackle more complex garment construction
- Common mistakes include forcing fabric that’s too large over the arm and forgetting to reattach the extension table for regular sewing
- The extension table and free arm serve opposite purposes: one creates a larger flat surface, the other provides access to a narrow cylindrical platform
What Is a Free Arm on a Sewing Machine Used For?
A free arm on a sewing machine is used primarily for sewing tubular or circular fabric pieces that would be difficult or impossible to maneuver on a flat sewing surface. The narrow cylindrical shape allows you to slide fabric tubes over the arm and rotate them smoothly as you stitch, keeping the seam allowance consistent and the fabric properly aligned.
Common projects that benefit from a free arm include:
- Sleeve hems and cuffs, Slide the sleeve over the arm to hem without flattening or distorting the shape
- Pant legs and shorts, Hem jeans, trousers, or children’s pants with professional results
- Shirt cuffs and collars, Attach cuffs to sleeves or finish collar edges with precision
- Children’s clothing, Smaller garments fit perfectly over the narrow arm
- Bag straps and handles, Topstitch tubular straps evenly on all sides
- Armholes, Finish armhole seams or attach sleeves to bodices
- Necklines, Apply binding or finish curved neckline edges
The free arm shines when you’re working with items that have a circumference smaller than about 20 inches. Anything larger becomes awkward to manipulate, and you’re better off using the flatbed surface. Many sewers find the free arm indispensable for alterations work, particularly hemming pants, which is one of the most common tailoring tasks.
Choose a free arm when:
- Your fabric piece is tubular and has a circumference under 20 inches
- You need to maintain the three-dimensional shape of the garment while sewing
- You’re hemming, topstitching, or applying trim to cylindrical items
- You want to avoid the bulk of sewing flat and then closing a seam
Free Arm vs Flatbed Sewing Machine: What’s the Difference?
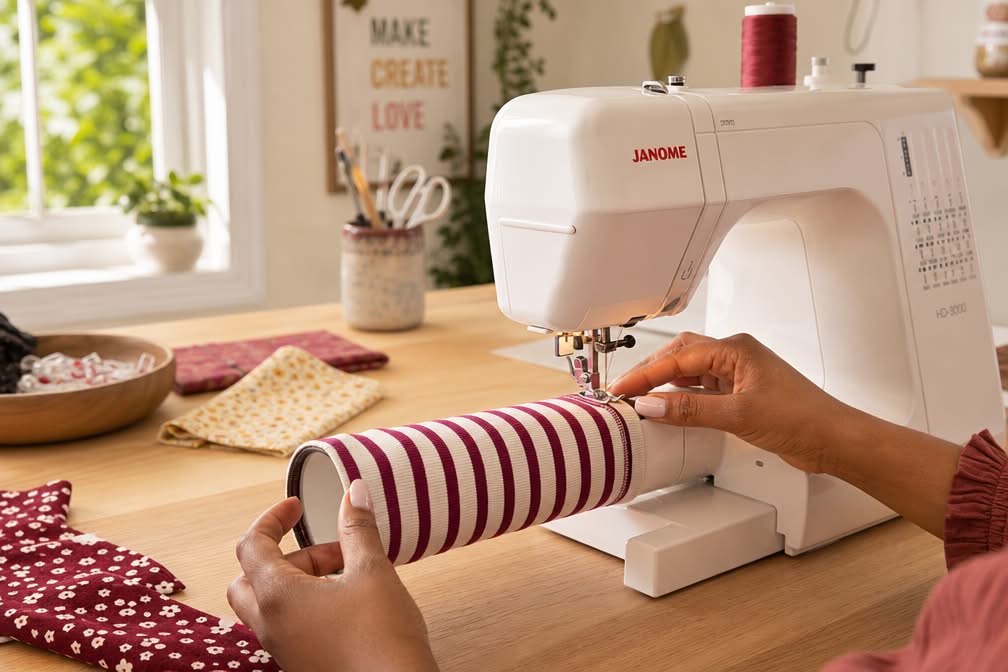
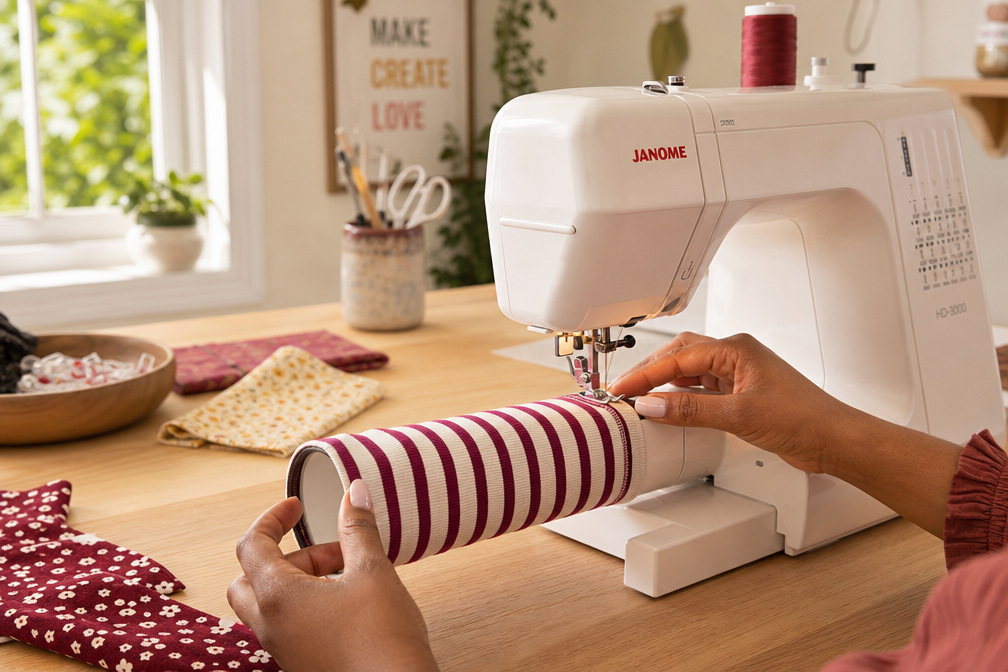
A free arm sewing machine has a removable extension that reveals a narrow cylindrical arm, while a flatbed machine provides only a wide, flat sewing surface without this feature. Most modern home sewing machines are actually convertible free arm machines that function as flatbeds when the extension table is attached and switch to free arm mode when you remove it.
Key differences:
| Feature | Free Arm (Extension Removed) | Flatbed (Extension Attached) |
|---|---|---|
| Surface shape | Narrow cylinder (typically 3-5 inches wide) | Wide flat platform (10-15+ inches) |
| Best for | Tubular items, sleeves, cuffs, small circumferences | Quilts, large fabric pieces, general sewing |
| Fabric support | Minimal, only what’s on the arm | Maximum, entire work surface supports fabric |
| Maneuverability | Excellent for rotating tubes | Excellent for sliding large flat pieces |
| Storage access | Often reveals bobbin/accessory storage | Covers storage compartment |
True flatbed-only machines (without a removable extension) are now relatively rare in the home sewing market. You’ll find them mainly in industrial settings or vintage models from before the 1950s when free arm technology became standard. If you’re shopping for a machine in 2026, assume it has a convertible free arm unless the specifications explicitly state otherwise.
Choose a flatbed setup when:
- You’re piecing a quilt or working with large fabric panels
- You need maximum fabric support to prevent drag or distortion
- You’re doing general construction sewing on flat pattern pieces
- You want the stability of a wider work surface
Switch to free arm mode when:
- The project involves tubular construction
- You need to access hard-to-reach seams inside a garment
- You’re doing alterations or repairs on finished clothing

Effortless Beginner-Friendly Sewing – Jumpstart your creative journey with a tailoring machine designed for first timers. The Arctic Crystal simplifies every step from threading to stitch selection, letting you focus on bringing your projects to life.
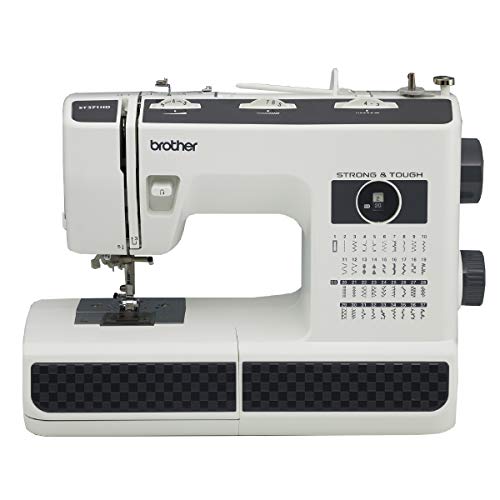
37 Unique Built-in Stitches: This advanced & beginner sewing machine features 37 built-in stitches including an auto-size buttonhole

Mechanical Sewing at its finest! The Elnita EM16 is easy to use and includes every feature you would need for basic or beginner sewing.
How Do You Use the Free Arm on a Sewing Machine?
Using the free arm on a sewing machine requires removing the extension table to expose the narrow arm, then sliding your tubular fabric piece over the arm and positioning the seam allowance under the presser foot. The process is straightforward once you understand the basic steps.
Step-by-step guide:
Remove the extension table, Locate the release button, latch, or slide mechanism (usually on the left side of the machine). Gently pull or slide the table away from the machine body. Some models require you to press a button while pulling; others simply slide off.
Prepare your fabric, Turn your tubular item inside out if you’re sewing an interior seam, or keep it right-side out for hems and topstitching. Make sure the seam you want to sew is accessible and not twisted inside the tube.
Slide the fabric over the arm, Open the tube and slip it over the free arm from the front of the machine, positioning the area you want to sew directly under the presser foot. The bulk of the fabric will hang off the back and sides of the arm.
Position the seam, Align your seam allowance or hem fold under the needle and presser foot, just as you would for flat sewing. Use the seam guide markings on the throat plate if your machine has them.
Sew while rotating, Begin stitching and gently rotate the fabric tube around the arm as you sew, keeping the seam allowance consistent. Let the machine feed the fabric naturally; don’t pull or push too hard.
Complete the circle, When you reach your starting point, backstitch or lock your stitches according to your pattern instructions. Remove the fabric by sliding it off the front of the arm.
Reattach the extension table, Once you’re finished with free arm sewing, slide the extension table back into place until it clicks or locks securely.
Common mistakes to avoid:
- Forcing oversized items, If the fabric tube is too large or bulky, it won’t rotate smoothly and you’ll create uneven stitches. Consider sewing flat instead.
- Forgetting to reposition the bulk, The weight of the fabric hanging off the arm can pull your seam out of alignment. Support heavy items with your free hand or a nearby surface.
- Sewing too fast, Free arm sewing requires more control than flatbed work. Slow down to maintain even seam allowances.
- Neglecting to check the underside, Because you’re sewing in a circle, it’s easy to accidentally catch extra layers. Stop periodically to check that only the intended layers are under the needle.

27 Unique Built-in Stitches: The Brother XM2701 sewing machine includes 27 built-in stitches including decorative, blind hem, zigzag, and stretch stitches and an auto-size buttonhole

Longarm Machine Compatibility: long arm quilting machine use matches this 0.25 inch clear acrylic guide for hopping foot safe clearance that helps prevent foot contact under the edge; Check that your setup is a longarm system, not a low shank home model

✅ EXTENSION TABLE FOR LARGE PROJECTS: Create professional sewing results with added workspace designed for quilting, home décor, and garment sewing. This sewing machine extension table expands your work area for better fabric control and smoother stitching on large projects.
Do All Sewing Machines Have a Free Arm?
Most modern home sewing machines manufactured after the 1960s include a free arm feature with a removable extension table, but not every machine has one. Industrial machines, some vintage models, and a few budget or specialty machines are built as flatbed-only units without the convertible free arm option.
Machines that typically have a free arm:
- Home sewing machines from major brands (Singer, Brother, Janome, Bernina, etc.)
- Computerized and mechanical domestic models
- Portable and lightweight machines designed for home use
- Most machines manufactured after 1960
Machines that may NOT have a free arm:
- Industrial straight-stitch or specialized machines designed for factory use
- Vintage treadle or hand-crank machines made before the 1950s
- Some ultra-budget models under $100 that sacrifice features for cost
- Specialty machines like walking-foot quilting machines with extra-large flatbed surfaces
- Certain heavy-duty machines designed exclusively for upholstery or leather work
If you’re shopping for a sewing machine in 2026 and want a free arm feature, check the product specifications or ask the retailer directly. The feature is so common that manufacturers usually highlight it in the description. Look for phrases like “convertible free arm,” “removable extension table,” or “free arm for circular sewing.”
For beginners: A free arm is helpful but not essential when you’re just learning. You can sew sleeves and hems using flat construction methods (sewing the seam flat, then closing it) until you’re ready to invest in a machine with more features. However, if you plan to sew clothing regularly, a free arm will save you time and frustration.
What Can You Sew with a Free Arm?
You can sew any tubular or cylindrical fabric item with a free arm, including sleeves, pant legs, cuffs, collars, necklines, armholes, bag straps, and children’s garments. The free arm excels at projects where maintaining the three-dimensional shape of the fabric is important and where the circumference is small enough to fit comfortably over the arm.
Detailed project list:
Clothing construction:
- Sleeve hems and cuffs on shirts, blouses, and jackets
- Pant and shorts hems (jeans, dress pants, children’s bottoms)
- Attaching cuffs to sleeve openings
- Finishing armhole seams after setting sleeves
- Applying binding or trim to curved necklines
- Topstitching collar edges and points
- Hemming and finishing children’s clothing (smaller circumferences fit perfectly)
Alterations and repairs:
- Hemming jeans and trousers to the correct length
- Replacing elastic in waistbands or cuffs
- Repairing split seams in sleeves or pant legs
- Shortening or lengthening sleeves
- Taking in or letting out side seams on tubular garments
Accessories and home décor:
- Topstitching tubular bag straps and handles
- Creating fabric tubes for drawstrings or ties
- Sewing napkin rings or fabric bangles
- Hemming cylindrical pillow covers or bolster ends
- Finishing the edges of fabric baskets or bins
Quilting and crafts:
- Binding the edges of small quilted items like placemats (if you can manipulate them into a tube shape)
- Creating fabric cuffs for stuffed animals or dolls
- Sewing small fabric pouches or gift bags
Size limitations: The free arm works best when the fabric tube has a circumference between about 6 and 20 inches. Smaller items (like doll clothes or narrow cuffs) may slip around too much, while larger items (like wide skirt hems or large tote bags) become awkward to rotate and are better sewn flat.
How to Attach the Free Arm on a Sewing Machine
Attaching the free arm on a sewing machine is actually a matter of removing the extension table or flatbed attachment to reveal the free arm underneath. The free arm itself is a permanent part of the machine body; what you’re attaching or detaching is the removable table that converts the machine between flatbed and free arm modes.
Removal methods by machine type:
Slide-off extension tables (most common):
- Locate the extension table on the left side of your machine, surrounding the free arm
- Look for a small button, latch, or release mechanism (usually on the left edge or underneath)
- Press the release button while gently pulling the table to the left
- The table should slide smoothly away from the machine body
- Store the table nearby so you can reattach it when needed
Snap-on extension tables:
- Grip the extension table firmly on both sides
- Pull straight out or slightly downward (depending on your model) with steady pressure
- The table will pop off when the snap connectors release
- To reattach, align the connectors and press firmly until you hear or feel a click
Hinged or flip-down tables:
- Some machines have a hinged section that flips down rather than removing completely
- Locate the hinge mechanism (usually at the back of the extension)
- Release any latch or lock, then fold the extension down or to the side
- This style is less common but appears on some vintage and specialty machines
To reattach the extension table:
- Align the table with the machine body, matching any guide rails or connector pins
- Slide or press the table back into place until it clicks or locks securely
- Test that it’s firmly attached by gently trying to pull it away
- The table should sit flush with the machine bed, creating a smooth, continuous surface
Troubleshooting attachment issues:
- Table won’t slide off, Make sure you’re pressing the release button fully. Some machines require you to hold the button while pulling. Check your manual for the specific release mechanism.
- Table feels loose after reattaching, The connectors may not be fully engaged. Remove and reattach, making sure you hear or feel a definite click.
- Can’t find the release button, It’s usually on the left side or underneath the table. Look for a small button, lever, or sliding latch. Consult your machine’s manual if you’re stuck.
- Table is stuck or jammed, Don’t force it. Check for thread, lint, or fabric scraps caught in the connection mechanism. Clean the area and try again.
Best Sewing Machines with Removable Free Arm
The best sewing machines with removable free arms in 2026 include models from Brother, Janome, Singer, and Bernina that offer smooth extension table removal, adequate free arm length (at least 4 inches), and stable construction. Nearly all modern home machines include this feature, so focus on overall machine quality rather than the free arm alone.
What makes a good free arm:
- Length and diameter, A free arm that’s at least 4-5 inches long and 3-4 inches in diameter provides enough space for most projects without being too bulky
- Smooth surface, The arm should be free of rough edges, screws, or protrusions that could snag fabric
- Easy table removal, The extension table should slide or snap off smoothly with one hand and reattach securely
- Stable construction, The arm shouldn’t flex or wobble when you’re rotating fabric around it
- Accessible storage, Many free arms double as storage compartments for bobbins and accessories, which is a nice bonus
Popular models known for good free arm design:
- Brother CS7000i, Computerized machine with smooth slide-off table, 4.5-inch free arm, excellent for beginners and intermediates
- Janome HD3000, Heavy-duty mechanical machine with sturdy free arm, great for denim and thick fabrics
- Singer Quantum Stylist 9985, Computerized model with easy-release extension table and spacious free arm
- Bernina 475 QE, High-end machine with precision-engineered free arm and professional-grade construction
- Janome Magnolia 7330, Mechanical machine with reliable free arm, popular for garment sewing
For beginners: Any machine in the $150-$400 range from Brother, Singer, or Janome will have a perfectly functional free arm. Don’t overthink this feature when you’re starting out; focus instead on stitch quality, ease of use, and overall reliability.
For advanced sewers: If you sew clothing regularly, look for machines with a longer free arm (5+ inches) and a very smooth surface finish. High-end brands like Bernina and Pfaff engineer their free arms with tighter tolerances, which can make a difference when you’re working with delicate or slippery fabrics.

165 unique built-in stitches: The Brother XR9550 computerized machine includes 110 built-in utility, decorative and heirloom stitches including 8 styles of auto-size buttonholes, plus 55 alphanumeric sewing stitches

Soft, flexible fingertip grips for full control when sewing free-motion
Can You Sew Sleeves Without a Free Arm?
Yes, you can sew sleeves without a free arm by using flat construction methods where you sew the sleeve seam and the armhole seam while the fabric is still flat, then close the side seam of the garment in one continuous line. This traditional technique was standard before free arm machines became common and still works perfectly well for many projects.
Flat sleeve construction method:
Sew the sleeve to the armhole first, With the bodice and sleeve both flat (side seams not yet sewn), pin the sleeve cap to the armhole opening, matching notches and easing as needed. Sew this seam while both pieces are flat.
Close the side seam and sleeve seam in one pass, Align the bodice side seam and sleeve underarm seam, pinning from the bottom hem of the bodice all the way to the cuff edge of the sleeve. Sew this entire seam in one continuous line, creating both the side seam and the sleeve seam simultaneously.
Finish the seam allowances, Press the seam and finish the raw edges with a serger, zigzag stitch, or French seam technique.
When flat construction works better than free arm:
- Very full or gathered sleeves, The bulk of gathered fabric can be difficult to manipulate on a free arm
- Sleeves with complex details, If your sleeve has pockets, pleats, or other features, it may be easier to work flat
- Matching plaids or stripes, Flat construction gives you better visibility for matching patterns across seams
- Beginner projects, Flat methods are often easier to visualize and execute when you’re learning
When a free arm is genuinely helpful:
- Hemming finished sleeves, If the sleeve is already attached and you need to adjust the length, a free arm is much easier than unpicking seams
- Topstitching cuffs, Adding decorative topstitching or attaching cuffs to finished sleeves is cleaner on a free arm
- Alterations, When you’re working on a completed garment, the free arm is often your only practical option
The free arm is a convenience feature, not a necessity. Many professional sewers still prefer flat construction for certain projects because it offers better control and visibility. Use whichever method makes sense for your specific project and skill level.
Free Arm Not Staying on Sewing Machine: Troubleshooting Tips
If your free arm extension table won’t stay attached to your sewing machine, the problem is usually caused by worn connector clips, accumulated lint in the attachment mechanism, misalignment of the guide rails, or damage to the locking mechanism. Most issues can be fixed with cleaning, adjustment, or replacement parts.
Common causes and solutions:
Lint and thread buildup:
- Remove the extension table and inspect the connection points on both the table and the machine body
- Use a small brush, compressed air, or a vacuum attachment to remove lint, thread fragments, and dust
- Wipe the connector surfaces with a slightly damp cloth and let them dry completely
- Reattach the table and test for a secure fit
Worn or damaged connector clips:
- Examine the plastic or metal clips that hold the table in place (usually on the underside of the table or on the machine body)
- If clips are cracked, bent, or broken, they’ll need to be replaced
- Contact your machine manufacturer or a local sewing machine repair shop for replacement parts
- Many brands sell replacement extension tables as separate accessories
Misaligned guide rails:
- The extension table typically slides onto guide rails or pins on the machine body
- If these are bent or misaligned, the table won’t seat properly
- Gently straighten any bent guides with pliers (be careful not to break plastic components)
- Make sure you’re inserting the table at the correct angle and fully pushing it into place
Broken locking mechanism:
- Some machines have a spring-loaded latch or button that locks the table in place
- If this mechanism is broken, the table will slide off easily
- This usually requires professional repair or replacement of the locking assembly
- Check if your machine is still under warranty before paying for repairs
Temporary workarounds:
- Quilter’s tape, Place a small piece of double-sided quilter’s tape on the connection points to add friction (not a permanent solution, but works in a pinch)
- Weight or clamp, If the table stays in place but shifts during sewing, place a small weight on the far edge or use a small clamp to secure it to your sewing table
- Replace the extension table, If the table itself is damaged, buying a replacement is often cheaper than repairing the original
Prevention tips:
- Always remove and reattach the extension table gently; forcing it can damage the connectors
- Clean the connection area regularly as part of your machine maintenance routine
- Store the extension table in a safe place when not in use to prevent warping or damage
- Avoid placing heavy objects on the extension table, which can stress the connection points
Is a Free Arm Necessary for Beginners?
A free arm is not strictly necessary for beginners, but it’s a valuable feature that makes certain projects significantly easier and is included on most modern machines anyway. Beginners can learn all the fundamental sewing skills using flat construction methods, then incorporate free arm techniques as they gain confidence and tackle more complex projects.
Why beginners can start without worrying about the free arm:
- Flat construction works for most beginner projects, Simple skirts, tote bags, pillowcases, and aprons don’t require a free arm
- Fewer techniques to learn at once, Focusing on straight seams, seam finishing, and basic construction is enough when you’re starting out
- Flat sewing is more intuitive, Seeing the entire seam laid out flat is easier to understand than manipulating fabric in three dimensions
Why beginners benefit from having a free arm available:
- Hemming pants is a common early alteration, Even beginners often need to hem jeans or trousers, and a free arm makes this much easier
- Children’s clothing projects, If you’re sewing for kids, the free arm is invaluable for small sleeves and pant legs
- Room to grow, As you advance to garment sewing, you’ll want the free arm for sleeves, cuffs, and other details
- It’s standard equipment, Since most machines include a free arm, you might as well learn to use it
Learning progression for beginners:
- Start with flat projects, Master straight seams, corners, and basic construction on pillows, bags, and simple home décor items
- Try basic hemming, Use the free arm to hem a pair of pants or finish a sleeve on a simple shirt
- Progress to simple garments, Make pajama pants or an elastic-waist skirt, using the free arm for hems
- Tackle set-in sleeves, Once you’re comfortable with garment construction, practice both flat and free arm methods for attaching sleeves
- Experiment with both techniques, As you gain experience, you’ll develop preferences for when to use the free arm versus flat construction
Bottom line for beginners: Don’t let the free arm intimidate you or influence your machine purchase decision too heavily. It’s a nice-to-have feature that you’ll appreciate as you grow, but it’s not a make-or-break consideration for your first machine. Focus instead on stitch quality, ease of threading, and overall reliability.
What Is the Difference Between Free Arm and Extension Table?
The free arm and extension table are opposite configurations of the same sewing machine feature: the free arm is the narrow cylindrical part of the machine body used for sewing tubular items, while the extension table is the removable flat platform that attaches around the free arm to create a larger work surface for general sewing and quilting.
Key distinctions:
Free Arm (extension table removed):
- Purpose, Sewing cylindrical or tubular items
- Shape, Narrow cylinder, typically 3-5 inches wide and 4-6 inches long
- Best for, Sleeves, cuffs, pant legs, small circumference items
- Work surface, Minimal; only the narrow arm supports the fabric
- When to use, When you need to slide fabric over the arm and sew in a circle
Extension Table (attached to machine):
- Purpose, Creating a larger flat sewing surface
- Shape, Flat platform that extends the machine bed, typically adding 6-12 inches of width
- Best for, Quilts, large fabric pieces, general construction sewing
- Work surface, Maximum; provides support for heavy or large projects
- When to use, For most regular sewing tasks, especially when fabric support is important
How they work together:
The extension table doesn’t replace the free arm; it covers it. When you attach the extension table, it surrounds the free arm and creates a flush, continuous surface with the main machine bed. When you remove the extension table, you reveal the free arm that was always there underneath.
Think of it like this: the free arm is the machine’s permanent structure, and the extension table is an optional add-on that changes how you can use that structure. You’re not choosing between two different machines; you’re choosing which configuration works best for your current project.
Additional functions:
Many extension tables also serve as storage compartments. When you remove the table, you’ll often find space inside for bobbins, extra needles, seam rippers, and other small accessories. This dual purpose makes the extension table a practical feature even when you’re not actively using it for sewing.
Common Mistakes When Using Free Arm Sewing
Common mistakes when using a free arm include forcing fabric that’s too large over the arm, failing to support the weight of heavy fabric, sewing too fast and losing control, accidentally catching extra layers in the seam, and forgetting to reattach the extension table for regular sewing. These errors can lead to uneven stitches, puckered seams, and damaged fabric.
Detailed mistake breakdown and fixes:
1. Forcing oversized items onto the free arm
- The mistake: Trying to hem a wide skirt, large tote bag, or other item with a circumference over 20 inches on the free arm
- Why it’s a problem: The fabric bunches up, pulls unevenly, and creates puckered or wavy seams
- The fix: If the item doesn’t fit comfortably over the arm with room to rotate, sew it flat instead or use the extension table
2. Not supporting heavy fabric
- The mistake: Letting the weight of jeans, thick curtains, or other heavy items drag on the free arm without support
- Why it’s a problem: The weight pulls the fabric out of alignment, creating uneven seam allowances and stressing the machine
- The fix: Support the bulk of the fabric with your free hand, rest it on a nearby chair or table, or use a fabric support stand
3. Sewing too fast
- The mistake: Running the machine at full speed while trying to rotate fabric around the free arm
- Why it’s a problem: You lose control of the seam allowance and can easily veer off course or create uneven stitches
- The fix: Slow down to about half your normal speed, especially when you’re learning. Use the hand wheel for extra control on tight curves.
4. Catching extra layers
- The mistake: Accidentally sewing through multiple layers of the tube because you didn’t check what was under the needle
- Why it’s a problem: You create unwanted seams inside the garment that have to be unpicked
- The fix: Stop every few inches and reach inside the tube to make sure only the intended layers are under the presser foot
5. Twisting the fabric tube
- The mistake: Not checking that the tube is properly aligned before you start sewing, resulting in a twisted seam
- Why it’s a problem: The seam spirals around the tube instead of running straight, distorting the garment
- The fix: Before you start, slide the tube onto the arm and visually trace the seam line all the way around to confirm it’s straight
6. Forgetting to reattach the extension table
- The mistake: Starting a new project without putting the extension table back on after free arm sewing
- Why it’s a problem: You lose fabric support and work surface, making regular sewing awkward and difficult
- The fix: Make it a habit to reattach the table as soon as you finish free arm work
7. Using the wrong presser foot
- The mistake: Leaving a specialty foot (like a zipper foot or buttonhole foot) on the machine when you switch to free arm sewing
- Why it’s a problem: The wrong foot can catch on the fabric tube or not provide adequate pressure for even stitching
- The fix: Switch to a standard presser foot for most free arm work, or use a narrow hemming foot for pant hems
8. Not adjusting stitch length
- The mistake: Using the same stitch length for free arm sewing as for flat sewing, even when the fabric thickness or type is different
- Why it’s a problem: Stitches may be too long for delicate hems or too short for thick denim, causing puckering or thread breakage
- The fix: Test your stitch length on a scrap of the same fabric before starting the actual project
Free Arm Sewing Machine for Hemming Pants
A free arm sewing machine is ideal for hemming pants because it allows you to slide the pant leg over the narrow arm and rotate it smoothly while stitching, creating an even hem without having to sew the leg flat and then close the inseam. This method is faster, cleaner, and produces more professional results than flat hemming techniques.
Step-by-step guide to hemming pants on a free arm:
Measure and mark the hem, Try on the pants and mark the desired length with pins or tailor’s chalk. Measure from the floor to the mark to ensure both legs are even.
Cut and press, Cut the excess fabric, leaving a hem allowance (typically 1-1.5 inches for jeans, 1-2 inches for dress pants). Press the hem up to the marked line, creating a crisp fold.
Remove the extension table, Take off the extension table to expose the free arm.
Slide the pant leg over the arm, Turn the pants right-side out and slide one leg over the free arm, positioning the folded hem under the presser foot.
Choose your stitch, For most pants, a straight stitch works well. For stretch fabrics, use a narrow zigzag or stretch stitch. For a professional blind hem, use a blind hem stitch and blind hem foot.
Sew the hem, Begin stitching, rotating the pant leg around the free arm as you go. Keep the hem fold aligned with your seam guide. Sew slowly for better control.
Overlap and secure, When you complete the circle and reach your starting point, overlap the stitches by about half an inch and backstitch to secure.
Repeat for the second leg, Remove the first leg and repeat the process for the second pant leg.
Press the finished hems, Give the hems a final press to set the stitches and create a crisp finish.
Tips for professional results:
- Use a hem guide, Many machines have seam guides on the throat plate. Use these to keep your stitching line consistent.
- Match the thread, Choose thread that matches the pants color for invisible stitching, or use contrasting thread for decorative topstitching.
- Double-needle for jeans, For an authentic jeans hem, use a double needle (also called a twin needle) to create two parallel rows of stitching.
- Blind hem for dress pants, Use a blind hem stitch and fold the fabric so only a tiny bit catches in the stitches, making the hem nearly invisible from the outside.
- Support heavy denim, Jeans can be heavy; support the bulk of the fabric with your hand or a nearby surface to prevent pulling.
Common hemming mistakes:
- Uneven hem height, Always measure both legs from the floor to ensure they’re the same length before cutting
- Puckered stitches, This usually means you’re pulling the fabric or your tension is too tight; let the machine feed naturally
- Visible stitches on blind hems, Make sure you’re catching only a tiny bit of the outer fabric in each stitch
- Hem twists or spirals, Check that the hem fold is straight all the way around before you start sewing
The free arm makes pant hemming so much easier that many sewers consider it the single most valuable use of the feature. Once you master this technique, you can hem jeans, dress pants, and children’s clothing quickly and professionally.
Frequently Asked Questions
Can you sew without a free arm on a sewing machine? Yes, you can sew without a free arm by using flat construction methods where you sew seams while fabric is flat, then close them. This technique works for sleeves, cuffs, and other tubular items, though it takes more time and planning than using a free arm.
How wide is a typical free arm on a sewing machine? A typical free arm is 3-5 inches wide and 4-6 inches long, though dimensions vary by machine model. Higher-end machines often have slightly longer free arms (5-6 inches) that accommodate a wider range of projects.
Can you quilt on a free arm sewing machine? You can quilt on a free arm machine, but you should keep the extension table attached to create a large flat surface that supports the quilt. The free arm itself is too narrow for quilting; you need the full flatbed configuration for adequate fabric support.
What’s the difference between a free arm and a flatbed attachment? The free arm is the narrow cylindrical part of the machine body, while the flatbed attachment (extension table) is the removable piece that covers the free arm to create a wider work surface. They’re two configurations of the same machine, not separate attachments.
Do industrial sewing machines have free arms? Most industrial sewing machines do not have free arms because they’re designed for high-speed production work on flat fabric pieces. Specialized industrial machines for sleeve hemming or tubular items may have a free arm or cylinder bed configuration.
How do you clean under the free arm extension table? Remove the extension table according to your machine’s instructions, then use a small brush, compressed air, or a vacuum attachment to remove lint and thread from the connection points and the area around the free arm. Wipe with a slightly damp cloth if needed.
Can you use a free arm for embroidery? You typically cannot use a free arm for machine embroidery because embroidery requires the fabric to be hooped flat and the hoop needs a wide surface to move freely. Keep the extension table attached for all embroidery work.
What size pant leg fits on a free arm? Most free arms accommodate pant legs with a circumference up to about 20 inches, which covers children’s pants, most adult pants, and slim-fit jeans. Very wide-leg pants or plus-size garments may be too large to rotate comfortably.
Is a longer free arm better? A longer free arm (5-6 inches versus 4 inches) provides more working space and accommodates slightly larger items, but the difference is modest. For most home sewing, a standard 4-5 inch free arm is perfectly adequate.
Can you add a free arm to a flatbed-only machine? No, you cannot add a free arm to a machine that was built as a flatbed-only model. The free arm is part of the machine’s structural design and cannot be retrofitted. If you need a free arm, you’ll need to purchase a different machine.
Why does my fabric bunch up on the free arm? Fabric bunching usually means the item is too large for the free arm, you’re pulling or pushing the fabric instead of letting the machine feed it, or your tension settings are incorrect. Try a smaller item, slow down, and check your tension.
What’s a cylinder bed sewing machine? A cylinder bed machine is similar to a free arm but typically has a longer, narrower cylinder (8-12 inches or more) and is used for industrial applications like sewing boot shafts, bag bodies, or other large tubular items. Home machines have shorter free arms.
Conclusion
A free arm on a sewing machine transforms how you approach tubular sewing projects, from hemming pants to finishing sleeves and cuffs. While it’s not essential for every project or every sewer, the free arm is one of those features that becomes indispensable once you understand how to use it effectively. The narrow cylindrical design allows you to maintain the three-dimensional shape of garments while sewing, producing cleaner, more professional results than flat construction methods in many situations.
Key points to remember:
- The free arm is revealed when you remove the extension table; it’s not a separate attachment
- Use it for tubular items with circumferences under 20 inches: sleeves, pant legs, cuffs, and children’s clothing
- Flat construction methods work perfectly well as an alternative, especially for beginners or complex projects
- Most modern home machines include a convertible free arm as standard equipment
- Common mistakes include forcing oversized items onto the arm, sewing too fast, and forgetting to support heavy fabric
Next steps:
Locate your free arm, If you haven’t already, remove your extension table and familiarize yourself with how the free arm looks and feels on your specific machine.
Practice on a simple project, Start with hemming a pair of pants or finishing a pillowcase opening. These low-stakes projects let you build confidence.
Experiment with both methods, Try sewing the same project using both free arm and flat construction techniques to see which you prefer for different situations.
Maintain the mechanism, Clean the connection points regularly and handle the extension table gently to keep the attachment mechanism working smoothly.
Expand your skills, As you grow more comfortable, tackle more complex projects like set-in sleeves, cuffed shirt sleeves, and children’s garments that really showcase the free arm’s advantages.
Whether you’re a beginner just learning the basics or an experienced sewer looking to refine your techniques, understanding what a free arm is and how to use it effectively will expand your sewing capabilities and help you achieve more professional results. The feature is there on your machine for a reason, take advantage of it.