


Quick Answer
Backstitching is the process of sewing in reverse for a few stitches at the beginning and end of a seam to lock the thread in place and prevent unraveling. Most modern sewing machines have a dedicated backstitch button or lever that temporarily reverses the feed dogs, while hand sewers create backstitches by overlapping previous stitches. This simple technique takes seconds but dramatically increases seam durability, making it essential for nearly all permanent seams in garment construction and home décor projects.
Key Takeaways
- Backstitching locks thread at seam ends by reversing 3-5 stitches, preventing unraveling during wear and washing
- Most sewing machines include a backstitch button (often marked with a reverse arrow or “REV”) that you hold while sewing
- Hand backstitching creates the strongest hand-sewn seam by overlapping each stitch with the previous one
- Skip backstitching only for basting, gathering, or seams that will be crossed by another permanent seam
- Common mistakes include backstitching too many stitches (creating bulk) or forgetting to backstitch at stress points like armholes
- Alternatives exist such as tying thread tails, using a locking stitch, or sewing over seam intersections
- Professional sewers backstitch selectively based on garment type, fabric, and construction method
- Stretch fabrics benefit from backstitching when using a stretch stitch or narrow zigzag, not just straight stitches
What Is Backstitching in Sewing
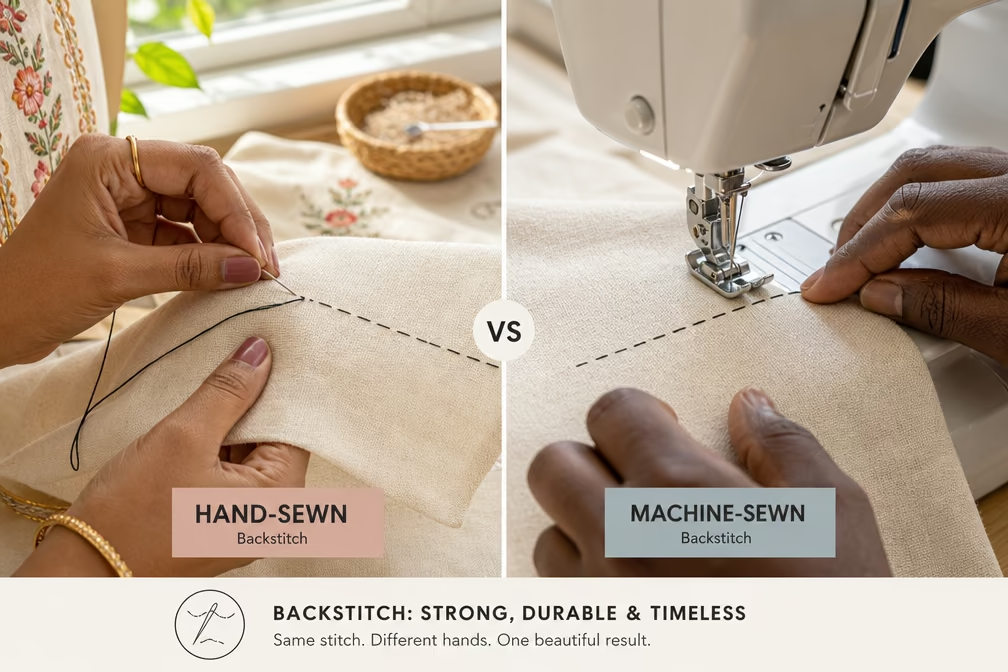
Backstitching is a securing technique where you sew backward over the first and last few stitches of a seam to lock the thread in place. On a sewing machine, this means pressing the reverse button and sewing 3-5 stitches back over your starting point, then releasing to continue forward. By hand, backstitching refers to a specific stitch where the needle enters behind the previous stitch and exits ahead, creating overlapping stitches that form a continuous, strong line.
The purpose is simple: thread naturally wants to pull out from the ends of a seam when tension is applied. Backstitching creates a knot-like anchor that holds everything together even under stress.
Machine backstitching uses the same stitch length and tension as your forward sewing, just in reverse. The feed dogs (those metal teeth under the presser foot) move backward instead of forward, pulling the fabric in the opposite direction.
Hand backstitching creates one of the strongest hand-sewn seams available. Each stitch overlaps the previous one by about half its length, leaving no gaps and creating a seam that looks almost like machine stitching on the right side.
When Backstitching Became Standard Practice
Backstitching on home sewing machines became widespread in the 1950s when manufacturers added reverse mechanisms to consumer models. Before that, sewers tied off thread tails by hand or used other securing methods. Hand backstitching, however, has been a tailoring staple for centuries because of its exceptional strength and neat appearance.
How Do You Backstitch on a Sewing Machine
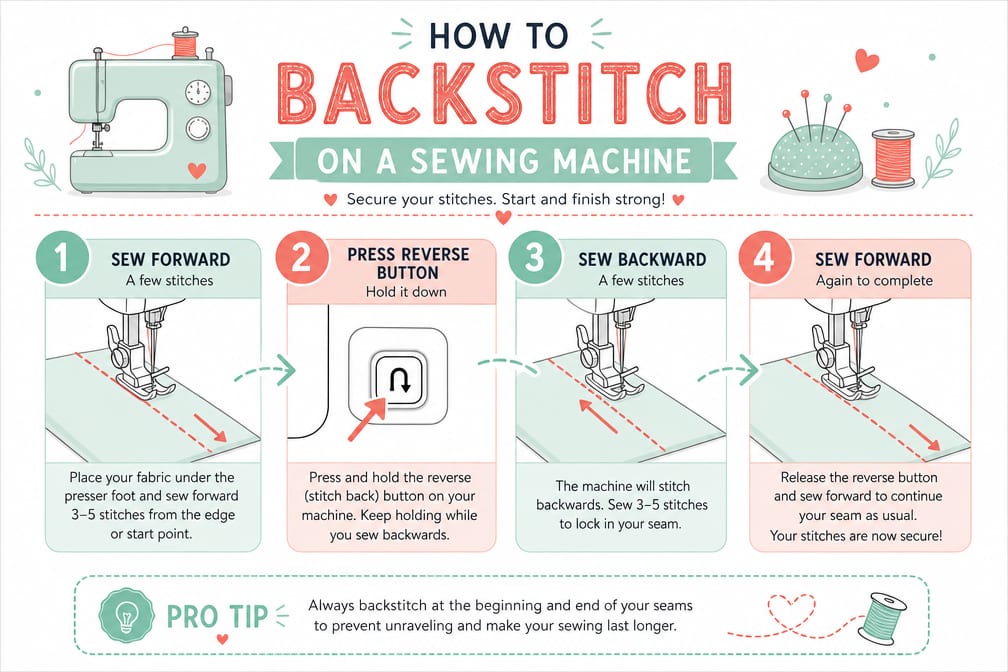
Backstitching on a sewing machine requires holding down the reverse button or lever while the machine runs, then releasing it to continue forward. Most machines place this button on the front panel near the needle or on the right side of the machine body, marked with a backward arrow, “REV,” or a U-turn symbol.
Step-by-step process:
- Position your fabric under the presser foot where you want to start the seam, about 1/4 inch from the raw edge
- Lower the presser foot and hold the thread tails with your left hand to prevent them from being pulled into the machine
- Press and hold the backstitch button while pressing the foot pedal or start button
- Sew 3-5 stitches backward (about 1/4 to 1/2 inch), keeping the fabric steady
- Release the backstitch button and continue sewing forward along your seam line
- At the end of the seam, stop with the needle down, press the backstitch button again, and sew backward 3-5 stitches
- Release the button, sew forward 1-2 stitches to finish, then lift the presser foot and remove your fabric
Common mistake: Backstitching too many stitches (8-10 or more) creates unnecessary bulk, especially at corners or intersections. Three to five stitches provide plenty of security without adding thickness.
Pro tip: On lightweight or delicate fabrics, reduce your stitch length slightly when backstitching to avoid creating visible holes or puckering. On heavy fabrics like denim or canvas, standard stitch length works fine.

【Premium ABS Material】Made of excellent ABS material, which has light weight, high strength, great wear resistance, stable performance, and no deformation.

1 SET button hole attachment. It is compatible with industrial single needle lockstitch sewing machine and domestic old type sewing machine with foot treadle. IMPORTANT: Its mechanical structure is relatively complicated and you are required to read the instruction carefully before use

High Quality , Clip, Snap On Foot
Troubleshooting Machine Backstitch Issues
If your machine jams or skips stitches when backstitching, check that your needle is sharp and properly inserted. Dull needles struggle with the backward motion and can cause thread breaks. Also verify that your thread tension is balanced, too tight and the thread will snap during reverse sewing, too loose and you’ll get loops underneath.
Why Do You Need to Backstitch at the Beginning and End of Seams
Backstitching at seam ends prevents the thread from unraveling when the garment is worn, washed, or stressed. Without this anchor, the first and last stitches will gradually pull out, causing the entire seam to fail. This is especially critical at stress points like armholes, crotch seams, and pocket openings where movement creates constant tension.
What happens during wear: Every time you move, sit, or stretch fabric, tension pulls on the seam threads. The ends of a seam are the weakest points because there’s nothing holding the thread in place except friction. Backstitching creates a mechanical lock that distributes stress across multiple overlapping stitches instead of relying on a single thread end.
Washing stress: The agitation and spinning in a washing machine can pull out unsecured thread ends within just a few wash cycles. Backstitched seams survive hundreds of washes because the overlapping stitches can’t pull free without breaking the thread itself.
Professional standards: In commercial garment manufacturing, quality control checks include testing seam security. Garments with unsecured seams fail inspection and get rejected. Home sewers should apply the same standard for projects meant to last.
Where Backstitching Matters Most
High-stress areas requiring backstitching:
- Armhole seams (constant movement)
- Crotch and inseam (sitting and walking stress)
- Waistband attachments (weight and movement)
- Zipper seam ends (opening and closing tension)
- Pocket openings (hand insertion stress)
- Shoulder seams (weight of garment and movement)
Lower-stress areas where you might skip it:
- Seams that will be crossed by another permanent seam (the intersection locks the threads)
- Seams inside a facing or lining that won’t be stressed
- Decorative topstitching that’s purely aesthetic
What Happens If You Don’t Backstitch
Seams without backstitching will gradually unravel from the ends, starting with the first few stitches pulling loose and progressing along the seam line. The timeline varies based on fabric type, seam stress, and how often the item is worn or washed, but most unsecured seams show signs of failure within 5-10 wash cycles or a few weeks of regular wear.
Immediate consequences:
- Thread tails pull out easily when you trim them close to the fabric
- Seam ends look messy with loose threads visible
- Slight tugging during construction can undo your work
Long-term failure:
- Seams open at stress points first (armholes, crotch, pockets)
- Washing accelerates unraveling as agitation pulls threads
- Repairs become necessary much sooner than expected
Fabric-specific risks:
- Woven fabrics (cotton, linen, wool) unravel moderately fast without backstitching
- Knit fabrics (jersey, interlock) are more forgiving because the fabric itself has stretch, but seams still fail eventually
- Loosely woven fabrics (gauze, linen blends) unravel extremely quickly, sometimes within one wash
- Tightly woven fabrics (denim, canvas) hold longer but still fail at stress points
Real-world example: A cotton t-shirt sewn without backstitching might survive 3-5 washes before the shoulder seams start opening. A pair of jeans without backstitched crotch seams could split within a month of regular wear.
Backstitch vs Lockstitch: What’s the Difference
A lockstitch is the fundamental stitch type that most home sewing machines create, where upper thread and bobbin thread interlock in the middle of the fabric layers. Backstitching is a technique that uses lockstitches sewn in reverse to secure seam ends. They’re not alternatives, backstitching is simply the method of applying lockstitches backward to create an anchor.
Lockstitch characteristics:
- Two threads (top and bobbin) interlock between fabric layers
- Creates a strong, balanced seam
- Standard for nearly all home sewing machines
- Can be sewn forward or backward (when backstitching)
Backstitching characteristics:
- Uses lockstitches (or any stitch type) sewn in reverse
- Specifically refers to the securing technique at seam ends
- Typically 3-5 stitches in length
- Can be done with straight stitch, zigzag, or decorative stitches
Why the confusion exists: Some sewers use “lockstitch” to refer to the built-in securing stitch on computerized machines that ties off threads automatically. This feature (sometimes called a “tie-off” or “fix” stitch) creates a few tiny stitches in place rather than sewing backward, achieving the same goal through a different method.
Choose backstitching when: You’re using a basic mechanical machine, sewing standard seams, or want maximum strength at seam ends.
Choose automatic lockstitch/tie-off when: Your computerized machine offers this feature and you’re working on delicate fabrics where backstitching might show or create bulk.

PRECISE SEAM CONTROL: The powerful magnetic seam guide is not easy to deviate from the direction, and can sew straight or curved stitches efficiently. Unlike traditional sewing supplies, our magnetic seam guide with clip won't veer off course when sewing through thick fabrics

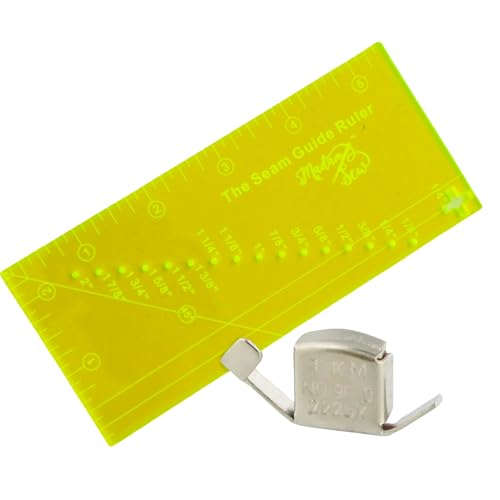
SET STITCHES ACCURATELY - Use any sewing machine with the Madam Sew Sewing and Quilting Seam Guide Ruler. Performing the duties of several sewing rulers and guides, it helps you measure seam allowances from 1/8” up to 2”. A wonderful sewing accessory to any sewing machine.
How to Backstitch by Hand Without a Machine
Hand backstitching creates a strong seam by inserting the needle behind the previous stitch and bringing it out ahead, forming overlapping stitches that resemble machine sewing. This technique is ideal for repairs, hand-sewn garments, or areas where a machine can’t reach. Each stitch should be about 1/8 to 1/4 inch long for standard seams.
Step-by-step hand backstitch:
- Thread your needle with a single strand about 18-24 inches long and knot the end
- Bring the needle up from the wrong side of the fabric at your starting point
- Insert the needle backward about 1/8 inch behind where the thread emerged (this creates the first stitch)
- Bring the needle up about 1/4 inch ahead of your starting point (now you’re 1/8 inch ahead of where the thread is)
- Insert the needle backward into the hole where the previous stitch ended (this creates the overlapping backstitch)
- Bring the needle up another 1/4 inch ahead
- Repeat the pattern: insert needle at the end of the previous stitch, bring it up one stitch length ahead
- Finish by taking 2-3 tiny stitches in place or passing the needle under the last few stitches on the wrong side
Stitch length guidelines:
- Fine fabrics (silk, voile): 1/8 inch stitches or smaller
- Medium fabrics (cotton, linen): 1/8 to 1/4 inch stitches
- Heavy fabrics (denim, canvas): 1/4 inch stitches
Common mistakes:
- Making stitches too long (reduces strength and looks sloppy)
- Pulling thread too tight (causes puckering)
- Not overlapping stitches completely (leaves gaps that weaken the seam)
When to use hand backstitching: Repairs on finished garments, historical costume reproduction, areas where machine access is impossible (inside tight curves or small openings), and when you want the control and precision that hand sewing provides.

Set of 30 assorted hand needles sizes 2 through 7 in square compact

SEWING, ARTS, AND CRAFTS STAPLE: Fiskars Assorted Sewing Needle contains 30 assorted needles and a needle threader, all neatly stored in a round compact

𝑩𝒊𝒓𝒕𝒉𝒅𝒂𝒚 𝑮𝒊𝒇𝒕𝒔 𝑰𝒅𝒆𝒂𝒔: This sewing kit is terrific gifts for people who travel frequently, mother, grandmother, backpacker, adults, kids and teen girls! The emergency kit is also suitable for both men and women, beginners and professionals alike, and it is definitely something that everyone needs in their life
How Many Stitches Should You Backstitch
Backstitch 3-5 stitches (about 1/4 to 1/2 inch) at the beginning and end of each seam for standard construction. This length provides adequate security without creating bulk or visible ridges on the right side of the fabric. More stitches don’t significantly increase strength but do add thickness at seam intersections.
Stitch count by situation:
| Situation | Backstitch Length | Reason |
|---|---|---|
| Standard seams | 3-5 stitches | Balances security and bulk |
| Lightweight fabrics | 3-4 stitches | Prevents visible ridges |
| Heavy fabrics | 4-6 stitches | Accommodates thicker threads |
| High-stress seams | 5-6 stitches | Extra security for armholes, crotch |
| Topstitching | 4-5 stitches | Visible, so keep neat and consistent |
| Seam intersections | 2-3 stitches | Reduce bulk where seams cross |
Why more isn’t better: Each backstitch adds another layer of thread at the seam end. When you have multiple seams intersecting (like at a waistband or collar), excessive backstitching creates a thick lump that’s difficult to press flat and may show through on the right side.
Measuring tip: Instead of counting stitches, aim for about 1/4 inch of backstitching. This translates to different stitch counts depending on your stitch length setting (shorter stitches = more stitches in 1/4 inch, longer stitches = fewer).
Edge case: When sewing very close to a fabric edge (like attaching binding or facing), you may only have room for 2-3 backstitches. That’s fine, the seam will be secured by the facing or binding attachment anyway.
Do You Backstitch When Basting Fabric
Do not backstitch when basting because basting is temporary stitching meant to be removed later. Backstitching would lock the threads in place, making removal difficult and potentially damaging the fabric when you try to pull out the stitches. Basting should use the longest stitch length on your machine (4-5mm) with no securing at either end.
What basting is for:
- Holding layers together temporarily during fitting
- Keeping fabric aligned before permanent stitching
- Gathering fabric (the loose threads pull easily)
- Marking placement lines
- Testing fit before committing to permanent seams
How to baste correctly:
- Set your machine to the longest straight stitch (usually 4-5mm)
- Leave 3-4 inch thread tails at the beginning (don’t backstitch)
- Sew along the seam line or placement line
- Leave 3-4 inch thread tails at the end (don’t backstitch)
- Remove by gently pulling one thread while holding the fabric
Other situations where you skip backstitching:
- Gathering stitches: You need to pull the threads to create gathers
- Ease stitching: Similar to gathering but with less fullness
- Seams that will be crossed: If another permanent seam will sew over the ends, backstitching creates unnecessary bulk
- Stay stitching: This is permanent but often gets enclosed in a seam, so backstitching isn’t always necessary
Exception: If you’re basting something that will stay in the garment temporarily but needs to withstand handling (like basting a zipper in place before the final installation), you might backstitch to prevent the basting from pulling out prematurely. Just be prepared for more difficult removal.
Is Backstitching Necessary for Stretch Fabrics
Backstitching is necessary for stretch fabrics when using a stretch stitch or narrow zigzag, but you should reduce the number of backstitches to 2-3 to minimize bulk and maintain stretch. Straight-stitch seams on knits should not be backstitched with a straight stitch because the seam needs to stretch with the fabric, instead, use a stretch stitch for the entire seam including the backstitch, or use an alternative securing method.
Stretch fabric considerations:
- Knit fabrics (jersey, interlock, rib knit) need seams that stretch with the fabric
- Straight stitches on knits will pop when the fabric stretches unless you’re sewing a non-stretch seam (like a hem)
- Stretch stitches (lightning bolt, narrow zigzag, or built-in stretch stitch) accommodate fabric movement
- Backstitching with a stretch stitch provides security while maintaining stretch
Best practices for knits:
- Use a stretch stitch for the entire seam, including backstitching
- Backstitch 2-3 stitches instead of 4-5 to reduce bulk (knits are thicker than wovens)
- Use a ballpoint needle to prevent skipped stitches and fabric damage
- Reduce presser foot pressure if your machine allows it, to prevent stretching the fabric as you sew
- Consider a serger for knit seams, sergers create stretchy, secure seams without backstitching
Alternative for knits: Many sewers prefer to tie off thread tails by hand on knit garments rather than backstitching. Pull the bobbin thread to bring a loop of the top thread to the wrong side, then tie the two threads together with a square knot. This eliminates bulk while securing the seam.
When straight stitching is okay on knits: Stabilized seams like shoulder seams (where you don’t want stretch) or hems can use straight stitches with standard backstitching. The key is knowing whether the seam needs to stretch or remain stable.
Common Mistakes When Backstitching
The most common backstitching mistakes include backstitching too many stitches (creating bulk), forgetting to backstitch at stress points, backstitching over pins (breaking needles), and backstitching on basting stitches (making removal difficult). Many beginners also backstitch in the seam allowance instead of on the seam line, which doesn’t secure the actual seam.
Top mistakes and fixes:
1. Backstitching too far from the edge
- Problem: Backstitching 1/2 inch or more from the fabric edge wastes thread and creates bulk
- Fix: Start your seam about 1/4 inch from the edge, backstitch to the edge, then sew forward
2. Not backstitching at stress points
- Problem: Forgetting to backstitch at armholes, crotch seams, or pocket openings leads to seam failure
- Fix: Make a mental checklist of high-stress areas and double-check before removing fabric from the machine
3. Backstitching over pins
- Problem: Hitting a pin while backstitching can break your needle, damage the machine, or cause injury
- Fix: Remove pins before they reach the presser foot, or place pins perpendicular to the seam line so you can remove them easily
4. Backstitching on curves
- Problem: Backstitching at the start of a curved seam can create puckering or distortion
- Fix: Start curved seams slightly before the curve begins, backstitch on the straight portion, then continue into the curve
5. Inconsistent backstitch length
- Problem: Backstitching different amounts at the beginning vs. end looks sloppy and may not secure evenly
- Fix: Count your backstitches (3-5) and use the same count at both ends
6. Backstitching with the wrong stitch
- Problem: Using a decorative stitch or zigzag for backstitching when you meant to use straight stitch
- Fix: Check your stitch selection before starting, especially on computerized machines
7. Not holding thread tails when starting
- Problem: Thread tails get pulled into the machine or create a thread nest underneath
- Fix: Hold both thread tails with your left hand for the first few stitches, including the backstitch
Can You Backstitch on Old Vintage Sewing Machines
Most vintage sewing machines from the 1950s onward can backstitch using a lever or button, but earlier machines (pre-1950s) often lack a reverse mechanism and require alternative securing methods like tying off threads by hand. Check your specific machine’s features, some vintage machines have a backstitch lever on the front or right side, while others may have a knob that disengages the feed dogs for manual backstitching.
Vintage machine backstitch mechanisms:
Lever-style (1950s-1970s): Push or pull a lever on the front or side of the machine while sewing. The lever mechanically reverses the feed dog direction. Release the lever to resume forward sewing.
Button-style (1960s onward): Similar to modern machines, press and hold a button to backstitch. Some vintage machines have a locking button that stays engaged until you press it again.
Manual reverse (pre-1950s): Some older machines allow you to turn a handwheel or knob to disengage the feed dogs, then manually move the fabric backward while stitching. This requires practice and doesn’t work well for beginners.
No reverse capability: Treadle machines and very early electric models often can’t backstitch at all. Sewers using these machines tie off threads by hand or use the “sewing over the beginning” method (start 1/2 inch into the seam, sew to the end, then sew from the beginning to overlap the first stitches).
How to check your vintage machine:
- Look for a lever, button, or knob marked “reverse,” “backstitch,” or with a backward arrow
- Consult the original manual if available (many are digitized online)
- Test on scrap fabric, engage the mechanism and see if the fabric moves backward
- Join vintage sewing machine communities online for model-specific guidance
Alternative securing methods for machines without reverse:
- Tie off thread tails by hand using a square knot
- Sew over the beginning of the seam (start mid-seam, sew to the end, return to the beginning and sew over the first stitches)
- Use tiny hand stitches to secure machine-sewn seam ends
When Should You Not Backstitch in Sewing
Skip backstitching when basting, gathering, or sewing seams that will be crossed and secured by another permanent seam. Also avoid backstitching on very delicate fabrics where the reverse motion might damage fibers, and when sewing seams that need to be easily adjustable during fitting. In these cases, alternative securing methods work better.
Specific situations to skip backstitching:
Basting and temporary stitching: Backstitching defeats the purpose of temporary stitches that need easy removal.
Gathering stitches: You need to pull the threads to create gathers, which is impossible if they’re backstitched.
Seams that will be crossed: When sewing a side seam that will be crossed by a waistband seam, the waistband stitching secures the side seam ends. Backstitching both creates unnecessary bulk.
Inside facings and linings: Seam ends that will be enclosed inside a facing or lining don’t need backstitching because they won’t be stressed and the enclosure prevents unraveling.
Delicate fabrics: Silk chiffon, organza, and other sheer fabrics can show backstitching as a visible ridge or may pucker from the reverse motion. Use tie-offs or very short backstitches (2 stitches) instead.
Fitting adjustments: When sewing a muslin or test garment that you’ll need to adjust, skip backstitching so you can easily remove and re-sew seams.
Serged seams: Sergers create a chain of thread at seam ends that you tie off or secure with seam sealant. You can’t backstitch on a serger.
Decorative exposed seams: Some design styles feature exposed seam allowances with raw edges. Backstitching might show and detract from the aesthetic.
Edge case, quilting: When piecing quilt blocks, many quilters don’t backstitch because the seams will be crossed by other seams and the entire quilt will be quilted together, securing everything. However, backstitching the outer edges of the quilt top is still recommended.
Alternatives to Backstitching to Secure Seams
The main alternatives to backstitching include tying off thread tails by hand, using your machine’s automatic tie-off or lock stitch function, sewing over seam intersections, applying seam sealant, and using a serger with secured chain tails. Each method has specific applications where it works better than traditional backstitching.
Hand-tied knots:
- Pull the bobbin thread to bring a loop of top thread to the wrong side
- Tie the two threads together with a square knot
- Trim tails to 1/4 inch
- Best for: Delicate fabrics, knits, areas where backstitching would show
Automatic lock stitch (computerized machines):
- Press the lock stitch button before starting and ending seams
- Machine sews several tiny stitches in place (not backward)
- Creates a secure knot without bulk
- Best for: Delicate fabrics, topstitching, decorative work
Sewing over intersections:
- Start a new seam 1/2 inch before it crosses an existing seam
- The crossing seam secures both seam ends
- Reduces bulk at intersections
- Best for: Garment construction with multiple seam intersections
Seam sealant:
- Apply a tiny drop of liquid seam sealant (like Fray Check) to thread ends
- Let dry completely before trimming
- Creates a permanent bond
- Best for: Serged seams, decorative threads, areas where knots would show
Serger chain securing:
- Sew off the fabric edge, creating a thread chain
- Tie the chain in a knot or use a needle to weave it back into the seam
- Alternatively, sew over the chain with the next seam
- Best for: Knit garments, activewear, fast construction
Comparison table:
| Method | Strength | Bulk | Speed | Best Use |
|---|---|---|---|---|
| Backstitching | High | Medium | Fast | Standard seams |
| Hand-tied knots | High | Low | Slow | Delicate fabrics |
| Lock stitch | Medium | Very low | Fast | Topstitching |
| Seam sealant | Medium | Very low | Slow (drying) | Serged seams |
| Sewing over | High | Low | Fast | Intersections |
Choose based on your project: For everyday garment sewing, backstitching remains the fastest and most reliable method. Use alternatives when specific circumstances (fabric type, construction method, or aesthetic concerns) make backstitching less ideal.
Do Professional Sewers Always Backstitch
Professional sewers backstitch selectively based on garment type, construction method, and production efficiency. In commercial manufacturing, many seams are secured by intersecting seams rather than individual backstitching, and sergers (which don’t backstitch) handle most seam construction. Couture and custom tailors backstitch high-stress seams but may use hand-tied knots or other methods on delicate fabrics to reduce bulk and maintain a clean finish.
Commercial garment production:
- Assembly line efficiency: Workers sew specific seam sections; intersecting seams secure most ends
- Serger-heavy construction: Knit garments use sergers almost exclusively, with chain tails tied or sewn over
- Quality control focus: Backstitching happens at stress points (armholes, crotch seams) but not every seam
- Speed matters: Eliminating unnecessary backstitching saves seconds per garment, which adds up to hours in mass production
Couture and custom tailoring:
- Hand-finished seams: Many high-end garments use hand backstitching for strength and control
- Selective machine backstitching: Machine seams get backstitched at stress points but not inside facings or enclosed areas
- Aesthetic considerations: Visible seams (like topstitching) receive careful, consistent backstitching
- Fabric-appropriate methods: Delicate fabrics get hand-tied knots instead of machine backstitching
Home sewing vs. professional standards:
Home sewers often backstitch more than professionals because they’re sewing one garment at a time and don’t have the efficiency constraints of production sewing. There’s nothing wrong with this approach, extra security ensures your handmade garments last.
When professionals skip backstitching:
- Seams that will be crossed by another seam within 1/2 inch
- Inside facings and linings
- Basting and temporary stitching
- Serged seams (secured by chain tails)
- Areas where bulk would create problems (collar points, cuffs)
When professionals always backstitch:
- Armhole seams
- Crotch and inseams
- Zipper seam ends
- Pocket openings
- Waistband attachments
- Any seam that won’t be crossed by another seam
Takeaway: Professional sewers use backstitching as a tool, not a rule. They understand when it’s necessary for structural integrity and when it’s redundant or counterproductive. Home sewers can adopt this selective approach as they gain experience and learn to evaluate each seam’s requirements.
FAQ
How long should a backstitch be?
Backstitch 3-5 stitches (about 1/4 to 1/2 inch) at the beginning and end of seams. This provides adequate security without creating bulk. More stitches don’t significantly increase strength but do add thickness at seam intersections.
Can you backstitch with a zigzag stitch?
Yes, you can backstitch with a zigzag stitch by pressing the reverse button while sewing. This is useful when sewing stretch fabrics or finishing raw edges with a zigzag. Use 2-3 backstitches instead of 4-5 to reduce bulk since zigzag stitches are wider than straight stitches.
What’s the difference between backstitching and reverse stitching?
These terms mean the same thing in sewing, both refer to sewing backward over the first or last few stitches to secure a seam. “Backstitch” is more common in American sewing terminology, while “reverse stitch” is sometimes used in machine manuals.
Do you backstitch when hemming?
Backstitch at the beginning and end of hem stitching if you’re sewing a straight hem with a single line of stitching. If you’re using a blind hem stitch or the hem will be crossed by another seam (like a side seam), backstitching may not be necessary.
Why does my machine jam when backstitching?
Machine jamming during backstitching usually indicates a dull or bent needle, incorrect threading, or improper tension. Replace the needle, rethread the machine completely, and check that the bobbin is inserted correctly. Also ensure you’re not backstitching over pins.
Can you backstitch on a serger?
No, sergers cannot backstitch because they use a different stitch formation that creates a thread chain. Secure serger seams by tying off the thread chain, using seam sealant, or sewing over the chain with the next seam.
How do you backstitch at a corner?
Stop with the needle down at the corner point, backstitch 3-4 stitches along the first seam line, then sew forward to the corner again. Lift the presser foot with the needle down, pivot the fabric, lower the foot, and continue sewing the second side. Backstitch at the end of the second side as normal.
Is backstitching necessary for topstitching?
Yes, backstitch topstitching because it’s visible and functional. Unsecured topstitching will unravel and look unfinished. Use consistent backstitch lengths (4-5 stitches) at both ends for a professional appearance.
What tension should I use for backstitching?
Use the same tension setting for backstitching as for forward sewing, usually the balanced tension recommended for your fabric (often around 4-5 on machines with numbered dials). Adjusting tension specifically for backstitching is rarely necessary.
Can you backstitch over thick seams?
Yes, but reduce your sewing speed and use a larger needle (size 90/14 or 100/16) to penetrate the layers. If the machine struggles, hand-walk the needle through the thick area by turning the handwheel manually. Consider reducing the number of backstitches to 2-3 to minimize bulk.
Do you backstitch when installing a zipper?
Backstitch at the top and bottom of zipper seams to prevent the stitching from unraveling when the zipper is opened and closed. This is especially important at the bottom stop where stress is highest. Don’t backstitch over the zipper teeth, stop just before or after them.
How do you remove backstitching if you make a mistake?
Use a seam ripper to carefully cut every 3-4 stitches on one side of the seam, then pull the thread from the other side. Backstitched areas require more careful removal because the overlapping stitches are harder to separate. Work slowly to avoid damaging the fabric.
Conclusion
Understanding how to backstitch and why it matters transforms your sewing from temporary to permanent, from fragile to durable. This simple technique, just 3-5 stitches in reverse at the beginning and end of seams, prevents unraveling, secures stress points, and ensures your handmade projects survive years of wear and washing. Whether you’re using a modern computerized machine, a vintage mechanical model, or sewing entirely by hand, backstitching gives you control over seam security.
The key is knowing when to backstitch and when to skip it. Backstitch high-stress seams like armholes, crotch seams, and pocket openings. Skip it for basting, gathering, and seams that will be crossed by other permanent stitching. Choose alternatives like hand-tied knots for delicate fabrics or serged seams that need different securing methods.
Next steps to master backstitching:
- Practice on scrap fabric until backstitching becomes automatic, aim for consistent 3-5 stitch lengths
- Identify stress points in your current project and double-check that you’ve backstitched them
- Experiment with alternatives like lock stitches or hand-tied knots to find what works best for different fabrics
- Evaluate each seam as you sew: does this need backstitching, or will another seam secure it?
- Check your machine manual to locate and understand your specific backstitch mechanism
Start incorporating selective, intentional backstitching into your sewing practice today. Your garments will last longer, look more professional, and give you confidence that your hard work won’t unravel at the first sign of stress. The few extra seconds spent backstitching each seam pay dividends in durability and quality that you’ll appreciate every time you wear or use your handmade creations.


