


Quick Answer
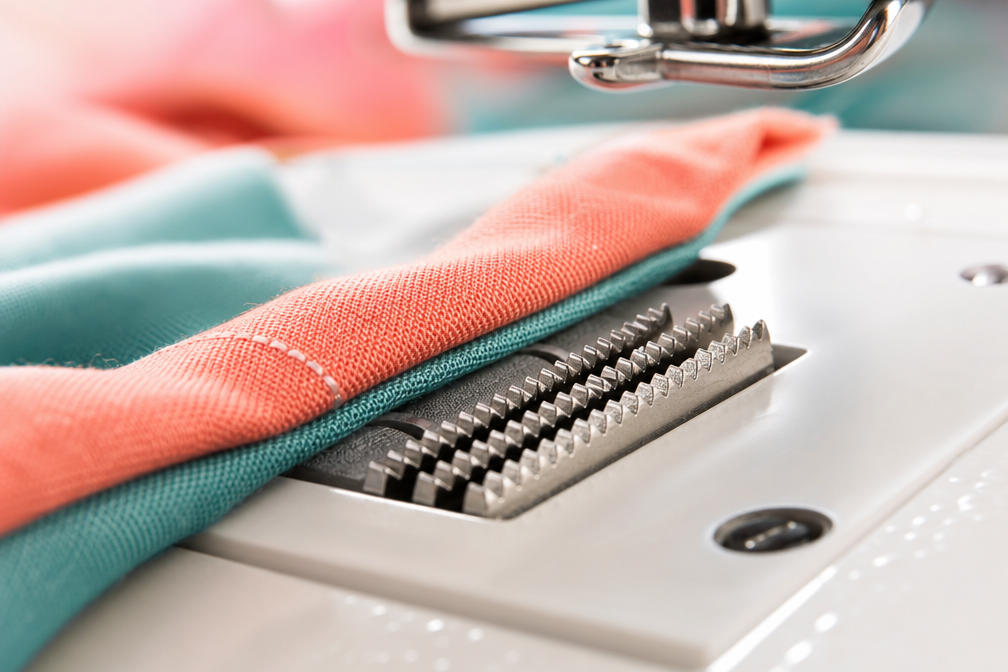
A feed dog is the set of metal teeth beneath your sewing machine’s presser foot that grips and moves fabric forward as you sew. These serrated bars rise and fall in a rhythmic motion, working with the presser foot to control fabric movement, stitch length, and seam quality. Without properly functioning feed dogs, your fabric won’t move smoothly, resulting in uneven stitches, bunched seams, or no movement at all.
Key Takeaways
- Feed dogs are metal teeth that grip fabric from below and pull it through the machine in coordination with the presser foot pressure from above
- Most machines have 5-point or 7-point feed dogs, with 7-point systems offering better grip on thick or slippery fabrics
- Feed dogs control stitch length by determining how far fabric moves between each needle penetration
- You can lower feed dogs for free-motion quilting, embroidery, and other techniques requiring manual fabric control
- Fabric won’t move if feed dogs are lowered, jammed with lint, damaged, or if presser foot pressure is too light
- Regular cleaning of the feed dog area prevents lint buildup that causes uneven feeding and skipped stitches
- Not all techniques need feed dogs, free-motion work, darning, and some embroidery are done with feed dogs lowered
- Beginners benefit from feed dogs because they automate fabric movement and help maintain consistent stitch length
- Walking feet work with feed dogs, not instead of them, providing additional top-layer feeding for thick or slippery materials
- Stuck feed dogs usually indicate lint buildup, mechanical jam, or a disengaged feed dog lever that needs adjustment
What Is a Feed Dog on a Sewing Machine?
A feed dog is a set of metal teeth located in the throat plate (needle plate) of your sewing machine, directly beneath the presser foot and needle. These serrated bars move in an elliptical pattern, rising up through slots in the throat plate to grip fabric, moving forward to advance the material, dropping down, then moving backward to reset for the next cycle. Most home sewing machines have one or two sets of feed dogs working in tandem.
The term “feed dog” likely comes from the mechanical “dog” components used in machinery to grip and advance materials. On a sewing machine, these dogs literally feed fabric through the stitching zone at a controlled rate.
Key components that work with feed dogs:
- Presser foot, Holds fabric down against the feed dogs from above
- Throat plate, The metal plate with slots that feed dogs rise through
- Feed dog height adjustment, Controls how high the teeth rise (on some machines)
- Stitch length dial, Determines how far forward the feed dogs move fabric with each cycle
The feed dog mechanism is one of the most important inventions in sewing machine history. Before feed dogs became standard in the mid-1800s, sewers had to manually push fabric through machines, making consistent stitching nearly impossible.
How Do Feed Dogs Work When Sewing?
Feed dogs work through a four-phase cycle synchronized with the needle’s up-and-down motion. When you press the foot pedal, the feed dogs rise through the throat plate slots, grip the fabric with their serrated teeth, move forward a distance determined by your stitch length setting, drop below the plate, then move backward to their starting position. This cycle repeats continuously as you sew, advancing fabric at a consistent rate.
The four-phase feed dog cycle:
- Rise phase, Feed dogs move up through throat plate slots while the needle is out of the fabric
- Forward phase, Feed dogs grip fabric and move it forward (stitch length distance)
- Drop phase, Feed dogs descend below the throat plate
- Return phase, Feed dogs move backward to starting position while below the fabric
The presser foot pressure is critical to this system. The foot must press fabric firmly enough against the feed dogs for the teeth to grip, but not so hard that it prevents movement. Most machines have a presser foot pressure adjustment dial or knob that lets you fine-tune this balance for different fabric weights.
What controls feed dog movement:
- Stitch length setting, Longer stitches mean feed dogs move fabric farther forward each cycle
- Feed dog drop lever, Lowers feed dogs below the throat plate for free-motion work
- Machine speed, Feed dog cycles happen faster or slower based on your pedal pressure
The synchronization between needle and feed dogs is precisely timed. Feed dogs only move fabric forward when the needle is out of the material, preventing fabric distortion or needle breakage.
Why Won’t My Fabric Move Through the Sewing Machine?
Fabric won’t move through your sewing machine when feed dogs can’t grip the material properly, which happens when feed dogs are lowered, jammed with lint, worn down, or when presser foot pressure is insufficient. The most common cause is accidentally engaging the feed dog drop lever, which lowers the teeth below the throat plate. Check this lever first before troubleshooting other issues.
Common reasons fabric won’t move:
- Feed dogs are lowered, Check if the feed dog drop lever is engaged (usually near the free-arm or on the machine bed)
- Lint buildup, Thread fibers and fabric dust pack around feed dogs, preventing them from rising fully
- Presser foot pressure too light, Fabric isn’t pressed firmly against feed dogs for teeth to grip
- Wrong presser foot, Some specialty feet (darning foot, embroidery foot) are designed for use with lowered feed dogs
- Worn feed dog teeth, Years of use can dull the serrated edges, reducing grip
- Mechanical jam, Thread, fabric, or debris stuck in the feed dog mechanism
Quick diagnostic steps:
- Remove fabric and presser foot, then look at the throat plate while turning the handwheel
- Watch if feed dogs rise and fall through the slots, if they don’t move, check the drop lever
- If they move but barely rise, clean the feed dog area thoroughly
- Test presser foot pressure by placing thick fabric under the foot, it should require moderate effort to pull out
For beginners, the feed dog drop lever is the culprit about 70% of the time when fabric suddenly stops moving. This lever is often bumped accidentally or left engaged after a previous project.
Feed Dogs vs Walking Foot: Which Is Better?
Feed dogs and walking feet aren’t competing systems, they work together, with the walking foot adding top-layer feeding to complement the bottom-layer feeding that standard feed dogs provide. Standard feed dogs alone work well for most fabrics, but a walking foot becomes essential when sewing thick layers, slippery materials, or fabrics that tend to shift (like velvet, vinyl, or quilts with batting).
A walking foot (also called an even-feed foot) has its own set of feed dogs on top that move in sync with the machine’s bottom feed dogs. This dual-feeding system grips fabric from both sides, preventing the top layer from shifting forward or bunching while the bottom layer feeds normally.
When standard feed dogs alone are sufficient:
- Single-layer cotton, linen, or medium-weight wovens
- Most garment construction with similar fabric layers
- Lightweight to medium-weight projects
- Fabrics with good grip and minimal slippage
When to add a walking foot:
- Quilting multiple layers (top fabric, batting, backing)
- Sewing vinyl, leather, or other sticky materials
- Working with slippery fabrics like satin or silk
- Matching stripes or plaids across seams
- Thick fabrics like denim, canvas, or upholstery weight
- Any project where top and bottom layers feed at different rates
The walking foot doesn’t replace feed dogs, it requires them to function. The bottom feed dogs still do the primary feeding work, while the walking foot’s top feed dogs prevent differential feeding between layers.
Cost consideration: Walking feet typically cost $30-80 for home machines, making them an affordable upgrade when you need even feeding. Most sewers keep both a standard presser foot and a walking foot in their accessory kit, switching based on the project.

Open toe for decorative stitching: The open toe design allows space for dense decorative stitches to glide easily under the foot, for more consistent stitching

Enhanced Compatibility: This walking foot attachment is compatible with Brother sewing machines, as well as part Singer and Janome models, making it a versatile addition to your crafting tool kit

SMOOTH FABRIC FEEDING: The SINGER Even Feed Walking Presser Foot ensures even fabric feeding for professional results, especially on thick or layered fabrics. Perfect for sewing challenging materials like velvet, denim, and quilts without shifting.
Do All Sewing Machines Have Feed Dogs?
Nearly all modern sewing machines have feed dogs, but the design, number of teeth, and adjustability vary significantly between models. Budget machines typically have basic 5-point feed dogs with limited or no drop capability, while mid-range and high-end machines feature 7-point feed dogs, adjustable height, and easy drop mechanisms. Some vintage machines and specialized industrial models use alternative feeding systems.
Feed dog variations across machine types:
- Basic mechanical machines, Fixed 5-point feed dogs, sometimes no drop lever
- Mid-range machines, 7-point feed dogs, drop lever, sometimes adjustable height
- Computerized machines, 7-point feed dogs, electronic drop control, programmable feed
- Industrial machines, Heavy-duty feed dogs designed for specific materials (leather, canvas, etc.)
- Vintage machines, Older designs may have 3-point or 5-point systems, manual drop mechanisms
Machines without traditional feed dogs:
- Free-arm embroidery machines, Some use alternative feeding or rely entirely on hoop movement
- Treadle machines, Very old models may have rudimentary or no feed dog systems
- Specialized industrial machines, Some use roller feeds, needle feeds, or compound feeds instead
The number of “points” refers to how many teeth are on each feed dog bar. A 7-point system has seven teeth compared to five on a 5-point system, providing more surface area to grip fabric. This matters most when sewing thick, heavy, or slippery materials that need extra grip.
What to check when buying a machine:
- Does it have a feed dog drop lever or button?
- How many points do the feed dogs have?
- Can feed dog height be adjusted?
- Are replacement feed dogs available if they wear out?
For sewing enthusiasts in 2026, feed dog drop capability is nearly standard even on entry-level machines, but it’s worth confirming before purchase if you plan to do free-motion quilting or embroidery.
How to Lower Feed Dogs for Free-Motion Quilting
Lowering feed dogs for free-motion quilting involves either engaging a drop lever, pressing a button, or covering the feed dogs with a specialized plate, depending on your machine model. Most modern machines have a feed dog drop lever located near the free-arm or on the machine bed that you slide or flip to lower the teeth below the throat plate. Once lowered, you control fabric movement manually while the machine stitches in place.
Step-by-step for lever-style drop:
- Turn off the machine and remove fabric and presser foot
- Locate the feed dog drop lever (check your manual, common locations are left side of free-arm, back of machine bed, or near the stitch selector)
- Slide or flip the lever to the “down” or “darning” position
- Turn the handwheel manually and watch the throat plate, feed dogs should stay below the surface
- Attach your free-motion or darning foot
- Test on scrap fabric, moving it manually in all directions
For machines with button-style drop:
- Press the feed dog drop button (often marked with a darning foot icon)
- The machine may require you to turn the handwheel or take one stitch to engage the drop
- Verify feed dogs are lowered by checking the throat plate while turning the handwheel
For machines without a drop mechanism:
- Purchase a feed dog cover plate (also called a darning plate or Supreme Slider)
- This plastic or metal plate fits over the throat plate, covering the feed dog slots
- Feed dogs still move but can’t rise through the plate to grip fabric
Common mistakes when lowering feed dogs:
- Forgetting to raise them again for regular sewing (causes fabric not to move)
- Not switching to a free-motion foot (standard feet can catch on fabric)
- Expecting the machine to move fabric automatically (you must move it manually)
- Moving fabric too fast or too slow for the stitch speed (practice coordination on scraps)
Free-motion quilting requires practice to coordinate fabric movement with machine speed. Start with the machine at medium speed and move fabric smoothly in the direction you want to stitch. The feed dogs being lowered means you’re now the “feed dog”, you control all movement.

Made in Taiwan High Quality Premium Sewing Presser Feet From DreamStitch.

Universal Model Compatibility: Directly replaces the needle plate cover on 1105, 1106, 1116, 1120, 1130, 1725, 1748, 2250 Tradition, 2259 Tradition, 2263 Simple, 2273 Esteem II, 8275, 8280 Prelude, 8770 Curvy, plus Bernette Sew and Go 1/3/5, Euro Pro 13520/8260L, and EverSewn Sparrow 15 sewing machines.

【Compatible This darning plate fits for Singer 2250 1304 1306 2277 2282 MX23 MX60, helping match your sewing machine model with less guesswork.
Can You Sew Without Feed Dogs?
Yes, you can sew without feed dogs by lowering them or covering them with a plate, but you must manually control all fabric movement, making this technique suitable only for specific applications like free-motion quilting, darning, embroidery, and decorative stitching. Regular seam sewing without feed dogs is extremely difficult and produces inconsistent results because maintaining even stitch length requires precise manual fabric advancement.
Techniques that require lowered feed dogs:
- Free-motion quilting, Creating curved, stippled, or custom quilting patterns
- Free-motion embroidery, Drawing with thread to create designs
- Darning, Repairing holes in fabric by stitching back and forth
- Thread painting, Layering thread to create artistic images
- Stippling and meandering, Random quilting patterns that fill space
Why regular sewing needs feed dogs:
When you lower feed dogs for standard seam sewing, you must push or pull fabric at exactly the right speed to match your stitch length setting. Even experienced sewers struggle to maintain consistency. The result is usually wavy seams with irregular stitch lengths, some stitches tiny, others long and loose.
Skills needed for sewing without feed dogs:
- Smooth, consistent fabric movement at a steady pace
- Coordination between fabric speed and machine speed
- Ability to move fabric in any direction (forward, backward, sideways, curves)
- Practice maintaining even stitch density in free-motion work
When beginners should lower feed dogs:
Start experimenting with lowered feed dogs after you’re comfortable with basic machine operation. Practice on quilt sandwiches (two fabric layers with batting between) to get the feel of manual fabric control. Many quilters spend months practicing free-motion techniques before using them on actual projects.
The key difference: with feed dogs up, the machine controls fabric movement and you guide direction. With feed dogs down, you control both movement and direction, which requires significantly more skill and practice.
Feed Dogs Not Moving Fabric Evenly: How to Fix
Feed dogs that move fabric unevenly usually indicate lint buildup in the feed dog mechanism, incorrect presser foot pressure, damaged or worn feed dog teeth, or timing issues between the feed dogs and needle. Start by thoroughly cleaning the feed dog area, as lint accumulation is the most common cause and the easiest to fix.
Step-by-step troubleshooting:
Clean the feed dog area thoroughly
- Remove the throat plate (needle plate) by unscrewing or unclipping it
- Use a stiff brush to remove all lint, thread, and fabric fibers from around the feed dogs
- Vacuum the area with a small brush attachment
- Wipe feed dog teeth with a lint-free cloth
- Replace throat plate and test
Check presser foot pressure
- Increase pressure if fabric slides under the foot without the feed dogs gripping
- Decrease pressure if fabric doesn’t move or bunches up
- Test on scrap fabric similar to your project material
Inspect feed dog teeth
- Look for worn, broken, or bent teeth
- Teeth should be sharp and evenly spaced
- Worn feed dogs need professional replacement
Verify feed dogs rise properly
- Remove presser foot and throat plate
- Turn handwheel and watch feed dogs move through their cycle
- They should rise at least 1mm above the throat plate surface
- If they barely rise, the mechanism may need adjustment or repair
Fabric-specific feeding problems:
- Thick fabrics, May need increased presser foot pressure or a walking foot
- Slippery fabrics, Benefit from a walking foot or tissue paper under/over fabric
- Stretchy fabrics, Need lighter presser foot pressure and possibly a walking foot
- Very lightweight fabrics, May need a straight stitch throat plate (smaller needle hole)
When to seek professional service:
- Feed dogs don’t rise and fall when turning the handwheel
- One feed dog bar moves but the other doesn’t
- Feed dogs are visibly damaged or missing teeth
- Cleaning and pressure adjustment don’t solve the problem
- You hear grinding or clicking sounds from the feed dog area
Regular maintenance prevents most feed dog problems. Clean the feed dog area every 8-10 hours of sewing time, or more frequently when working with linty fabrics like fleece or flannel.

【Premium Material】These sewing machine cleaning brushes consist of silicone bristles and plastic handles. They are odorless, lint-free, and reusable. The overall length is approximately 4.2 in, with a 1 in brush head, long enough to reach narrow and deep areas for thorough cleaning

Package Include:8 pcs sewing machine cleaning brush
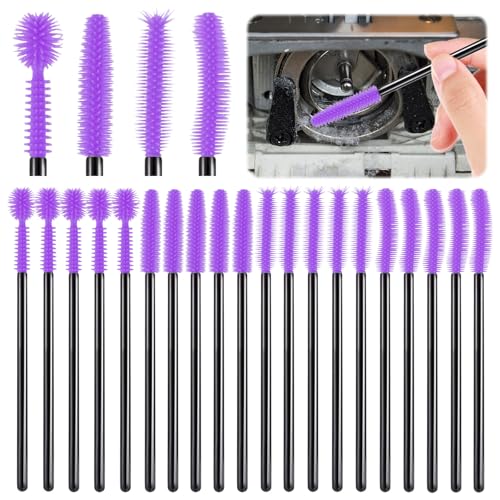
Clever Design: Get into every nook and cranny of your sewing machine with these handy, reusable cleaning kits from the FJW.
What Are Feed Dogs Made Of?
Feed dogs are made of hardened steel or metal alloys designed to withstand millions of cycles while maintaining sharp, serrated teeth that grip fabric effectively. The metal is typically heat-treated to increase hardness and wear resistance, with teeth that are either machined or stamped into the feed dog bars. Some industrial machines use carbide-tipped feed dogs for extreme durability when sewing abrasive materials.
Common feed dog materials:
- Hardened steel, Standard for most home and industrial machines, offers good durability and grip
- Stainless steel, Used in some higher-end machines, resists corrosion and wear
- Metal alloys, Blends designed for specific balance of hardness, flexibility, and longevity
- Carbide-tipped, Industrial applications involving leather, canvas, or other tough materials
The serrated teeth are the critical feature. These small ridges or points grip fabric fibers without damaging them. The tooth pattern varies by manufacturer and machine type, some have fine, closely-spaced teeth for delicate fabrics, while others have larger, more aggressive teeth for heavy materials.
Feed dog construction details:
- Tooth height, Typically 0.5-1.5mm, with taller teeth for heavy-duty machines
- Tooth spacing, Closer spacing for fine fabrics, wider for heavy materials
- Bar width, Wider feed dog bars provide more gripping surface
- Number of bars, Most machines have 1-2 feed dog bars working together
Lifespan and replacement:
Feed dogs on home machines can last 20-30 years with normal use and proper maintenance. They wear down gradually, with teeth becoming rounded and less effective at gripping fabric. Industrial machines that run continuously may need feed dog replacement every few years.
Replacement feed dogs are machine-specific and typically cost $15-40 for home machines. Installation usually requires a technician unless you’re comfortable with detailed machine disassembly.
When Should You Drop Feed Dogs?
You should drop feed dogs whenever you need complete manual control over fabric movement, including free-motion quilting, free-motion embroidery, darning, thread painting, and any technique where you want to move fabric in directions other than straight forward. Keep feed dogs raised for all standard sewing, including seams, hems, topstitching, and any project requiring consistent stitch length.
Always drop feed dogs for:
- Free-motion quilting, Stippling, meandering, custom patterns
- Free-motion embroidery, Thread sketching, thread painting
- Darning, Repairing holes by stitching in multiple directions
- Button sewing, Some machines require lowered feed dogs for button attachment
- Monogramming, Manual letter creation (if not using computerized embroidery)
Always keep feed dogs raised for:
- Straight seams, Garment construction, bag making, home decor
- Curved seams, You guide the curve, feed dogs maintain stitch length
- Topstitching, Decorative or functional stitching along edges
- Hemming, Blind hems, rolled hems, standard hems
- Quilting with a walking foot, Straight-line or gentle-curve quilting
- Appliqué, Standard appliqué techniques (some raw-edge appliqué uses free-motion)
The decision rule:
If you want the machine to control how far fabric moves between stitches, keep feed dogs up. If you want to control both direction and distance manually, drop them.
Common beginner confusion:
New sewers sometimes think they should lower feed dogs when sewing curves or circles. This isn’t necessary, feed dogs only move fabric forward, so you can guide curves while feed dogs maintain consistent stitch length. Only lower them when you need to move fabric backward, sideways, or in complex patterns.
Practice recommendation:
Before dropping feed dogs on a real project, practice on scrap fabric sandwiches. Free-motion work requires coordination between machine speed and fabric movement that takes time to develop. Most quilters practice for several hours before achieving smooth, consistent results.
How to Clean Feed Dogs on Your Sewing Machine
Cleaning feed dogs requires removing the throat plate, brushing away lint and thread debris from around the feed dog mechanism, and wiping the teeth with a lint-free cloth, ideally after every 8-10 hours of sewing or whenever you notice uneven fabric feeding. This simple maintenance task prevents most feed dog problems and takes only 5-10 minutes.
Tools you’ll need:
- Small screwdriver (usually Phillips head) or throat plate removal tool
- Stiff brush (old toothbrush works well) or specialized machine brush
- Tweezers for removing stuck threads
- Lint-free cloth
- Small vacuum with brush attachment (optional but helpful)
- Sewing machine oil (for occasional lubrication per your manual)
Step-by-step cleaning process:
- Turn off and unplug the machine, Safety first, always
- Remove the presser foot and needle, Gives you clear access and prevents accidents
- Remove the throat plate, Usually held by 1-2 screws or clips; consult your manual for your specific model
- Brush away visible lint, Use a stiff brush to sweep lint from around feed dogs and the bobbin area
- Remove stuck threads, Use tweezers to pull out any thread wrapped around feed dogs or in the mechanism
- Vacuum the area, A small vacuum removes loose debris the brush dislodged
- Wipe feed dog teeth, Use a lint-free cloth to clean the serrated teeth
- Check for damage, Look for bent, broken, or excessively worn teeth
- Replace throat plate, Ensure it’s seated correctly and screws are snug but not overtightened
- Test the machine, Turn the handwheel manually to verify feed dogs move freely
How often to clean:
- Every 8-10 hours of sewing, For regular maintenance
- After working with linty fabrics, Fleece, flannel, terry cloth produce excessive lint
- When fabric stops feeding smoothly, Immediate cleaning often solves the problem
- Before starting important projects, Ensures optimal performance
What not to do:
- Don’t use compressed air (it blows lint deeper into the machine)
- Don’t oil feed dogs unless your manual specifically instructs it
- Don’t force the throat plate if it doesn’t fit easily (check for proper alignment)
- Don’t use harsh chemicals or solvents on feed dogs or throat plate
Signs your feed dogs need cleaning:
- Fabric moves unevenly or jerks through the machine
- Stitches are irregular in length
- Machine sounds different (clicking or grinding)
- Visible lint buildup around the throat plate
- Feed dogs don’t rise as high as usual
Regular cleaning is the single most effective way to maintain feed dog performance and extend your machine’s lifespan. Many sewing machine problems that seem mechanical are actually just lint buildup.
Are Feed Dogs Important for Beginners?
Feed dogs are essential for beginners because they automate fabric movement, maintain consistent stitch length, and allow new sewers to focus on guiding fabric direction rather than managing multiple variables simultaneously. Learning to sew with properly functioning feed dogs builds fundamental skills before advancing to techniques that require manual fabric control.
Why beginners need feed dogs:
- Consistent stitch length, Feed dogs move fabric the exact distance set by your stitch length dial
- Even seams, Automated feeding prevents the wavy, irregular seams that result from manual fabric pushing
- Reduced cognitive load, You focus on steering and seam allowance, not fabric speed
- Faster learning curve, Master basic techniques before adding complexity
- Better results, Early projects look more professional, building confidence
Skills beginners develop with feed dogs:
- Guiding fabric to maintain seam allowance
- Controlling sewing speed with the foot pedal
- Pivoting at corners
- Starting and stopping precisely
- Understanding how different fabrics behave
When beginners should experiment with lowered feed dogs:
Wait until you’re comfortable with basic machine operation and have completed several projects. Most sewing instructors recommend at least 20-30 hours of practice with standard sewing before attempting free-motion techniques. The coordination required for manual fabric control builds on the foundation of basic machine skills.
Common beginner feed dog mistakes:
- Accidentally lowering feed dogs and not understanding why fabric won’t move
- Pushing or pulling fabric while feed dogs are trying to move it (causes needle breakage or skipped stitches)
- Not adjusting presser foot pressure for different fabric weights
- Forgetting to clean feed dogs, leading to feeding problems
Teaching approach:
Start by understanding what feed dogs do and how they work. Practice on scrap fabric, observing how stitch length settings change feed dog movement. Once you’re comfortable with standard sewing, experiment with lowered feed dogs on practice pieces before incorporating free-motion techniques into projects.
The progression from feed-dog-assisted sewing to free-motion work mirrors learning to ride a bike, you need training wheels (feed dogs) until you develop the balance and coordination for independent control.
My Feed Dogs Are Stuck or Jammed: What to Do
Stuck or jammed feed dogs usually result from thread wrapped around the mechanism, lint buildup preventing movement, a mechanical jam from broken parts, or the feed dog drop lever being partially engaged. Start by removing the throat plate and inspecting the feed dog area for visible obstructions, as most jams can be cleared without professional service.
Immediate troubleshooting steps:
- Turn off and unplug the machine, Never work on a jammed machine while it’s powered
- Remove throat plate, presser foot, and needle, Get clear access to the feed dog area
- Look for visible obstructions, Thread, fabric pieces, or broken needle parts
- Check the feed dog drop lever, Ensure it’s fully in the “up” position, not stuck between settings
- Try turning the handwheel manually, Gentle pressure may reveal where the jam is located
- Remove any visible thread or debris, Use tweezers and scissors to carefully extract material
If feed dogs still won’t move:
- Clean thoroughly, Follow the cleaning process described earlier, removing all lint and debris
- Check for broken parts, Look for pieces of broken needle, bent feed dog teeth, or damaged mechanisms
- Inspect the feed dog timing, Feed dogs should move in coordination with the needle; if timing is off, you need professional service
- Test the feed dog drop mechanism, Move the lever back and forth several times to ensure it’s not stuck
Common jam causes:
- Thread bird’s nest, Tangled thread under the throat plate wrapped around feed dogs
- Broken needle fragment, Pieces lodged in the feed dog mechanism
- Fabric jam, Thick fabric or multiple layers forced into the mechanism
- Lint compaction, Years of lint buildup hardened into a mass that blocks movement
- Mechanical failure, Broken gears, bent linkages, or worn parts in the feed dog drive system
When to call a technician:
- Feed dogs won’t move after cleaning and removing visible obstructions
- You hear grinding or clicking sounds when trying to move the handwheel
- Feed dog teeth are visibly bent or broken
- The feed dog drop lever doesn’t engage or disengage properly
- You’re uncomfortable disassembling parts of your machine
Prevention tips:
- Clean the feed dog area regularly (every 8-10 hours of sewing)
- Don’t force thick fabrics through the machine
- Replace needles regularly (dull needles are more likely to break)
- Use appropriate thread quality (cheap thread sheds fibers that cause buildup)
- Have your machine professionally serviced annually if you sew frequently
Most feed dog jams are preventable through regular maintenance. The few minutes spent cleaning after each project save hours of frustration and potential repair costs.
Difference Between 5-Point and 7-Point Feed Dogs
The difference between 5-point and 7-point feed dogs is the number of serrated teeth on each feed dog bar, 5-point systems have five teeth while 7-point systems have seven, giving 7-point feed dogs approximately 40% more gripping surface area. This additional surface area provides better fabric control, especially with thick, heavy, slippery, or stretchy materials that need more grip to feed evenly.
5-point feed dogs:
- Teeth count, Five serrated teeth per feed dog bar
- Best for, Lightweight to medium-weight wovens, basic garment sewing, quilting cotton
- Advantages, Adequate for most home sewing, standard on budget machines
- Limitations, May struggle with very thick layers, slippery fabrics, or heavy materials
- Common on, Entry-level and basic mechanical machines
7-point feed dogs:
- Teeth count, Seven serrated teeth per feed dog bar
- Best for, All fabric weights, especially thick, heavy, slippery, or stretchy materials
- Advantages, Superior grip, more consistent feeding across fabric types, better for multiple layers
- Limitations, Slightly more expensive (typically on mid-range and higher machines)
- Common on, Mid-range to high-end home machines, most computerized models
Performance comparison:
| Feature | 5-Point Feed Dogs | 7-Point Feed Dogs |
|---|---|---|
| Gripping surface | Adequate for most fabrics | 40% more surface area |
| Thick fabrics | May need walking foot | Better performance |
| Slippery fabrics | Often requires assistance | More reliable feeding |
| Multiple layers | Walking foot recommended | Improved control |
| Price point | Budget to mid-range | Mid-range to high-end |
Does the difference matter for your sewing?
- Mostly sew garments from cotton or linen, 5-point feed dogs are sufficient
- Work with varied fabrics, 7-point feed dogs provide more versatility
- Quilt frequently, 7-point feed dogs handle batting and multiple layers better
- Sew home decor with heavy fabrics, 7-point feed dogs are worth the investment
- Beginner on a budget, 5-point feed dogs work fine while you’re learning
Can you upgrade?
Some machines allow feed dog replacement, but it’s not a simple DIY upgrade. Feed dogs must match your specific machine model, and installation typically requires a technician. If feed dog performance is a priority, it’s better to choose a machine with 7-point feed dogs initially rather than planning to upgrade later.
The practical reality:
Most home sewers won’t notice a dramatic difference between 5-point and 7-point feed dogs for everyday sewing. The difference becomes apparent when working with challenging fabrics or multiple layers. A walking foot can compensate for 5-point feed dog limitations in many situations, making it a more cost-effective upgrade than buying a new machine.
FAQ
How long do feed dogs last on a sewing machine?
Feed dogs typically last 20-30 years on home sewing machines with regular use and proper maintenance. Industrial machines that run continuously may need replacement every 3-5 years. Feed dog teeth gradually wear down over time, becoming less effective at gripping fabric, but catastrophic failure is rare.
Can I replace feed dogs myself?
Feed dog replacement requires disassembling the machine’s lower mechanism and is not recommended as a DIY project unless you have mechanical experience and your machine’s service manual. Professional replacement typically costs $50-100 including parts and labor. Incorrect installation can damage timing and other critical components.
Why do my feed dogs make noise?
Noisy feed dogs usually indicate lint buildup in the mechanism, lack of lubrication (if your machine requires it), or worn parts creating excess play. Clean the feed dog area thoroughly first. If noise persists after cleaning, the machine may need professional service to check for worn gears or bearings.
Do serger machines have feed dogs?
Yes, serger machines (overlock machines) have feed dogs, often with differential feed capability that uses two sets of feed dogs moving at different speeds. This allows sergers to ease or stretch fabric as it feeds, preventing wavy seams on knits or puckering on wovens.
Can feed dogs damage delicate fabric?
Feed dogs can leave slight marks on very delicate fabrics like silk organza or fine tulle, though this is uncommon with properly maintained machines. Use tissue paper above and below delicate fabrics, reduce presser foot pressure, or use a walking foot to distribute pressure more evenly if you notice marking.
What’s the difference between feed dogs and a dual feed system?
Feed dogs are the standard bottom-feeding mechanism on all machines. A dual feed system (like Pfaff’s IDT or Janome’s AcuFeed) adds built-in top feeding similar to a walking foot, with upper feed dogs integrated into the machine rather than as a separate presser foot attachment.
How do I know if my feed dogs need replacing?
Feed dogs need replacement when teeth are visibly worn down, broken, or bent, or when fabric won’t feed properly even after thorough cleaning and presser foot pressure adjustment. If you can’t feel distinct teeth when running your finger across the feed dogs, they’re likely too worn to grip fabric effectively.
Can you sew leather without feed dogs?
Sewing leather requires feed dogs to be raised, often with a walking foot or roller foot to prevent sticking. Leather is too thick and sticky to control manually with lowered feed dogs. Some industrial leather machines use specialized feed systems, but home machines need standard feed dogs for leather work.
Why do feed dogs have different heights on different machines?
Feed dog height varies based on the machine’s intended use. Heavy-duty and industrial machines have taller feed dog teeth (1-2mm rise) for better grip on thick materials, while standard home machines have shorter teeth (0.5-1mm) suitable for general sewing. Some machines offer adjustable feed dog height.
Do vintage sewing machines have feed dogs?
Most vintage sewing machines from the 1850s onward have feed dogs, though early models may have simpler 3-point or 5-point systems. Very early machines (pre-1850s) sometimes used hand-cranked feed mechanisms or required manual fabric advancement. Feed dog design has evolved significantly, but the basic concept has remained consistent for over 150 years.
What happens if one feed dog bar breaks?
If one feed dog bar breaks or stops moving while the other continues, fabric will feed unevenly, pulling to one side and creating diagonal seams. This requires professional repair, as it indicates a mechanical failure in the feed dog drive system. Don’t continue sewing with broken feed dogs, as it can damage fabric and create additional machine problems.
Can I use a sewing machine with broken feed dogs?
You can technically sew with broken feed dogs by lowering them and manually controlling fabric movement, but this is impractical for anything except free-motion work. For standard sewing, broken feed dogs must be repaired or replaced. Attempting to sew normally with damaged feed dogs produces unusable results and may damage your machine further.
Conclusion
Understanding what feed dogs are and why they matter transforms your relationship with your sewing machine. These small metal teeth beneath your presser foot control fabric movement, stitch consistency, and ultimately the quality of every seam you sew. Whether you’re troubleshooting feeding problems, deciding when to lower feed dogs for free-motion work, or choosing between machines with different feed dog systems, knowing how this mechanism works empowers you to sew with confidence.
Your next steps:
- Locate your feed dog drop lever, Know where it is and practice raising and lowering feed dogs
- Clean your feed dogs today, Remove the throat plate and brush away lint buildup
- Test presser foot pressure, Adjust for different fabric weights and observe how it affects feeding
- Practice free-motion on scraps, Lower feed dogs and experiment with manual fabric control
- Maintain regularly, Clean feed dogs every 8-10 hours of sewing to prevent problems
The difference between frustrating sewing sessions and enjoyable ones often comes down to properly functioning feed dogs. Regular maintenance takes minutes but prevents hours of troubleshooting. Whether you’re working with a basic 5-point system or an advanced 7-point mechanism, understanding how feed dogs work and keeping them clean ensures smooth, consistent stitching on every project.
Now that you know what feed dogs are and why they matter, you’re equipped to diagnose feeding problems, choose appropriate techniques, and maintain this critical component. Your sewing machine is a partnership between you and the mechanism, feed dogs handle the consistent fabric advancement while you provide the creative direction.


